The administration space lets administrators supervise the No Code Studio: users and their permissions, groups, the data protection (GDPR) page, and usage statistics for applications and form responses.
It applies to Convertigo No Code Studio 2.2. The screenshots use demonstration data. Labels are shown in English; the French label is given in parentheses when it helps to find a menu entry.
Access to the administration
There are two administrator levels:
| Level | What it allows |
|---|---|
| Administration | Full access: manage users, groups and permissions, edit the GDPR page, see and act on every application. |
| Administration (read only) (Administration (consultation)) | See all administration pages and statistics, without changing anything. |
A user is an administrator when the Administration permission is set on their own profile, or on one of the groups they belong to. The same rule applies to the read-only level.
When the user is an administrator, the side menu shows the MANAGEMENT (GESTION) section:
| Menu entry | Page | Route |
|---|---|---|
| Dashboard (Tableau de bord) | Administration home | admin/dashboard |
| Users (Utilisateurs) | User administration | admin/dashboard-user |
| Groups (Groupes) | Group management | admin/dashboard-groups |
| Data protection settings (Configuration RGPD) | GDPR page management | admin/gdrp |
| Settings (Paramètres) | Personal settings, shown to every user |
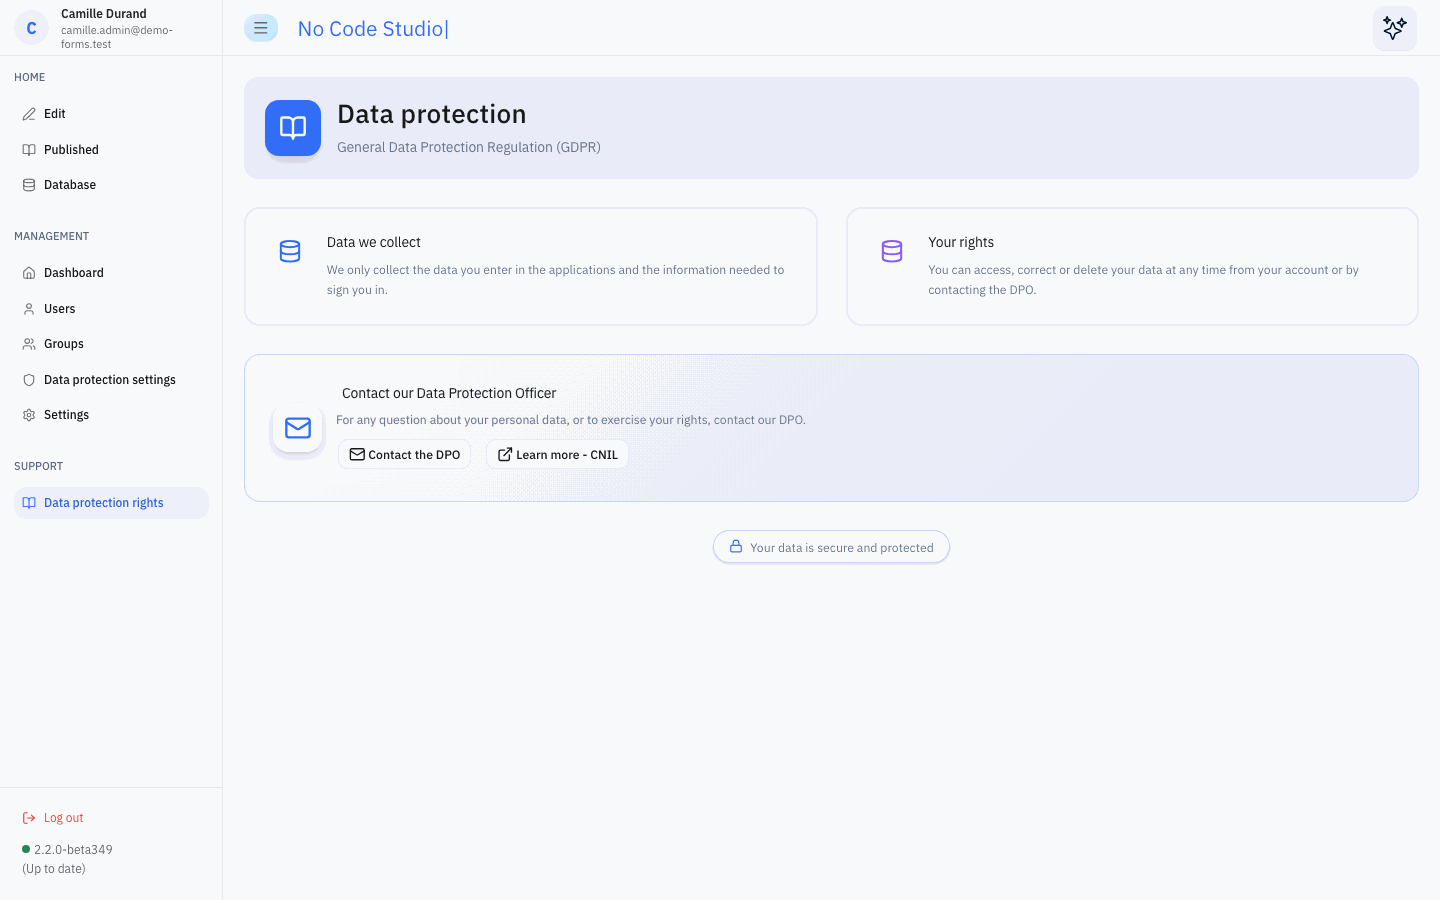
The SUPPORT section, shown to every user, contains Data protection rights, the GDPR page that administrators edit.
Making the first administrator
Once an administrator exists, other administrators are appointed from the Users or Groups pages. On a new server, appoint the first one with a Convertigo server administrator account:
- Sign in to the Convertigo administration console,
https://<server>/convertigo/admin/, with a server administrator account. -
In the same browser, open:
https://<server>/convertigo/projects/C8Oforms/.json?__sequence=APIV2_setUserAdmin&id=<user login><user login>is the user’s login identifier, the e-mail address for No Code Studio accounts. The answer is{"success": true}. - The user sees the MANAGEMENT section the next time a page loads.
A server administrator session passes the server-side checks of the administration sequences, but it does not show the administration menu by itself: the user also needs the Administration permission.
Permissions
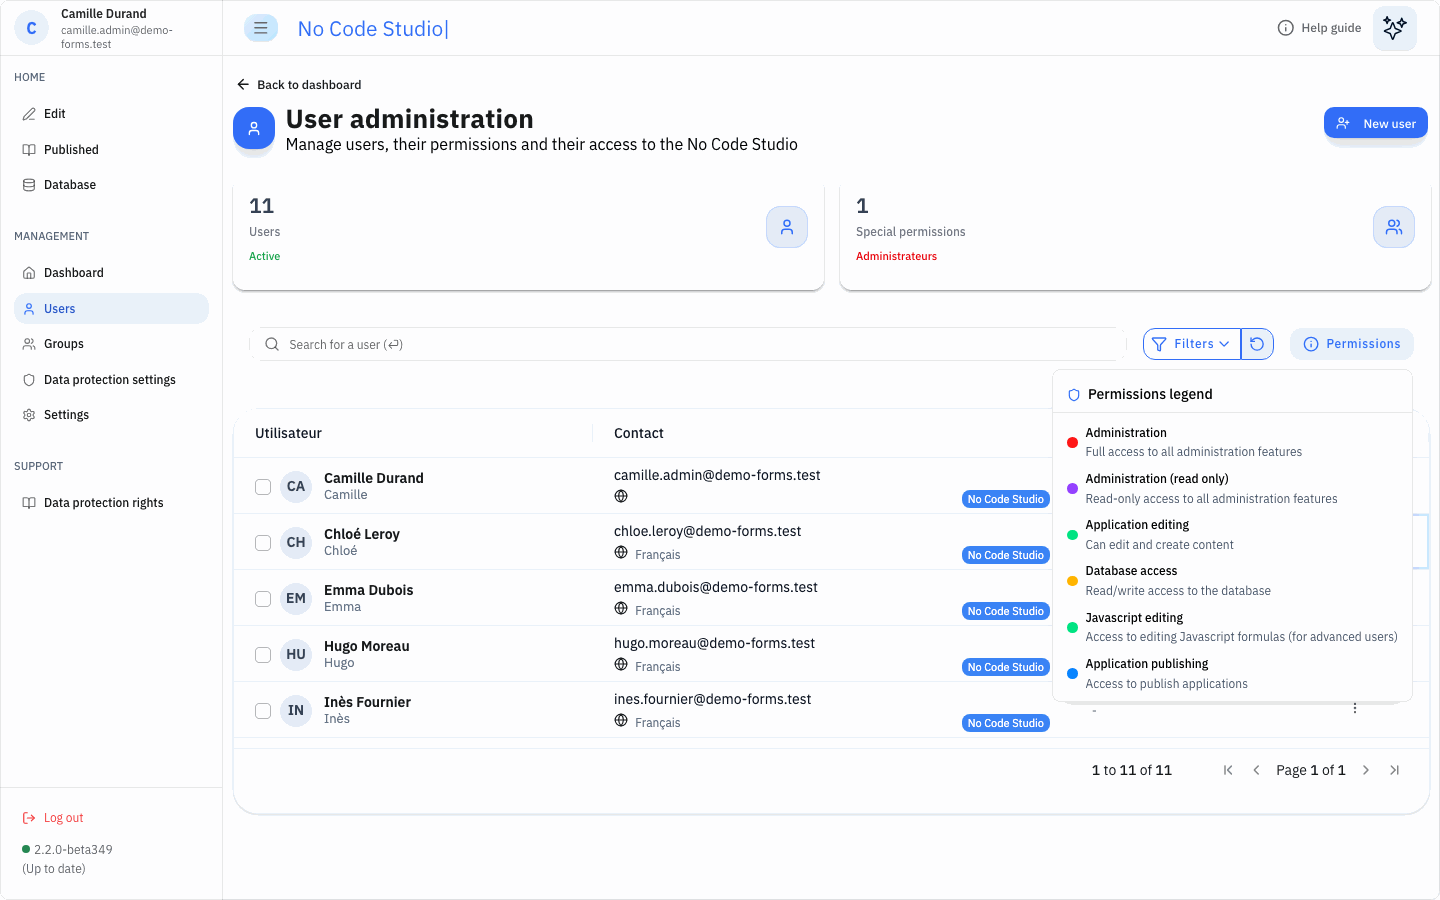
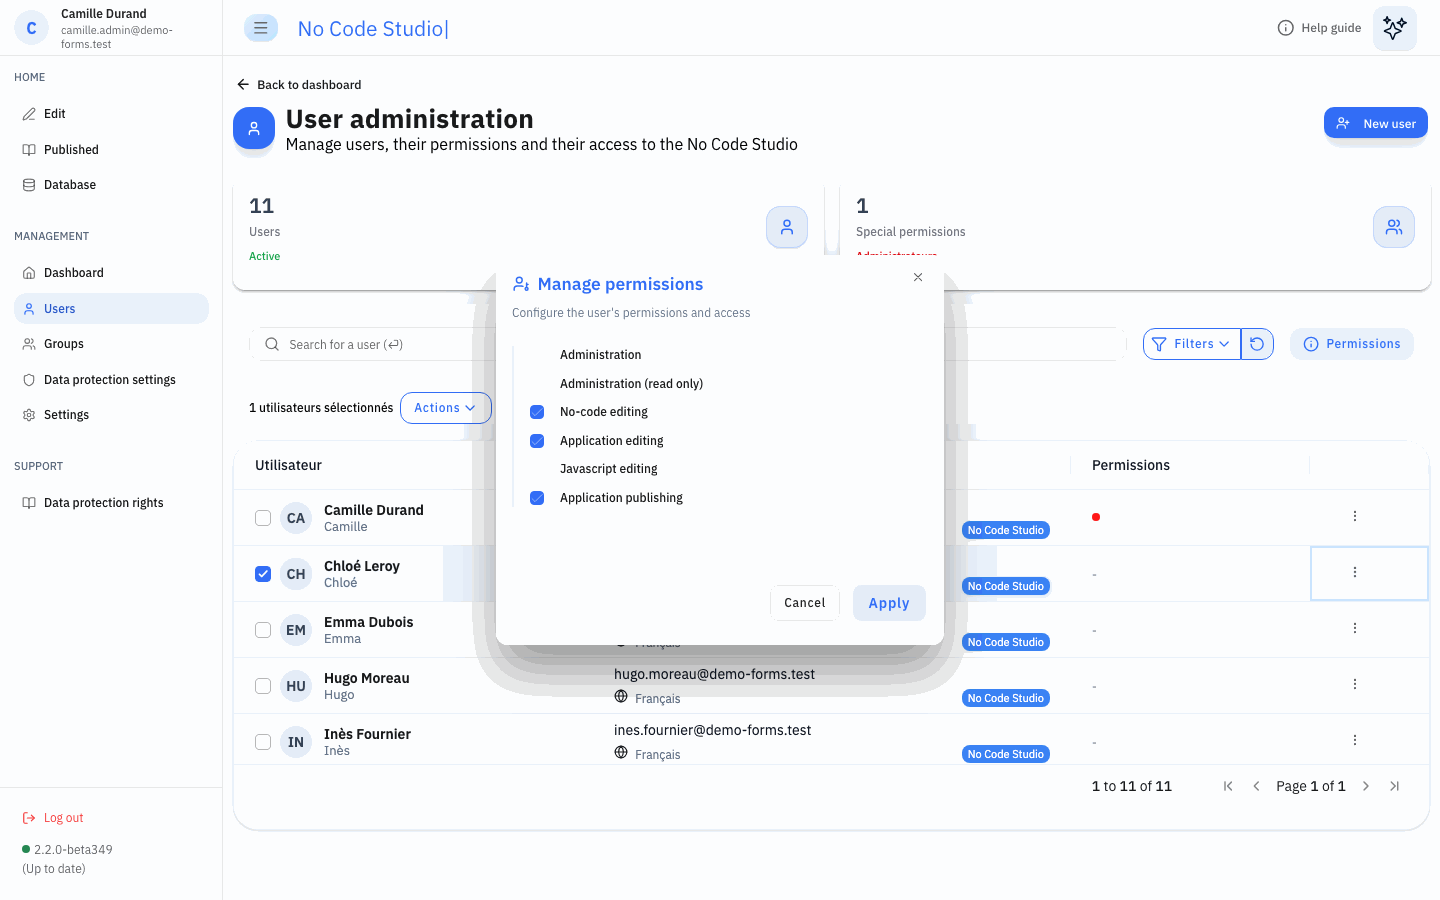
Each user has six permissions. In lists, they appear as coloured dots; the Permissions button of the Users and Groups pages shows the legend.
| Permission (UI label) | Dot | What it allows | Default when not set on the user |
|---|---|---|---|
| Administration | red | Full access to all administration features. | off |
| Administration (read only) | purple | Read-only access to all administration features. | off |
| No-code editing (database access) | yellow | Create, edit and delete no-code databases, tables and data. | C8Oforms.no_code_db_rights_default_enabled (true) |
| Application editing | green | Create and edit applications. | C8Oforms.editing_rights_default_enabled (true) |
| Javascript editing | green | Edit advanced JavaScript formulas. | C8Oforms.formulas_default_enabled (true) |
| Application publishing | blue | Publish applications. | C8Oforms.publication_default_rights (true) |
Permissions are cumulative. A user’s effective permissions combine:
- the permissions set on their own profile;
- the default value of the global symbol, for the four non-administration permissions when they are not set on the profile;
- the permissions of every group they belong to.
The Users page shows only the permissions set on the profile. The Groups page shows the effective permissions.
Dashboard
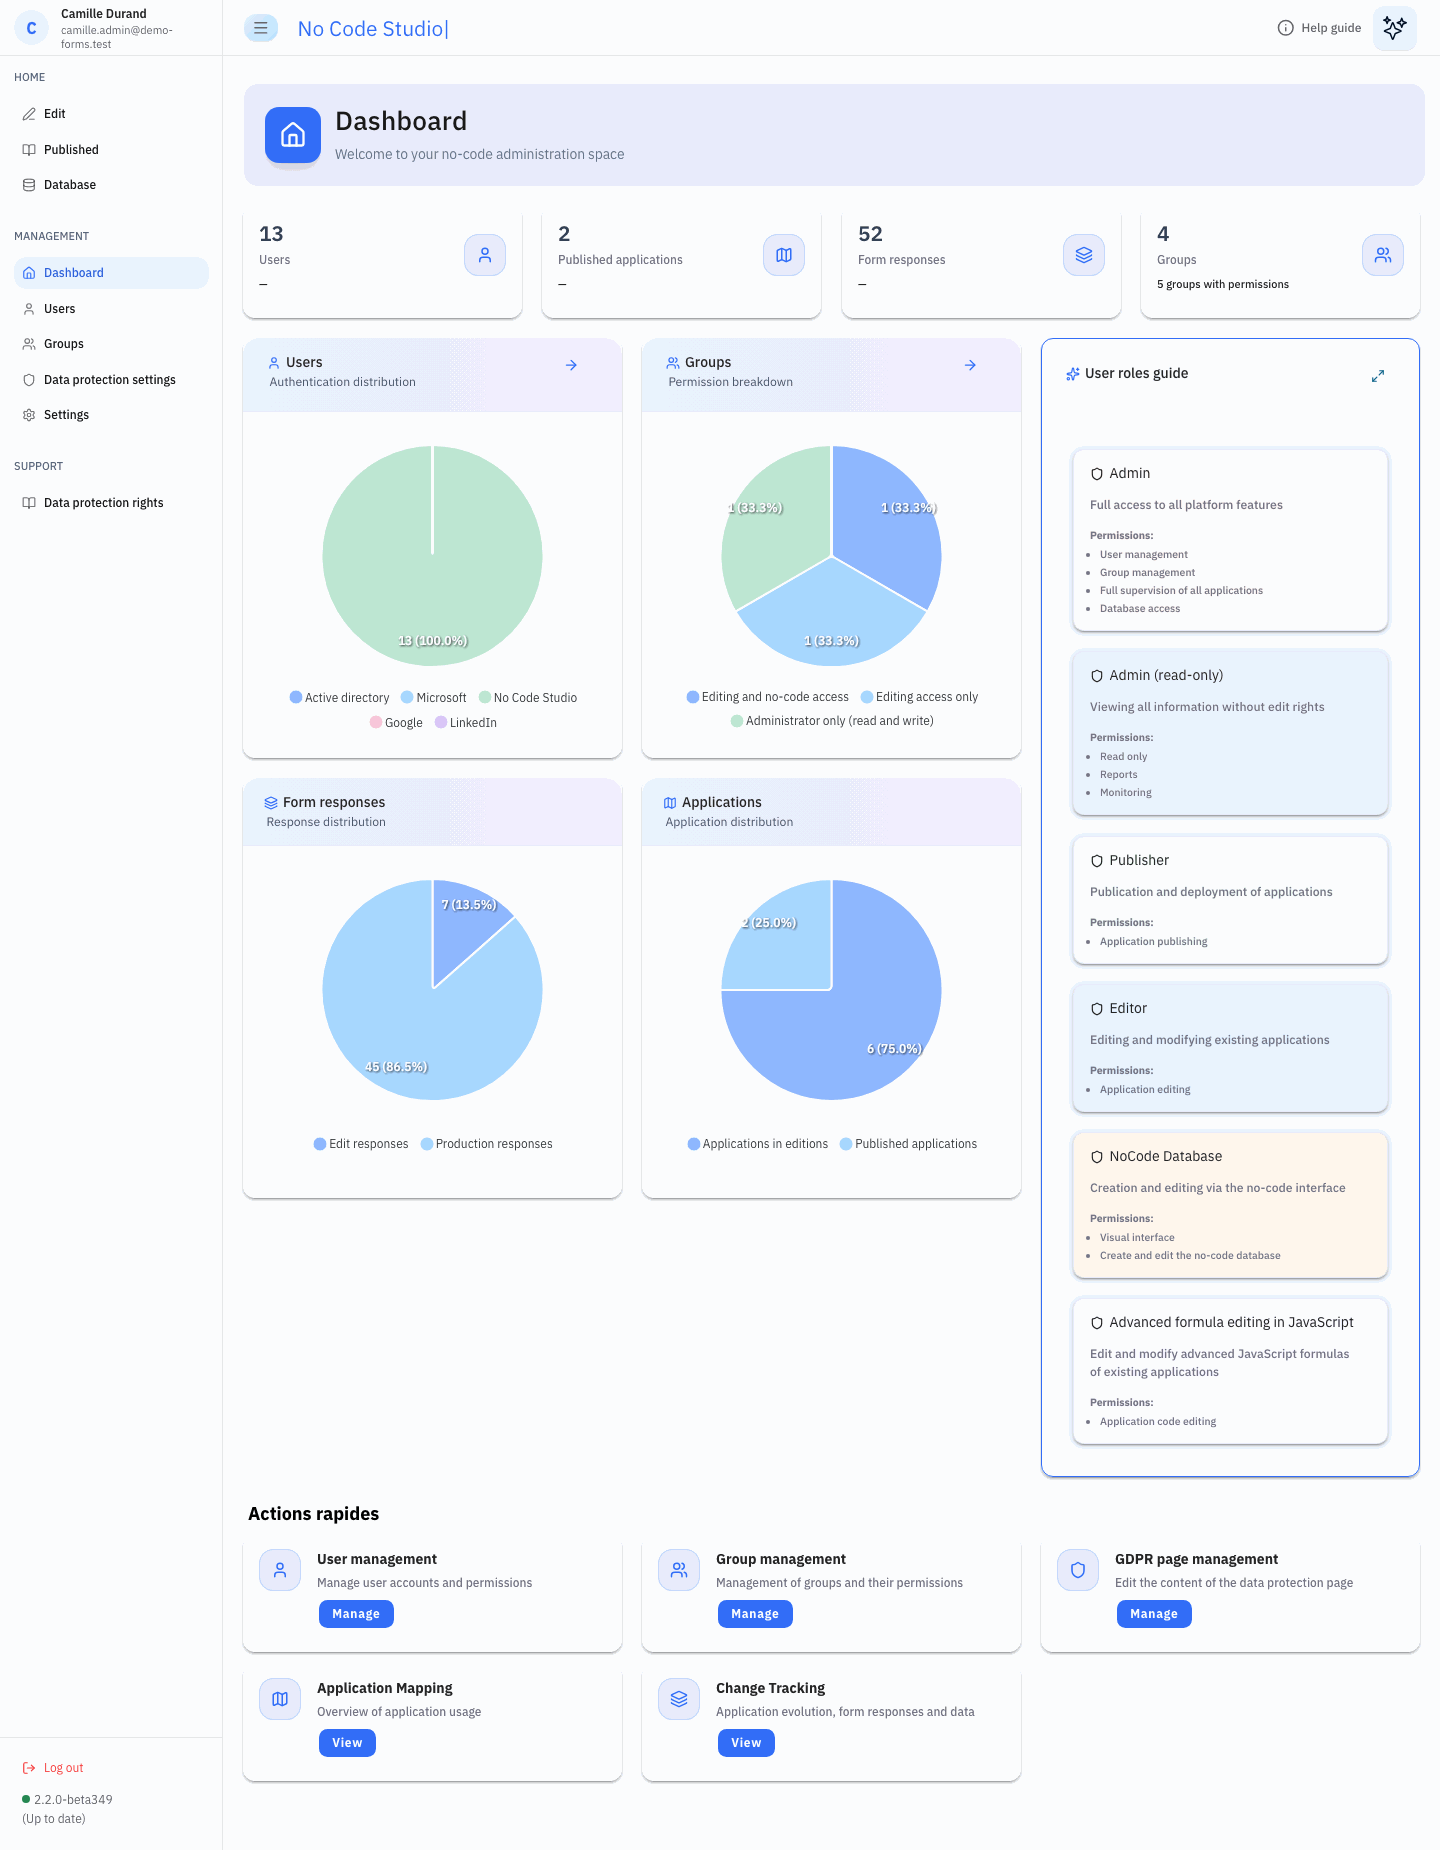
MANAGEMENT > Dashboard opens the administration home (“Welcome to your no-code administration space”).
| Element | Content | Click |
|---|---|---|
| Users card | Number of users. | Users page |
| Published applications card | Number of published applications. | Application mapping |
| Form responses card | Number of responses, from the editor and from published applications. | Tracking changes |
| Groups card | Number of groups that carry permissions; the line below gives the total number of groups. | Groups page |
| Users chart, “Authentication distribution” | Users by sign-in source: Active directory, Microsoft, No Code Studio, Google, LinkedIn. | Users page (arrow) |
| Groups chart, “Permission breakdown” | Groups by combination of editing, administration and no-code permissions. | Groups page (arrow) |
| Form responses chart, “Response distribution” | Responses sent from the editor preview (“Edit responses”) versus from published applications (“Production responses”). | |
| Applications chart, “Application distribution” | Applications in edition versus published applications. | |
| User roles guide | Description of the roles: Admin, Admin (read-only), Publisher, Editor, NoCode Database, Advanced formula editing in JavaScript. It can be expanded; it is hidden on narrow screens. | |
| Quick actions | User management, Group management, GDPR page management (button Manage); Application Mapping, Change Tracking (button View). | Corresponding page |
User administration
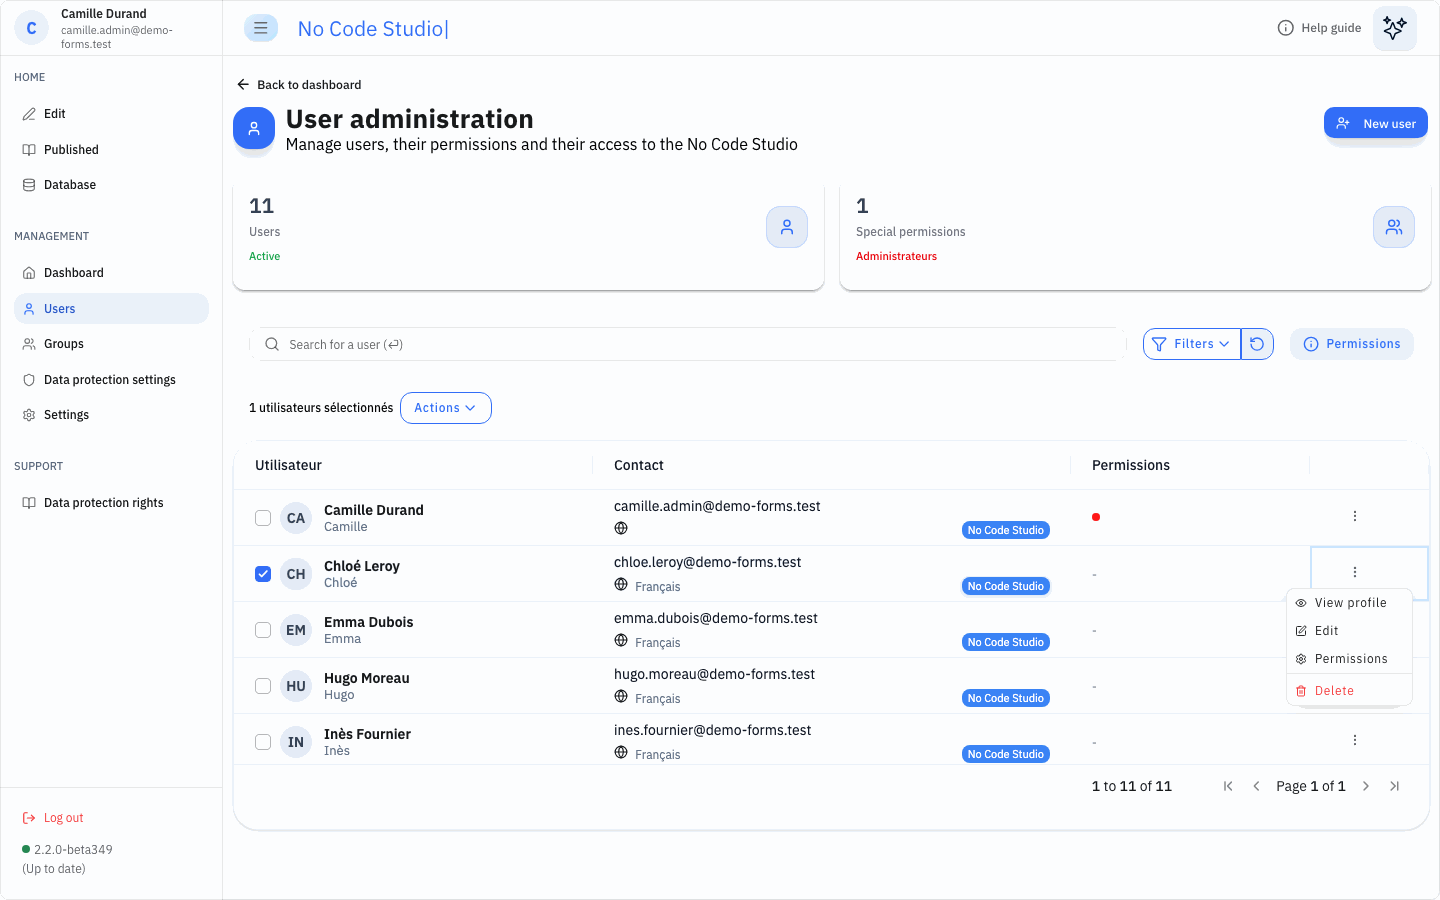
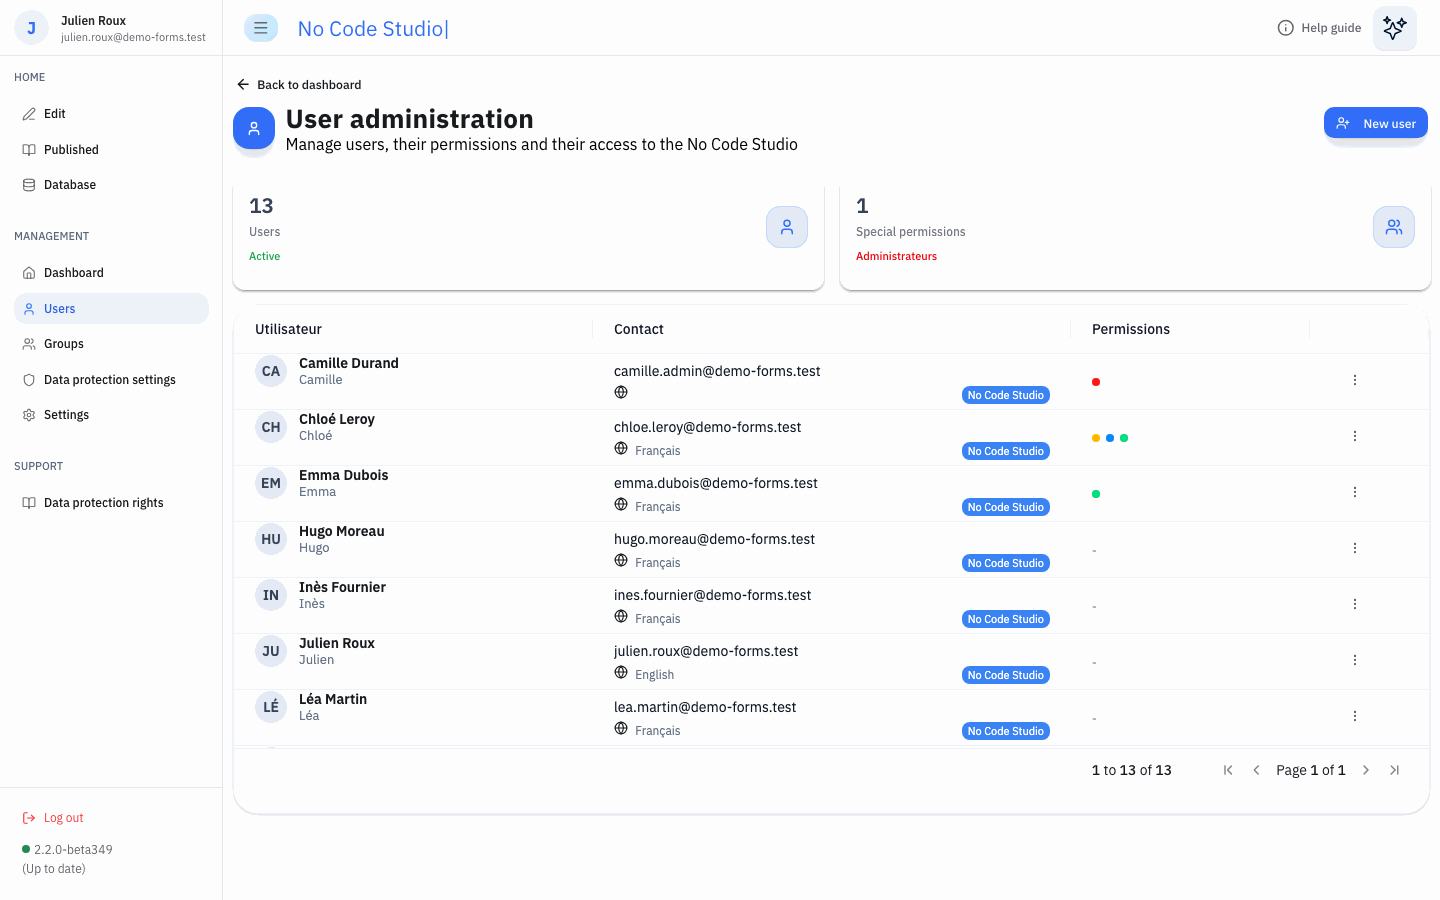
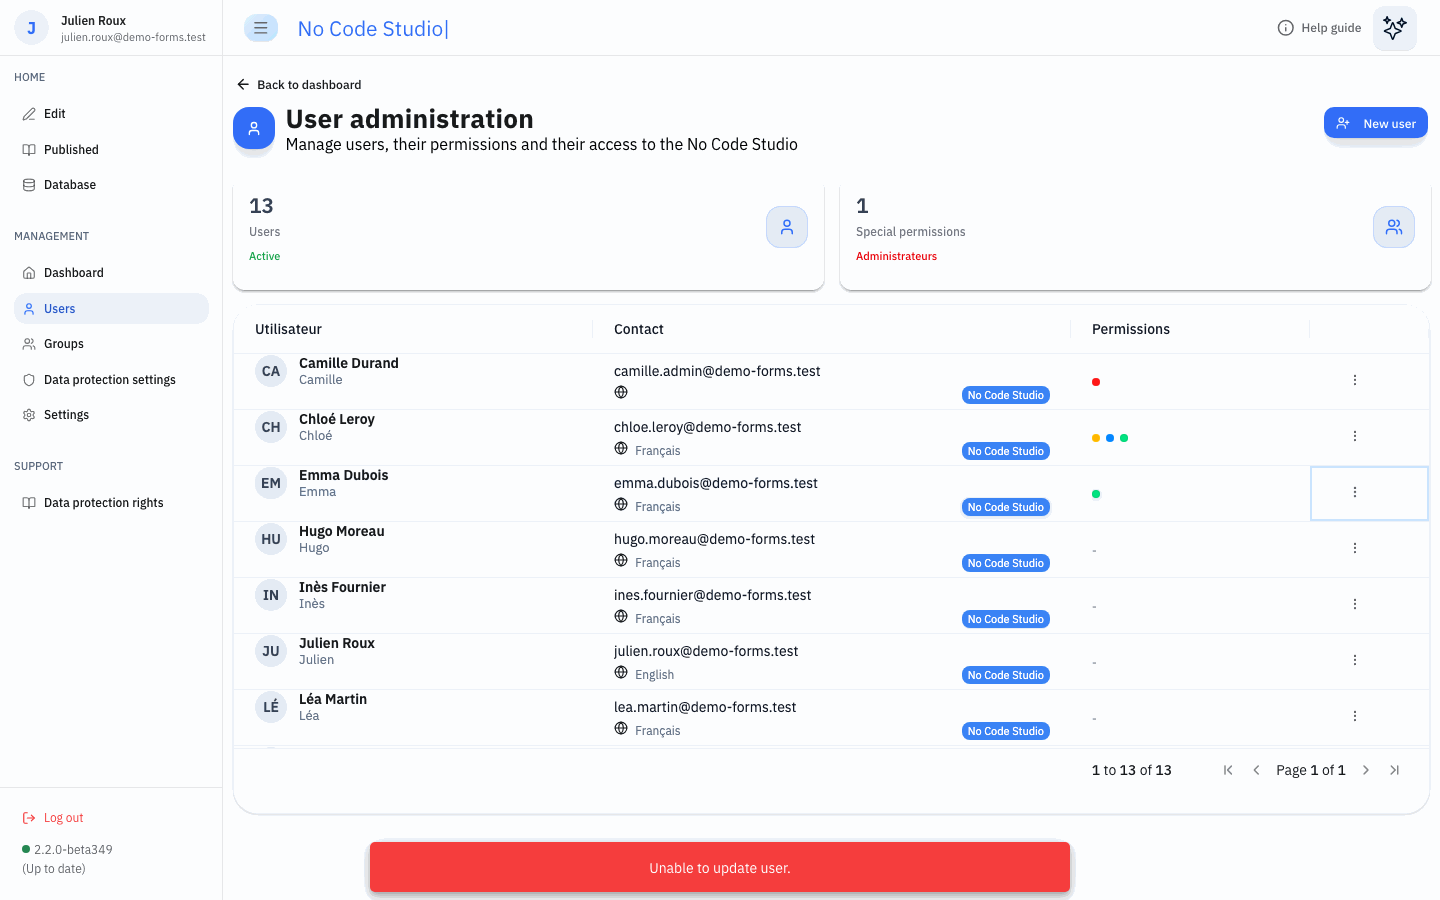
MANAGEMENT > Users (“User administration”) lists every user of the No Code Studio.
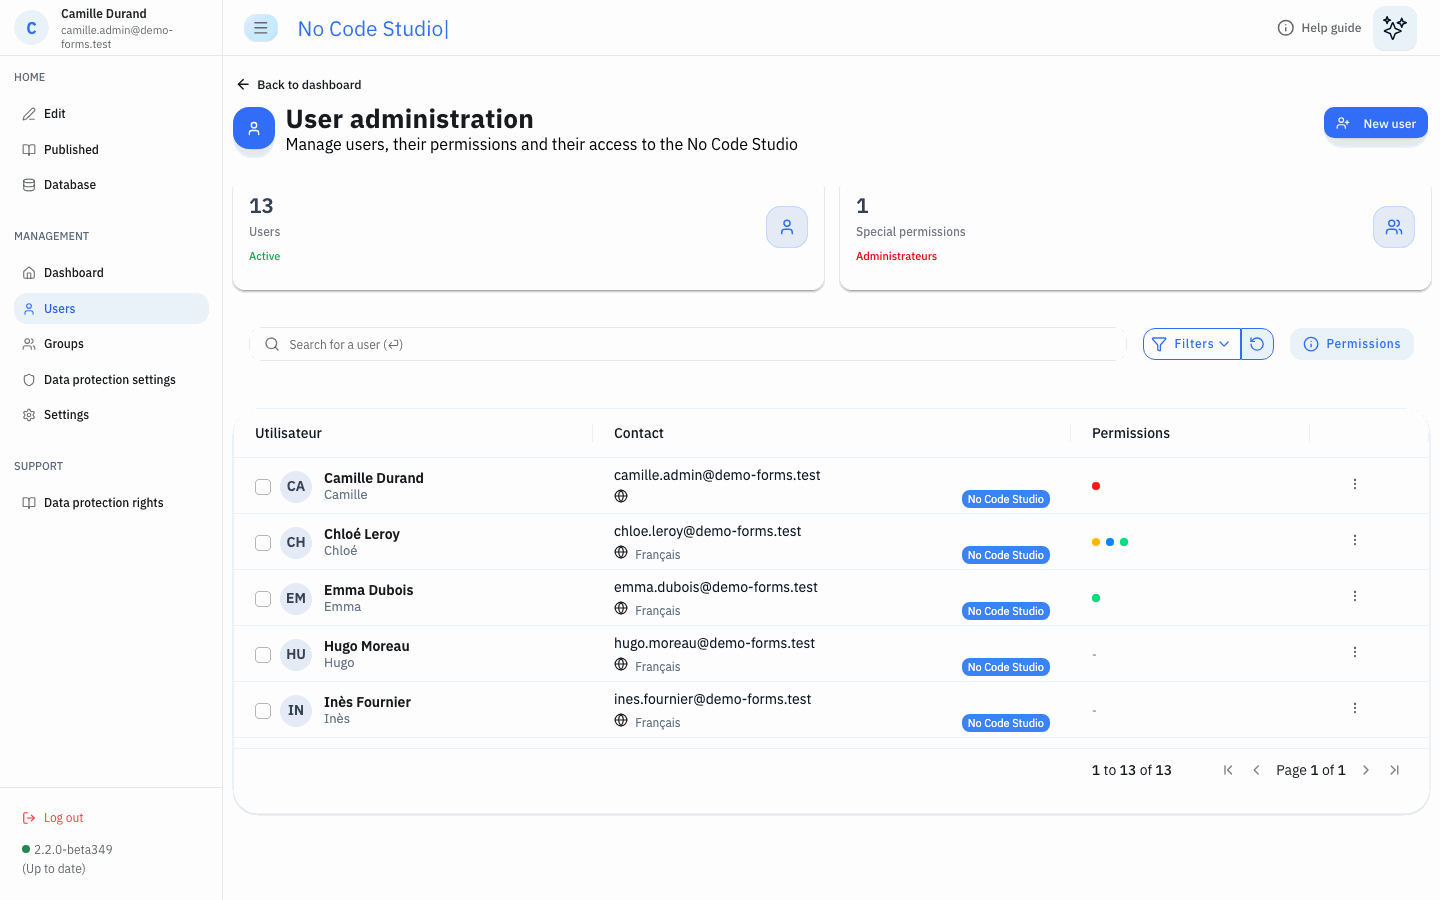
- Cards: number of users, and number of users with the Administration permission on their profile (“Special permissions”).
- Search: name, e-mail, language, source and permission names. Press Enter to search.
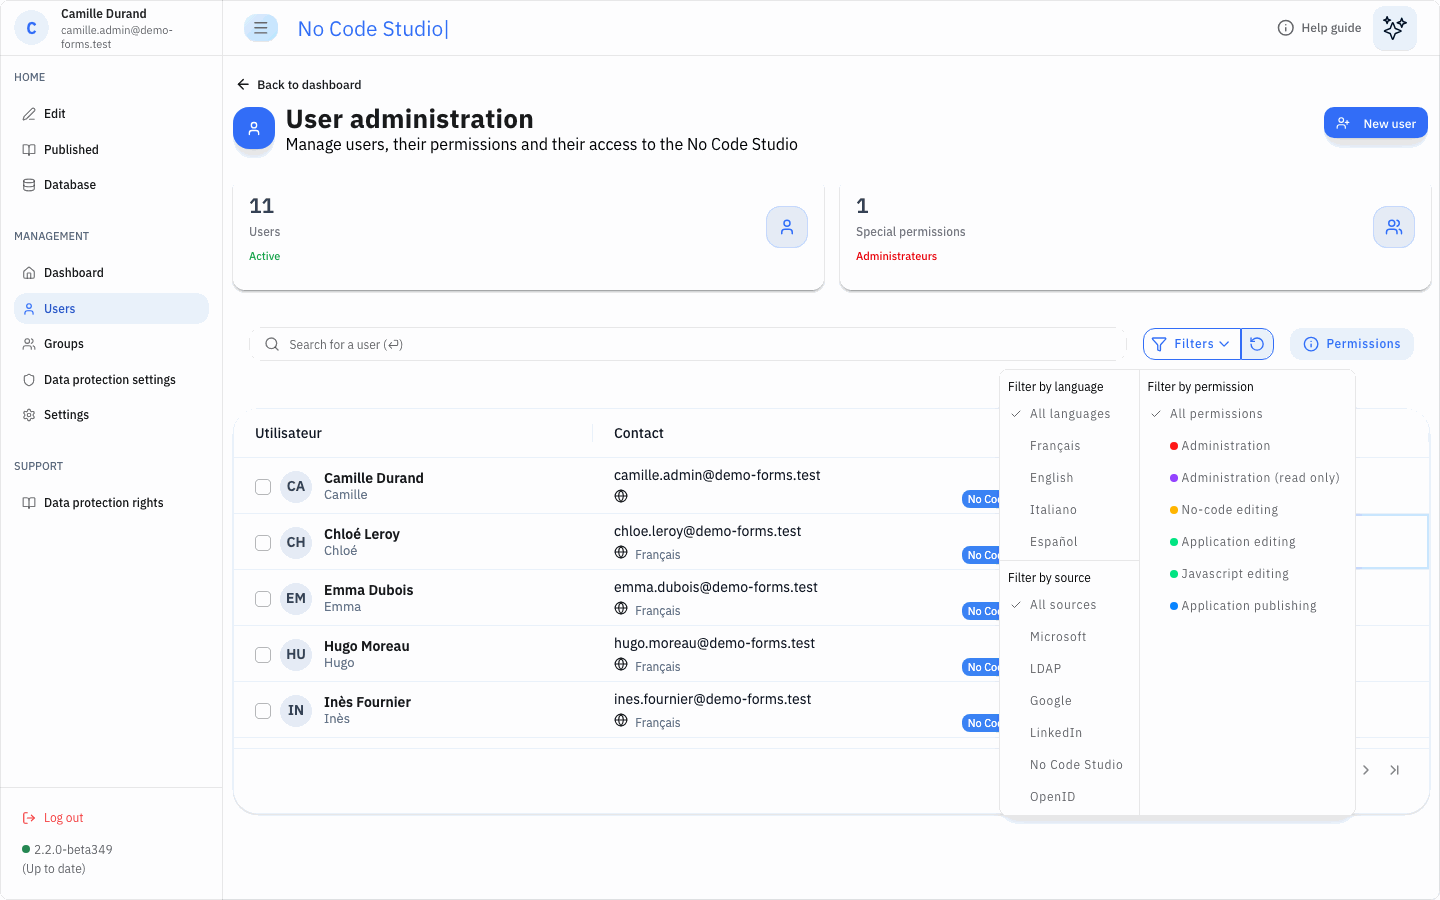
- Filters: by language (Français, English, Italiano, Español), by source (Microsoft, LDAP or Active Directory, Google, LinkedIn, No Code Studio, OpenID) and by permission. The round arrow button clears the search and the filters.
- Grid: user (initials, display name, first name), contact (e-mail, language, source badge), permissions (dots), and the ⋮ menu. Columns can be sorted; pages hold 100 users.
Actions on one user
The ⋮ menu of a row offers:
| Action | Effect |
|---|---|
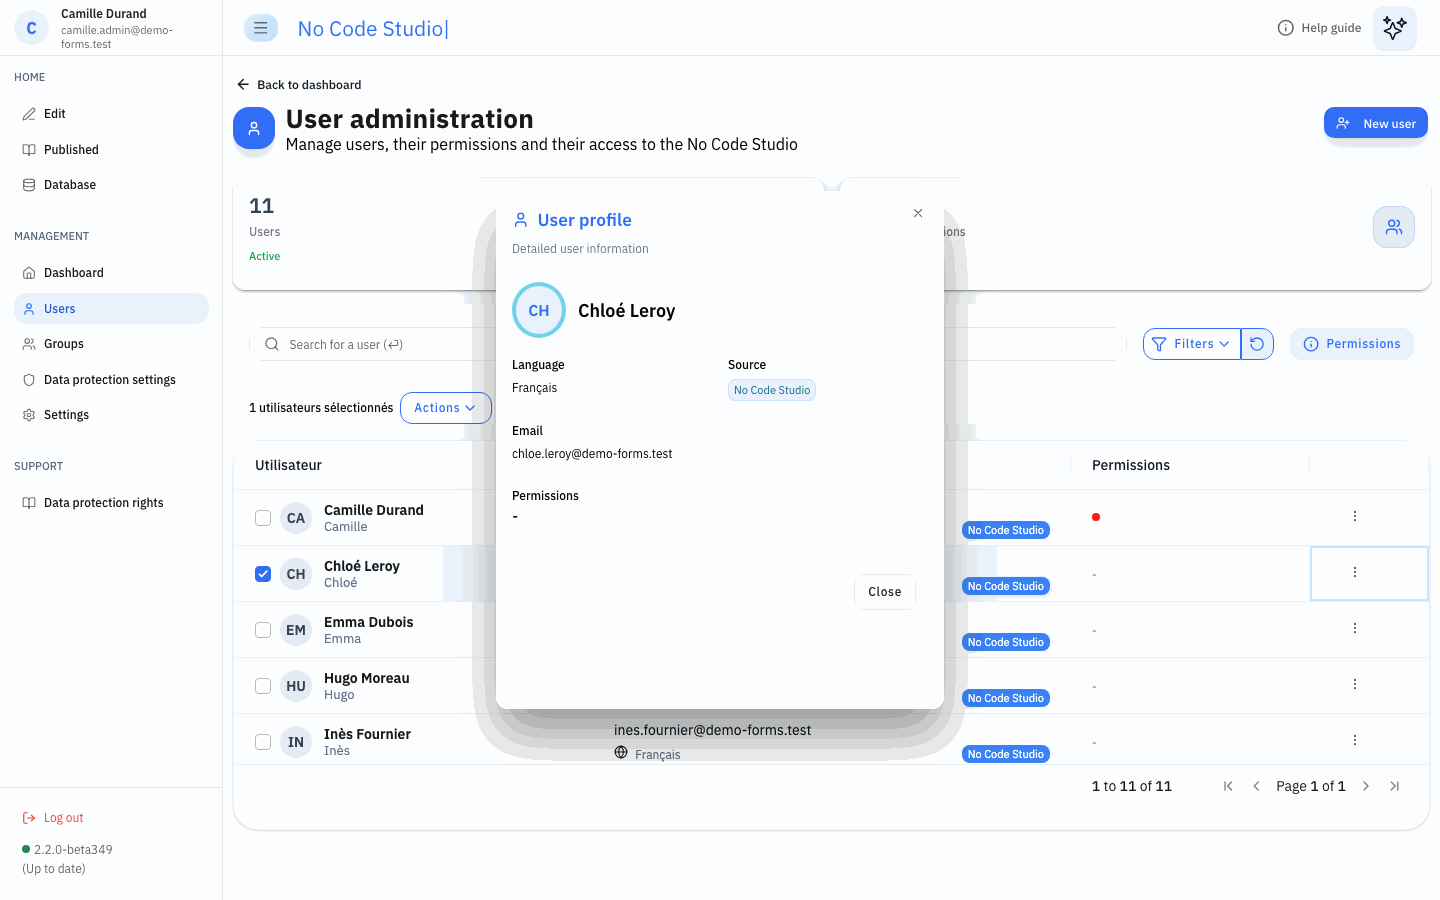
| View profile | Shows the name, language, source, e-mail and permissions of the user. |
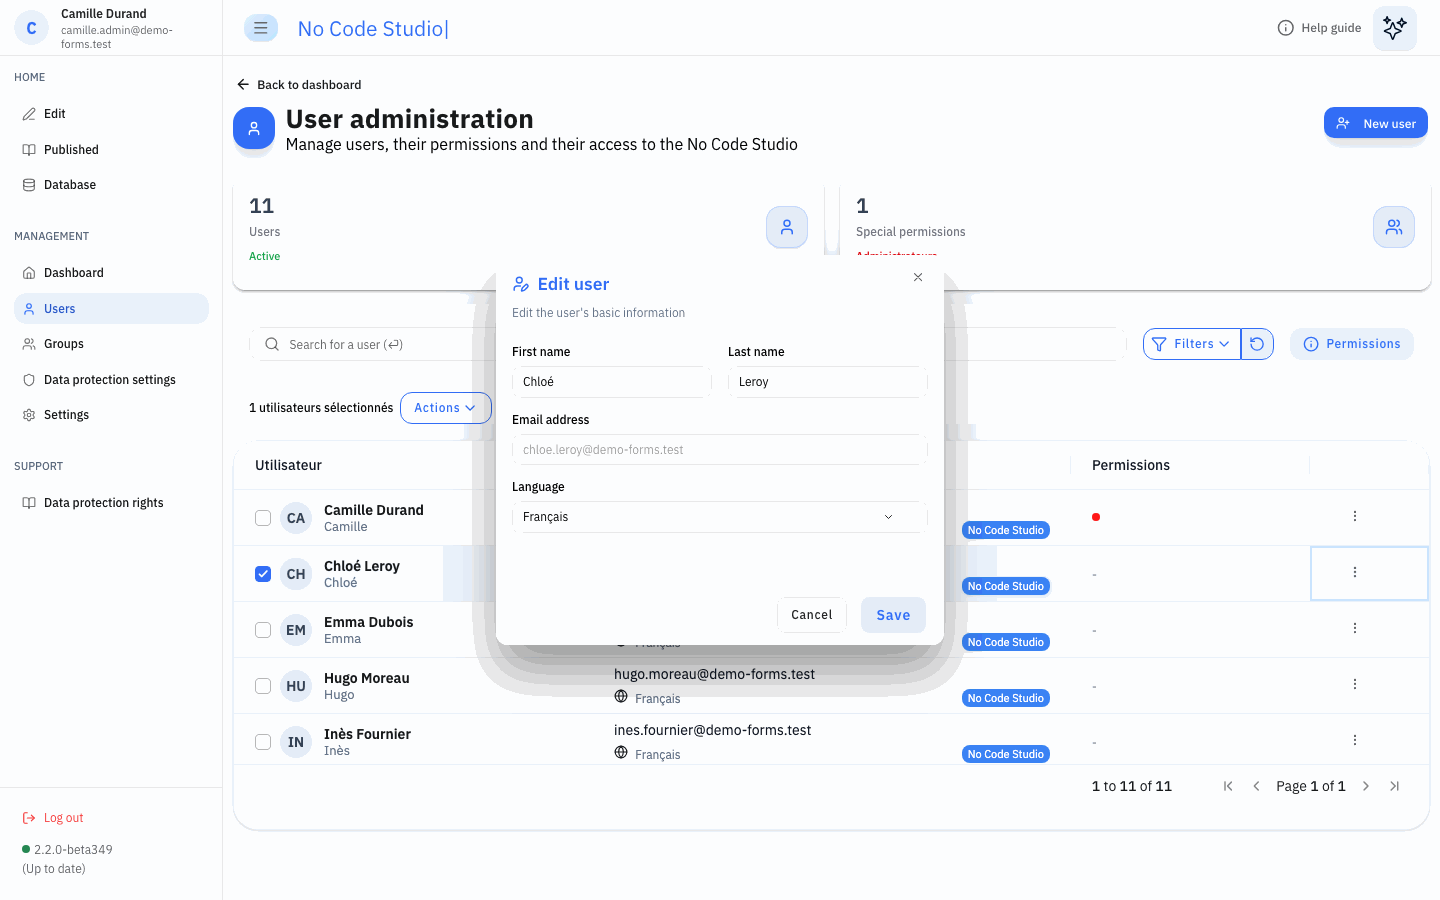
| Edit | Changes the first name, last name and language. The e-mail address cannot be changed. |
| Permissions | Opens “Manage permissions”: tick or untick each of the six permissions, then Apply. |
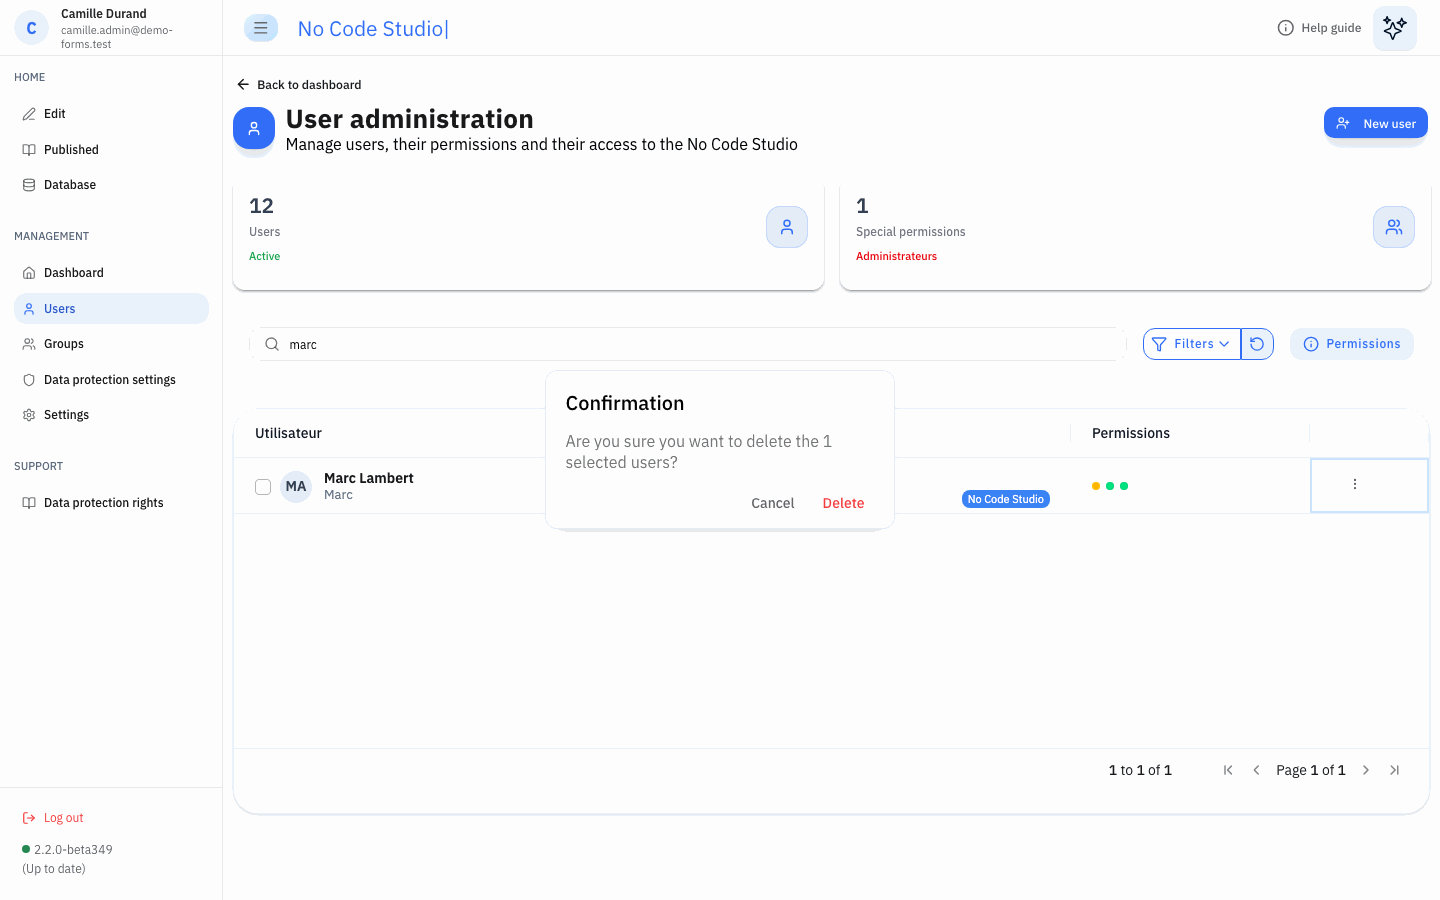
| Delete | Deletes the user’s account and profile after confirmation. The user’s applications are kept. |
Actions on several users
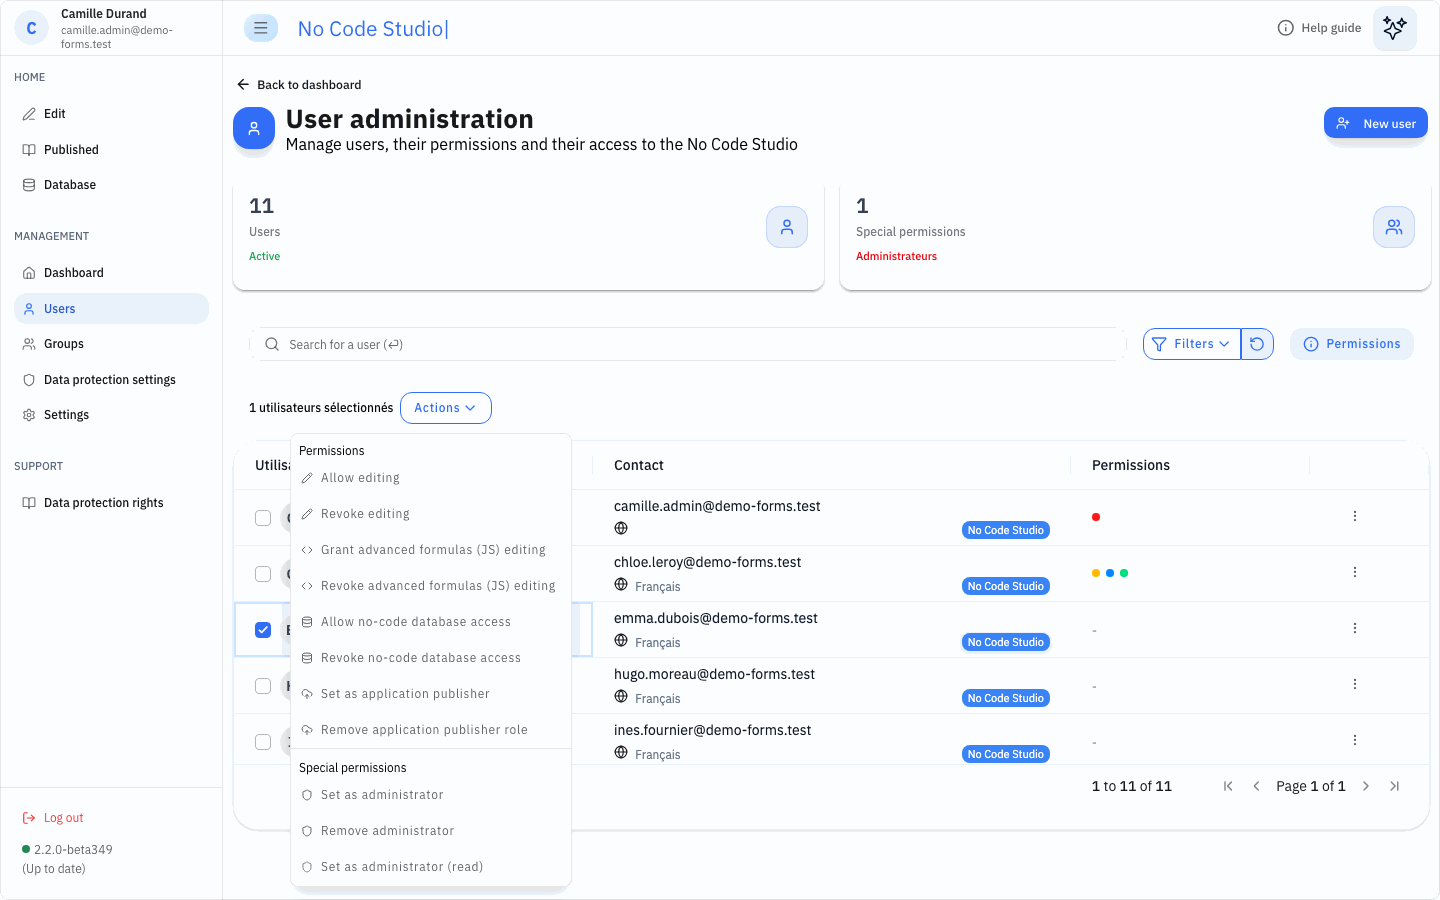
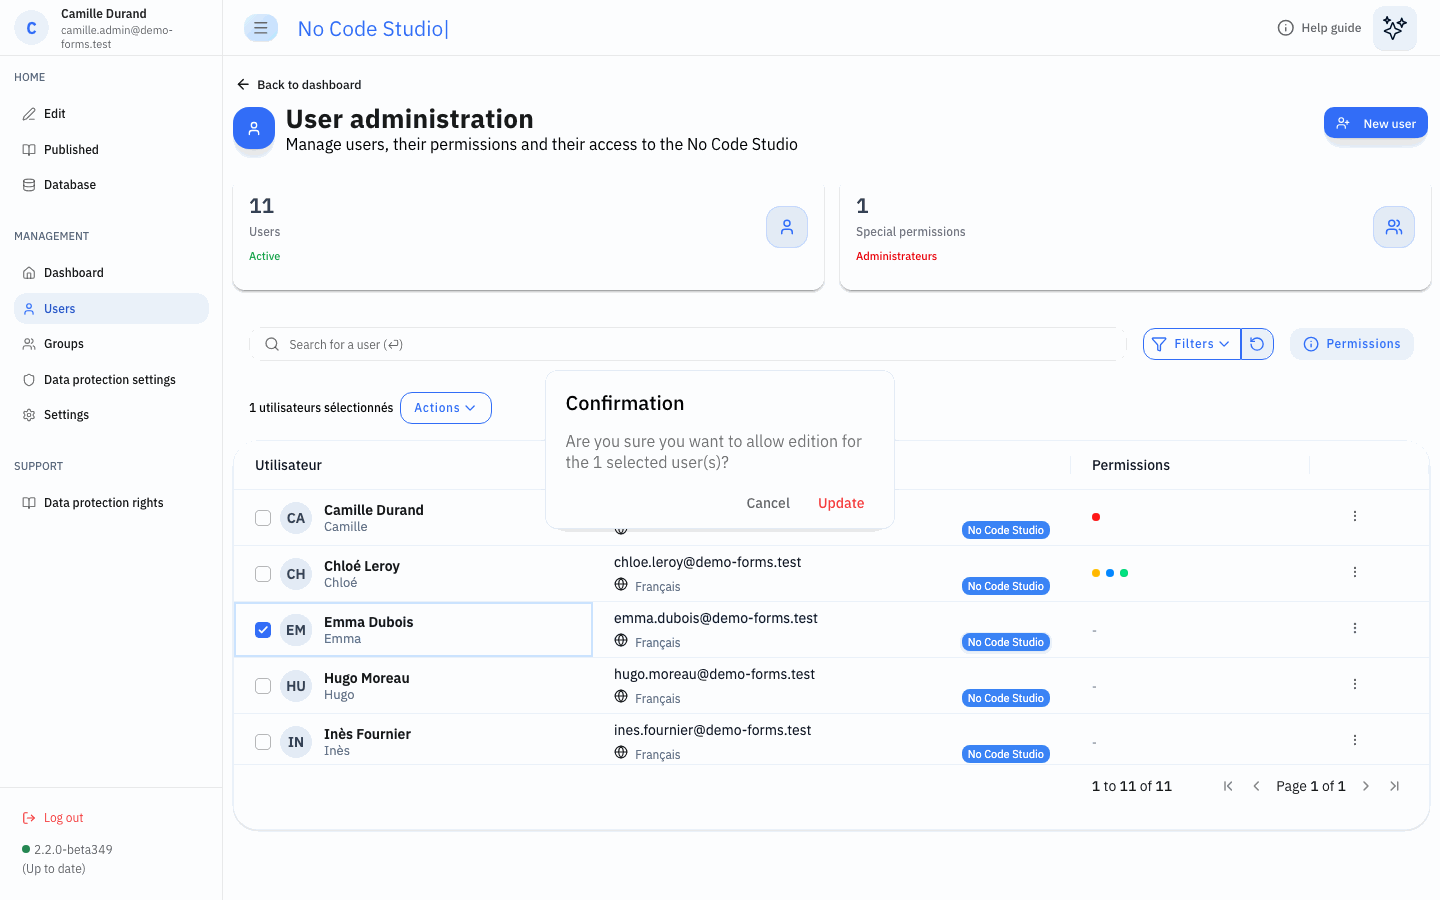
Tick users in the grid: the bar “n utilisateurs sélectionnés” appears with an Actions button. Each action asks for confirmation, then applies to all the selected users.
| Group | Actions |
|---|---|
| Permissions | Allow editing / Revoke editing; Grant / Revoke advanced formulas (JS) editing; Allow / Revoke no-code database access; Set as application publisher / Remove application publisher role |
| Special permissions | Set as administrator / Remove administrator; Set as administrator (read) / Remove as administrator (read) |
| Remove: deletes the selected users |
Creating a user
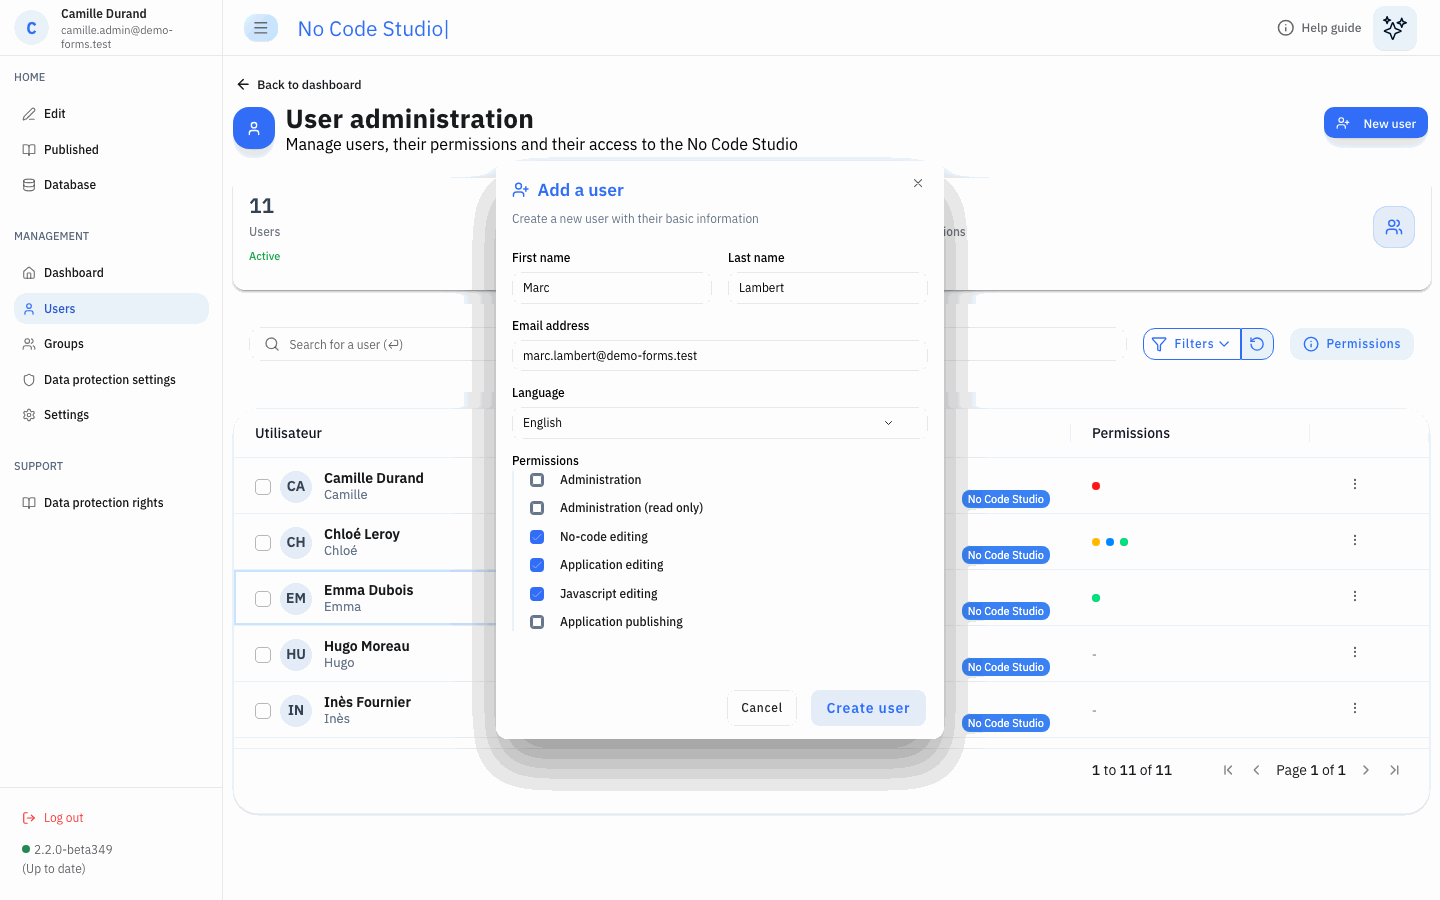
New user opens “Add a user”: first name, last name, e-mail address, language and permissions. By default, No-code editing, Application editing and Javascript editing are ticked.
Create user creates a No Code Studio account (sign-in with e-mail and password). The user receives an e-mail to set their password, so the server must be able to send e-mails. An e-mail address can be used by one account only.
Users who sign in with Active Directory, LDAP, Microsoft, Google, LinkedIn or OpenID do not need to be created: they appear in the list after their first sign-in.
Group management
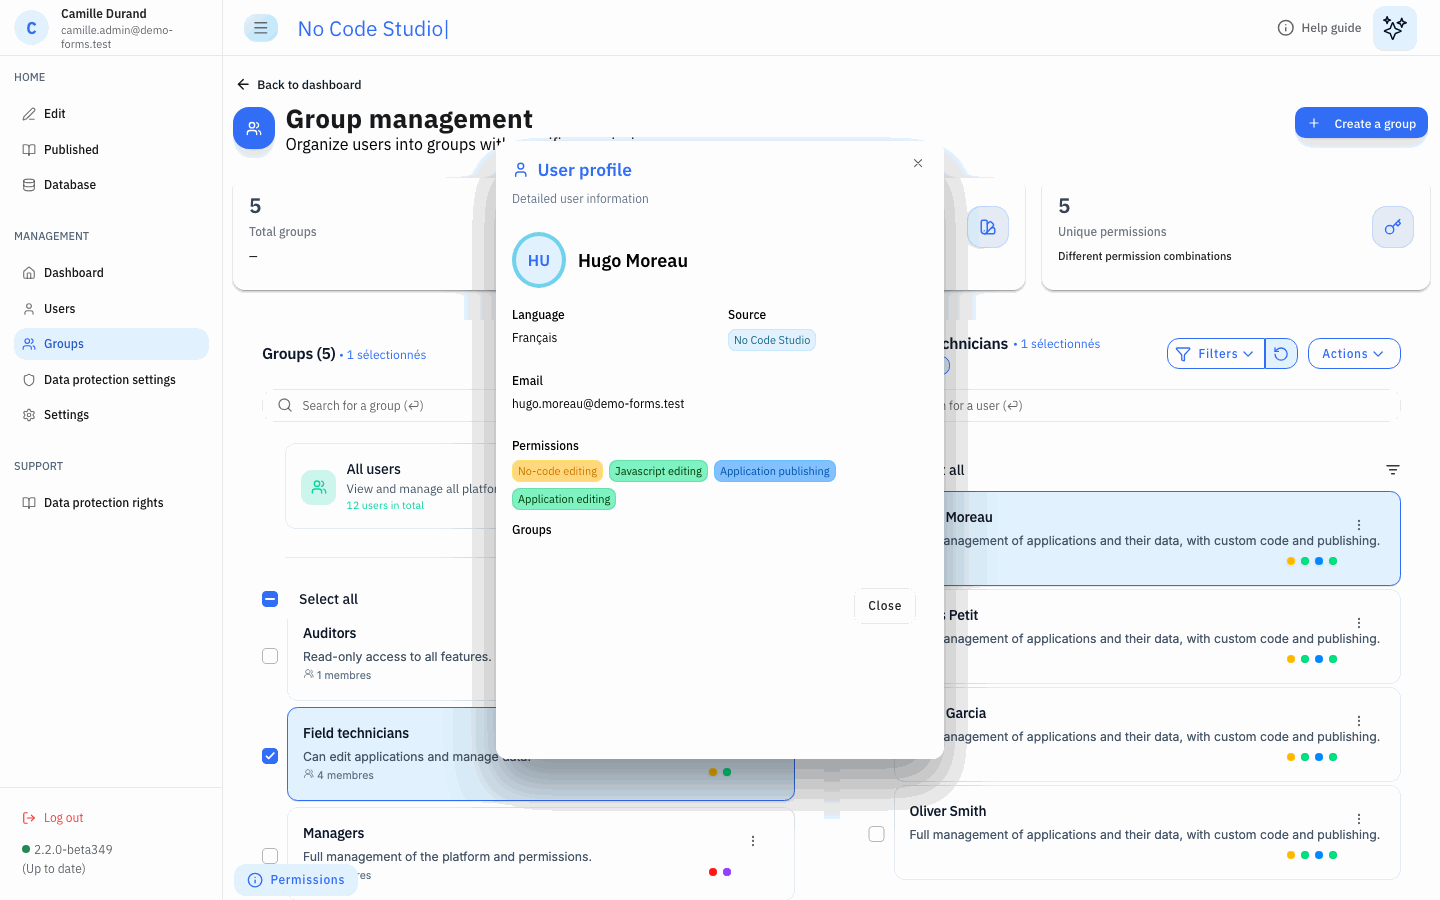
MANAGEMENT > Groups (“Group management”) organises users into groups. A group gives its permissions to all its members.
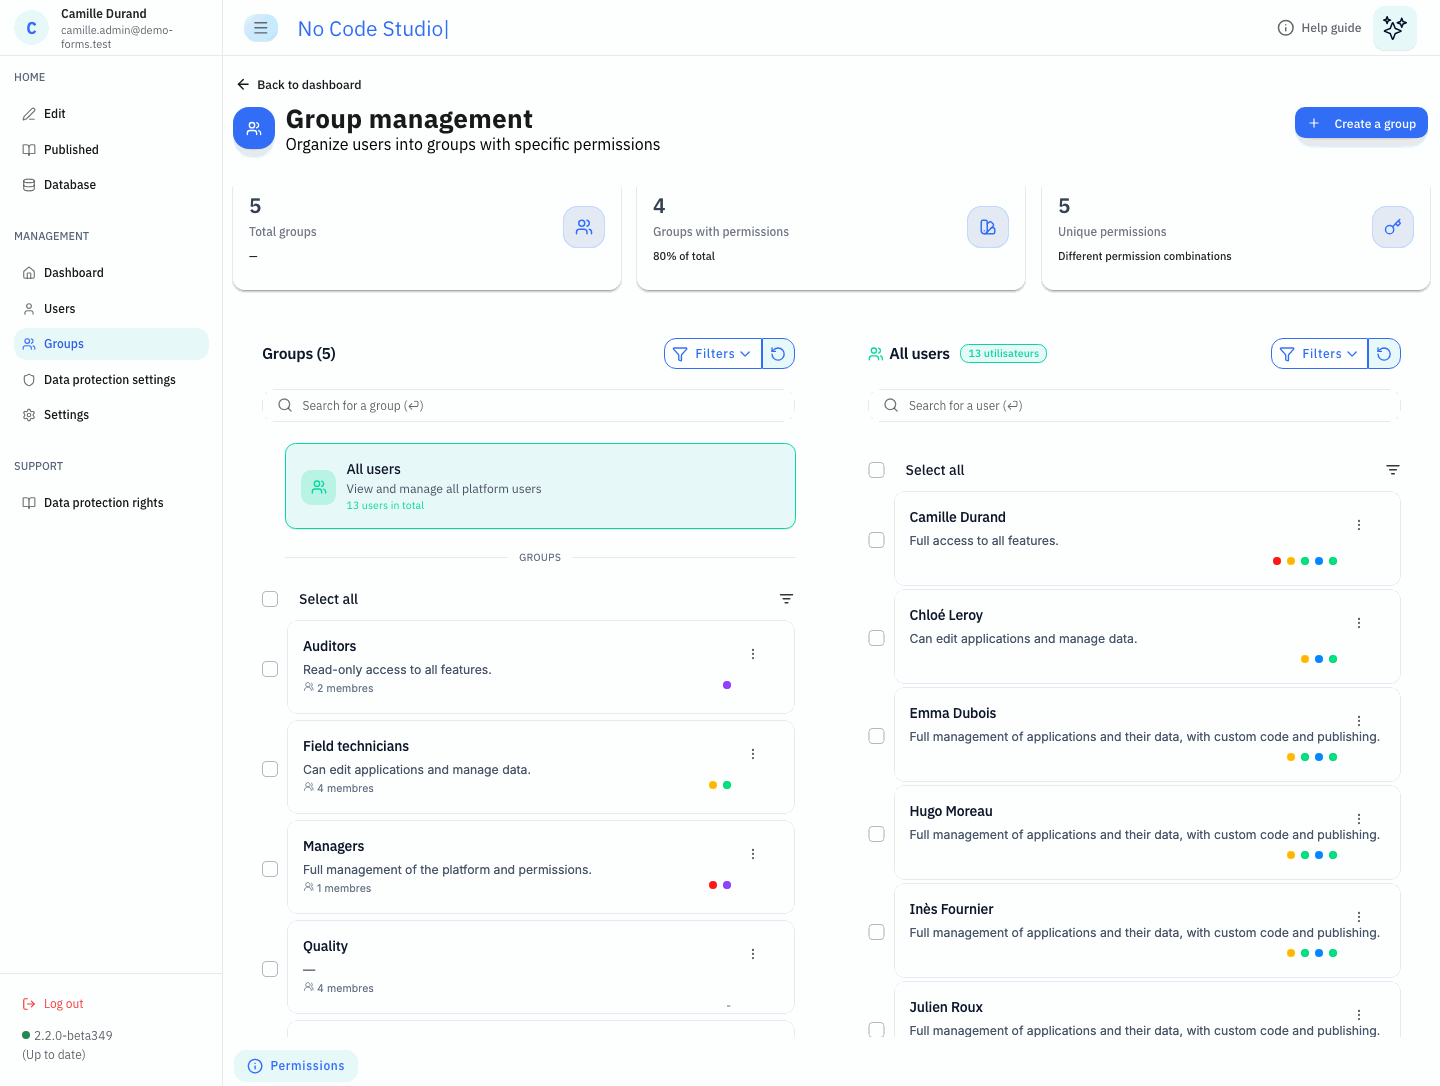
- Cards: total number of groups, groups with permissions (and their share), and number of distinct permission combinations.
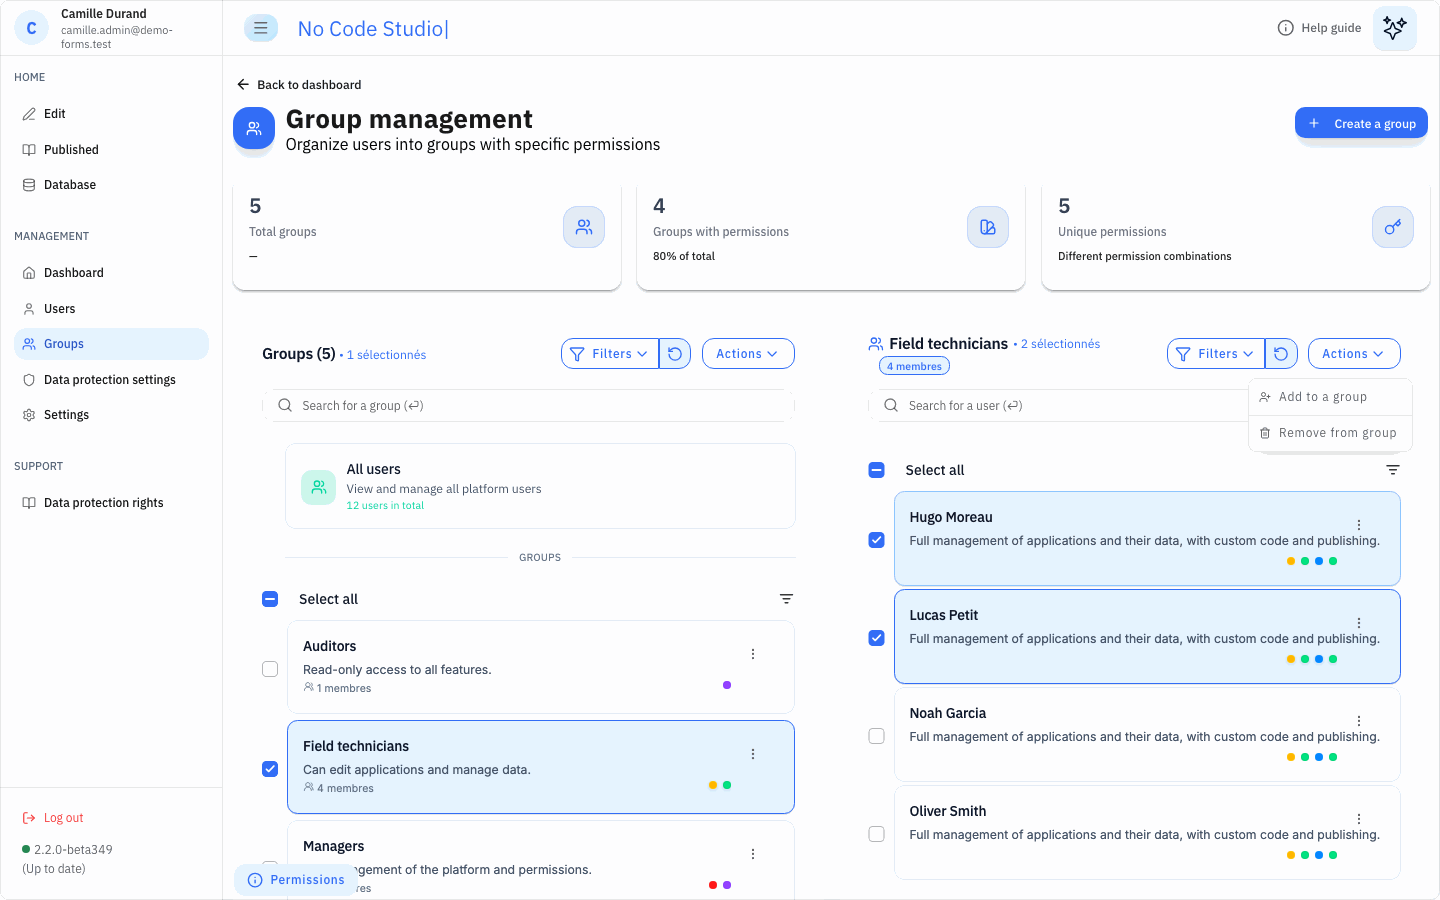
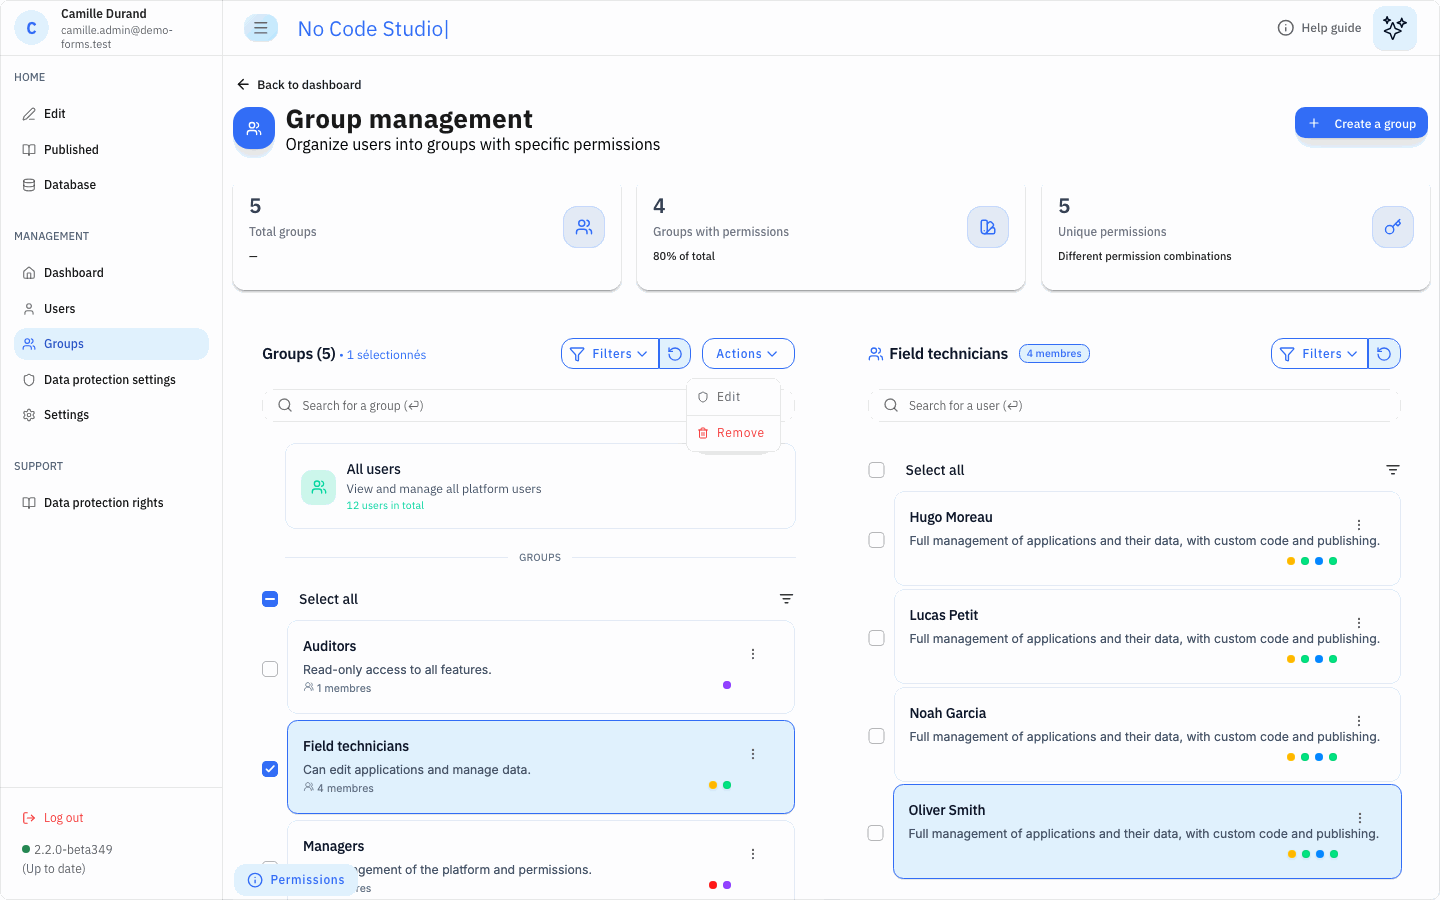
- Left panel: the All users card, then the groups with their description (generated from their permissions), number of members and permission dots. A search field, a permission filter and, when groups are ticked, an Actions button (Edit, Remove) are above the list.
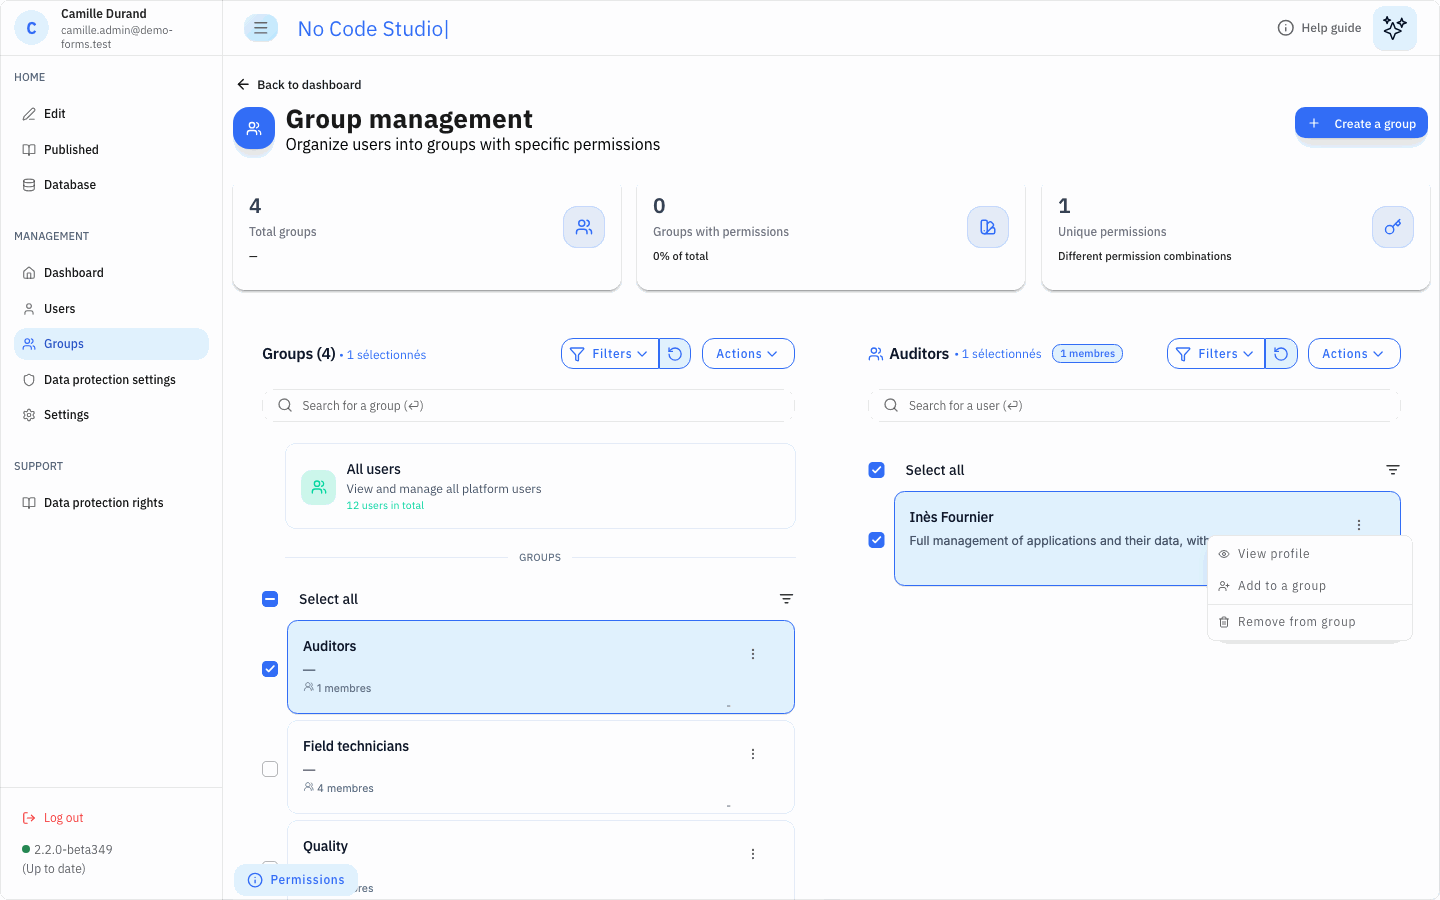
- Right panel: the members of the selected group, or all users when All users is selected. Cards show the effective permissions of each user. A search field, filters (language, source, permission) and, when users are ticked, an Actions button (Add to a group, Remove from group) are above the list.
Click a group to show its members. The ⋮ menu of a group offers Edit and Delete; the ⋮ menu of a member offers View profile, Add to a group and Remove from group.
Creating and editing a group
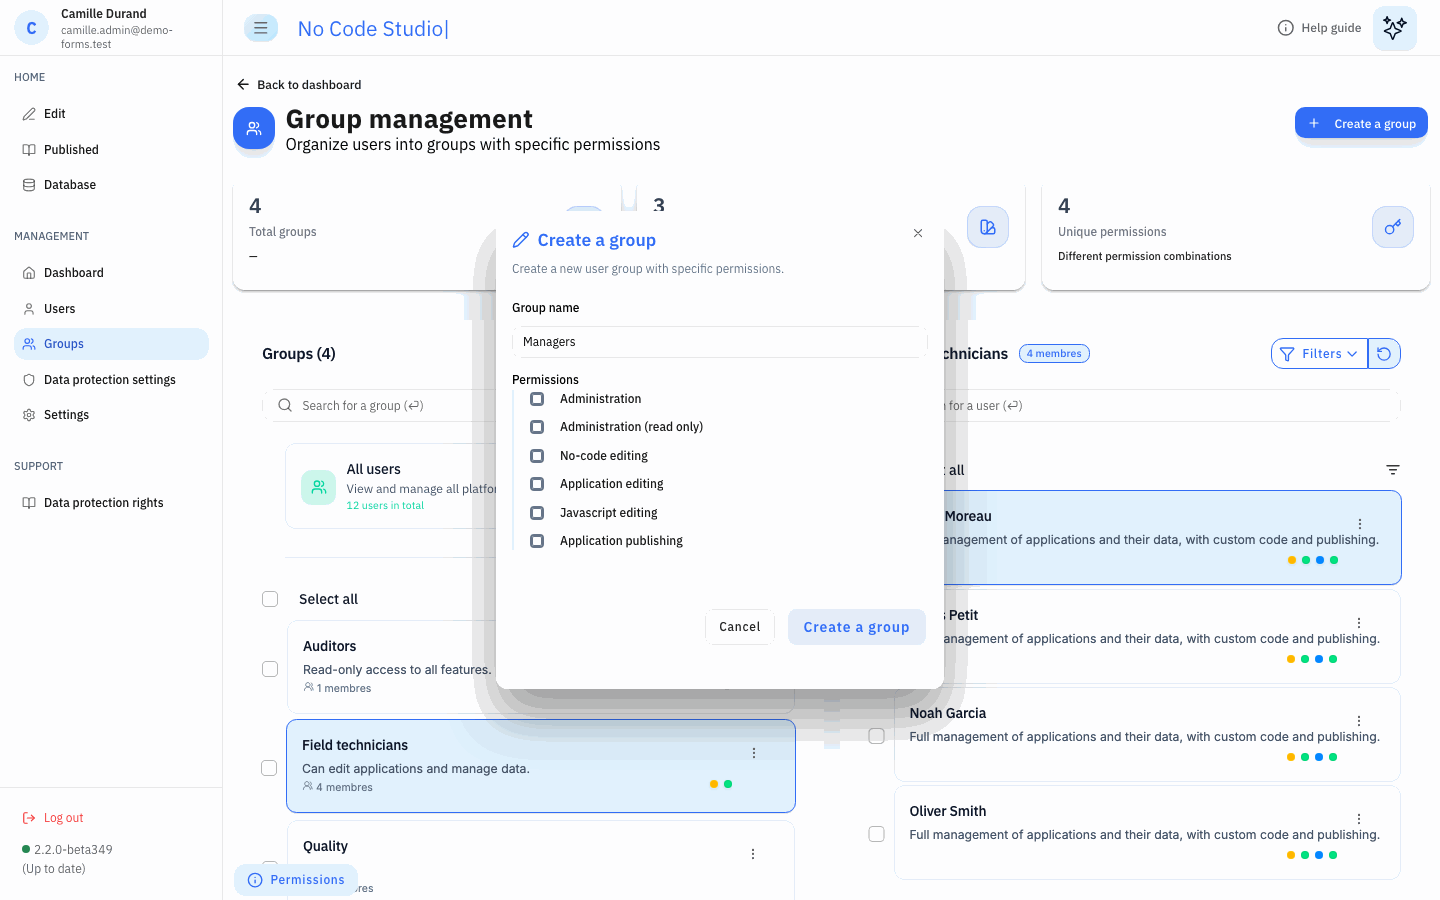
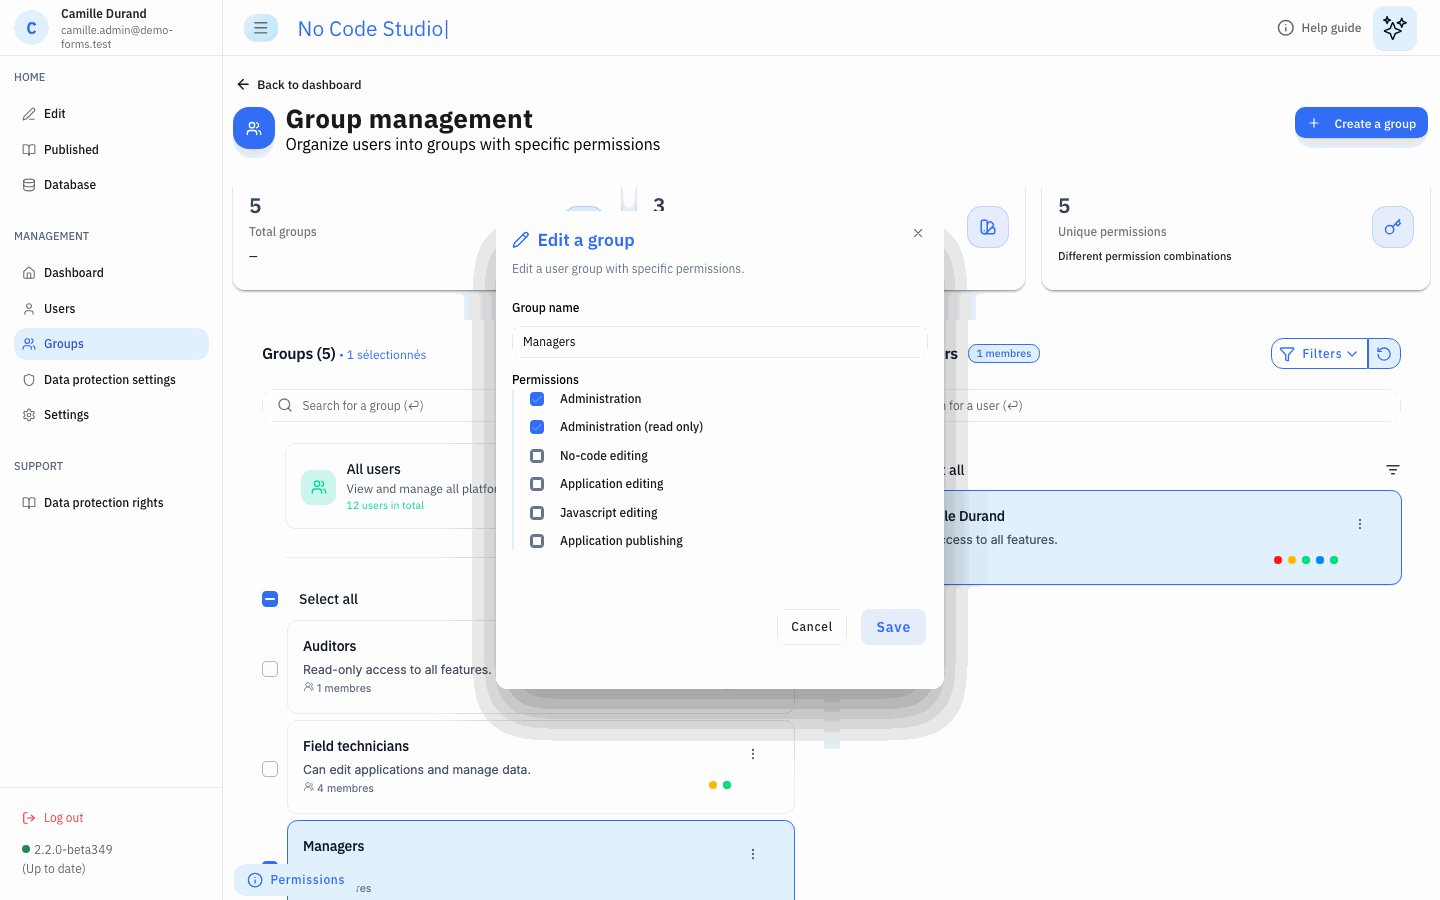
Create a group asks for a name and the permissions of the group. Ticking Administration also ticks Administration (read only); unticking the read-only permission also unticks Administration.
A group exists through its members: the administrator who creates it becomes its first member. Remove yourself from the group afterwards if needed.
Edit (from the ⋮ menu or the Actions button) renames the group or changes its permissions. When several groups are ticked, Actions > Edit changes their permissions together.
Adding users to groups
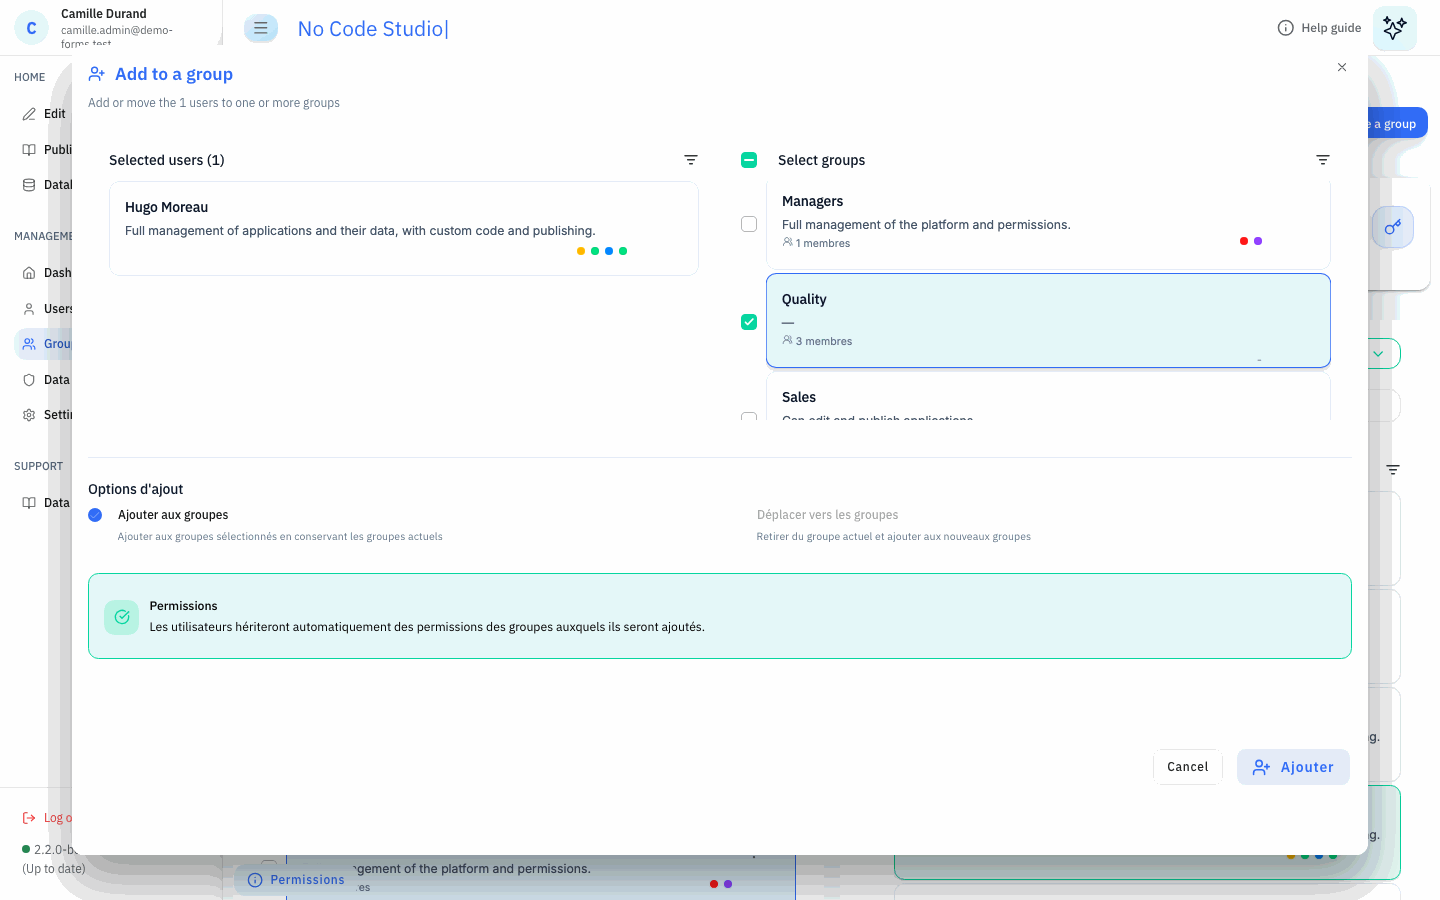
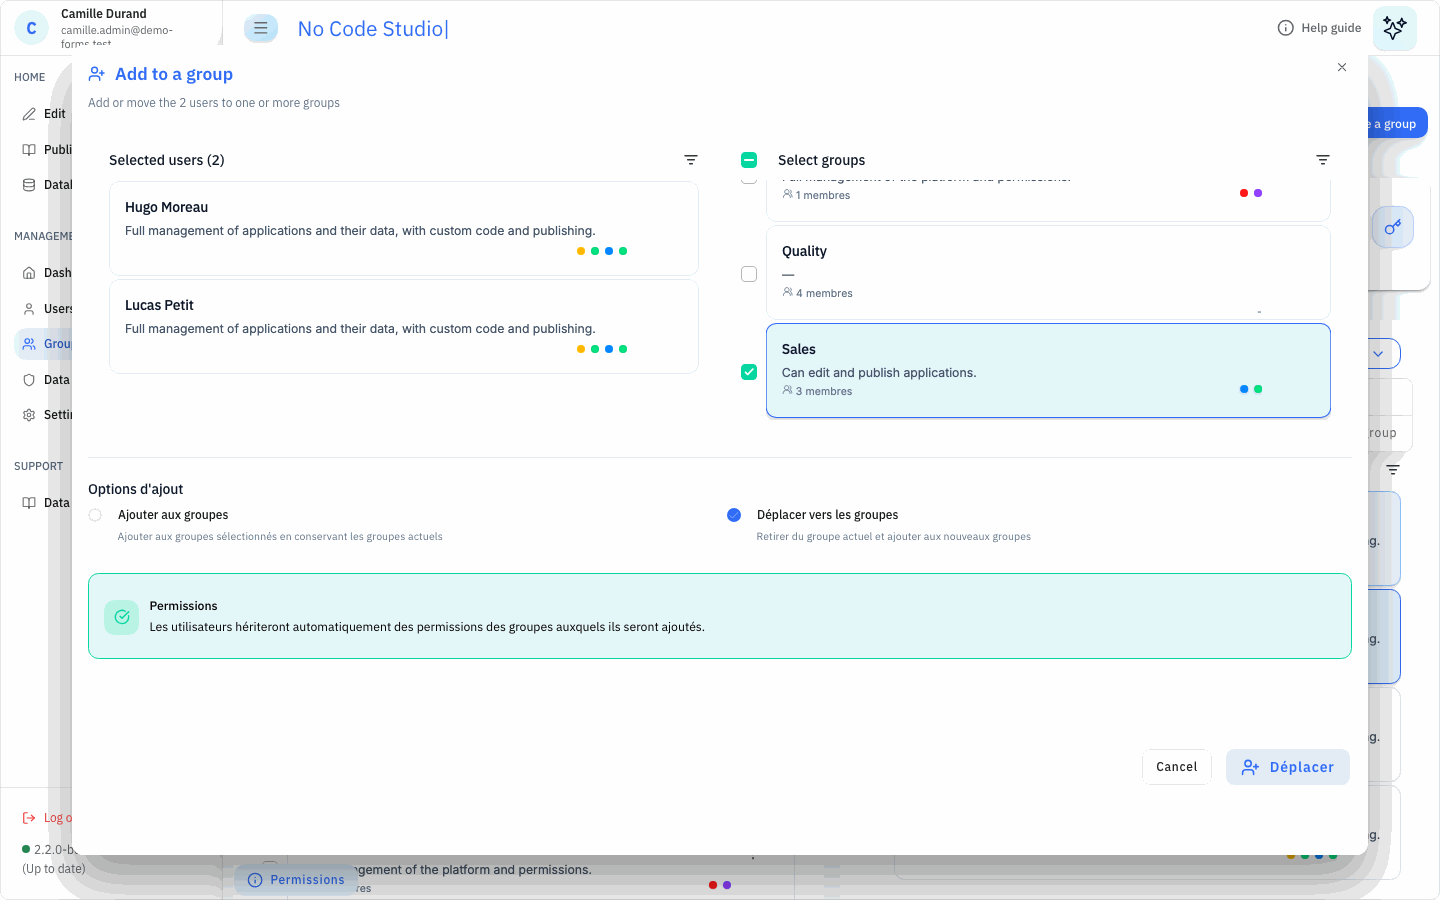
Add to a group opens a dialog listing the selected users and the groups. Tick one or more groups, then choose:
- Ajouter aux groupes (add): the users join the groups and keep their current groups;
- Déplacer vers les groupes (move): the users leave the current group and join the selected groups. This option is available when the dialog is opened from a group.
Users inherit the permissions of their new groups.
Removing users and deleting groups
- Remove from group takes the selected users out of the group. When all members are removed, the group is deleted with its permissions.
- Delete (group ⋮ menu) or Actions > Remove deletes the selected groups and their permissions after confirmation. Their members keep their accounts and their other groups.
- View profile shows a member’s details and effective permissions.
Data protection (GDPR)
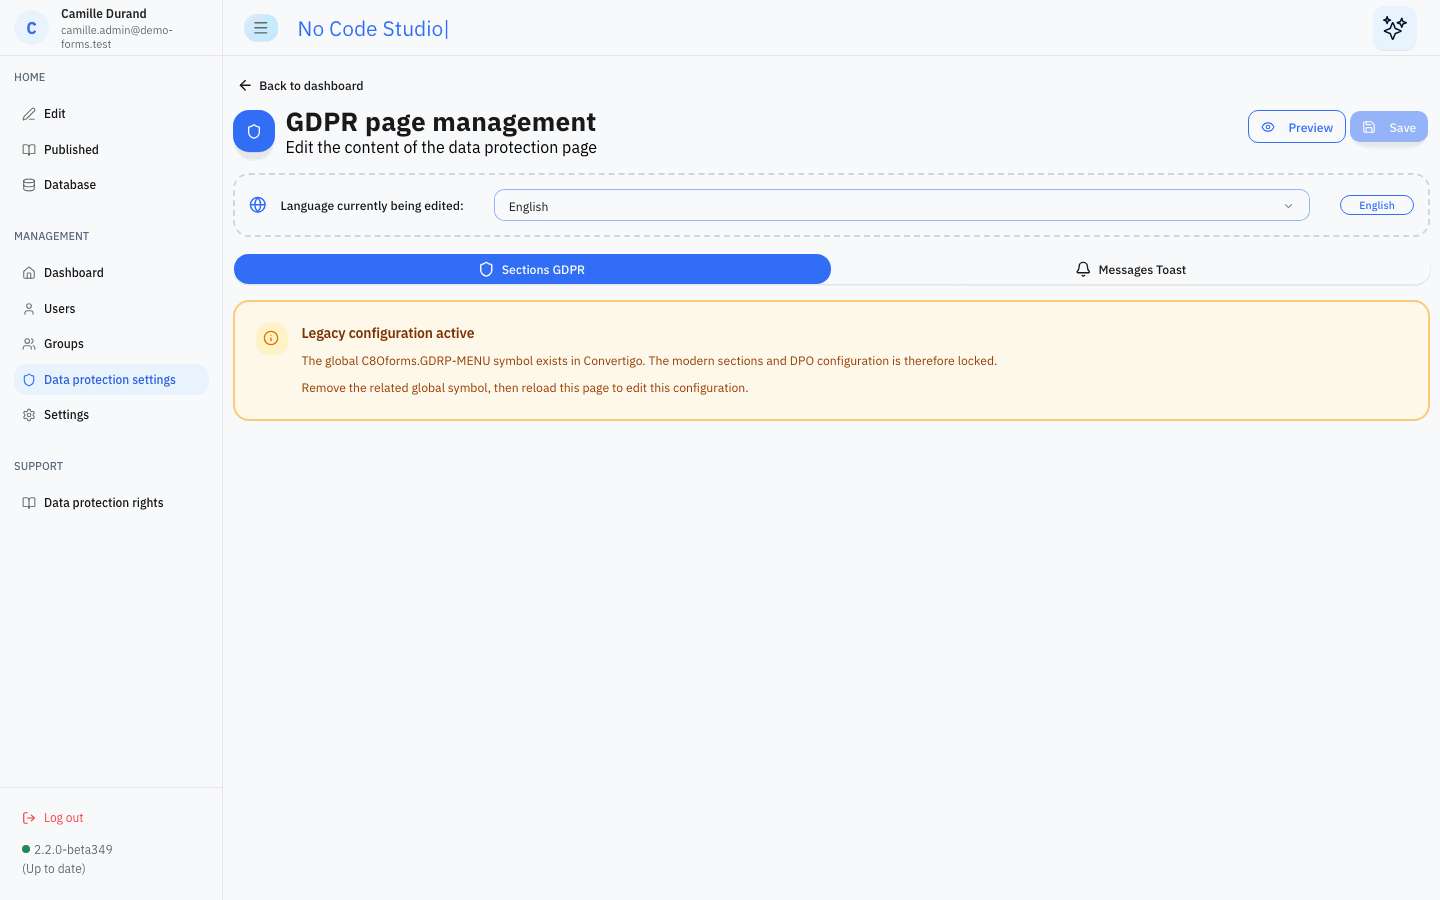
MANAGEMENT > Data protection settings (“GDPR page management”) edits the Data protection rights page that every user can open from the SUPPORT menu, and the GDPR reminders displayed as toasts.
The content is defined per language. Choose the language in Language currently being edited (French, English, Spanish, Italian or Simplified Chinese) before editing. Preview opens the resulting page; Save stores the configuration for all languages.
Sections tab
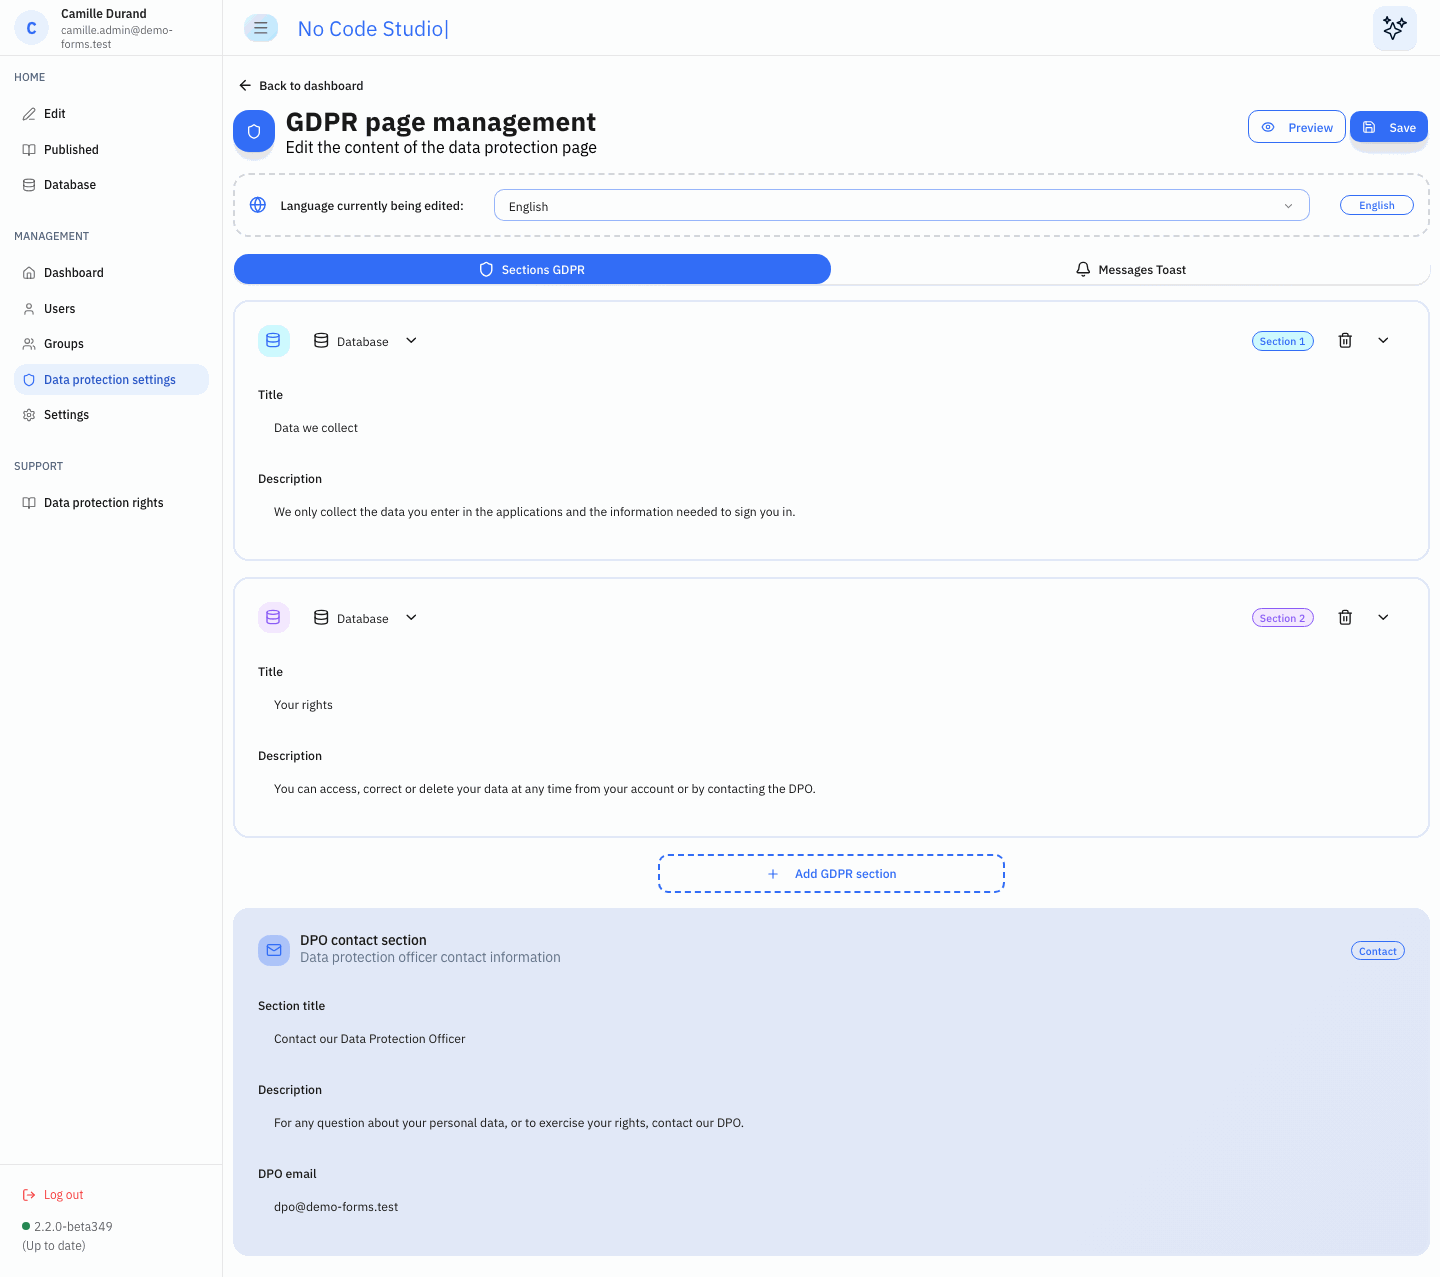
- Each section has an icon, a title and a description. Colours alternate automatically.
- Add GDPR section adds a section in all languages or only in the language being edited.
- The trash icon deletes a section in all languages or only in the language being edited.
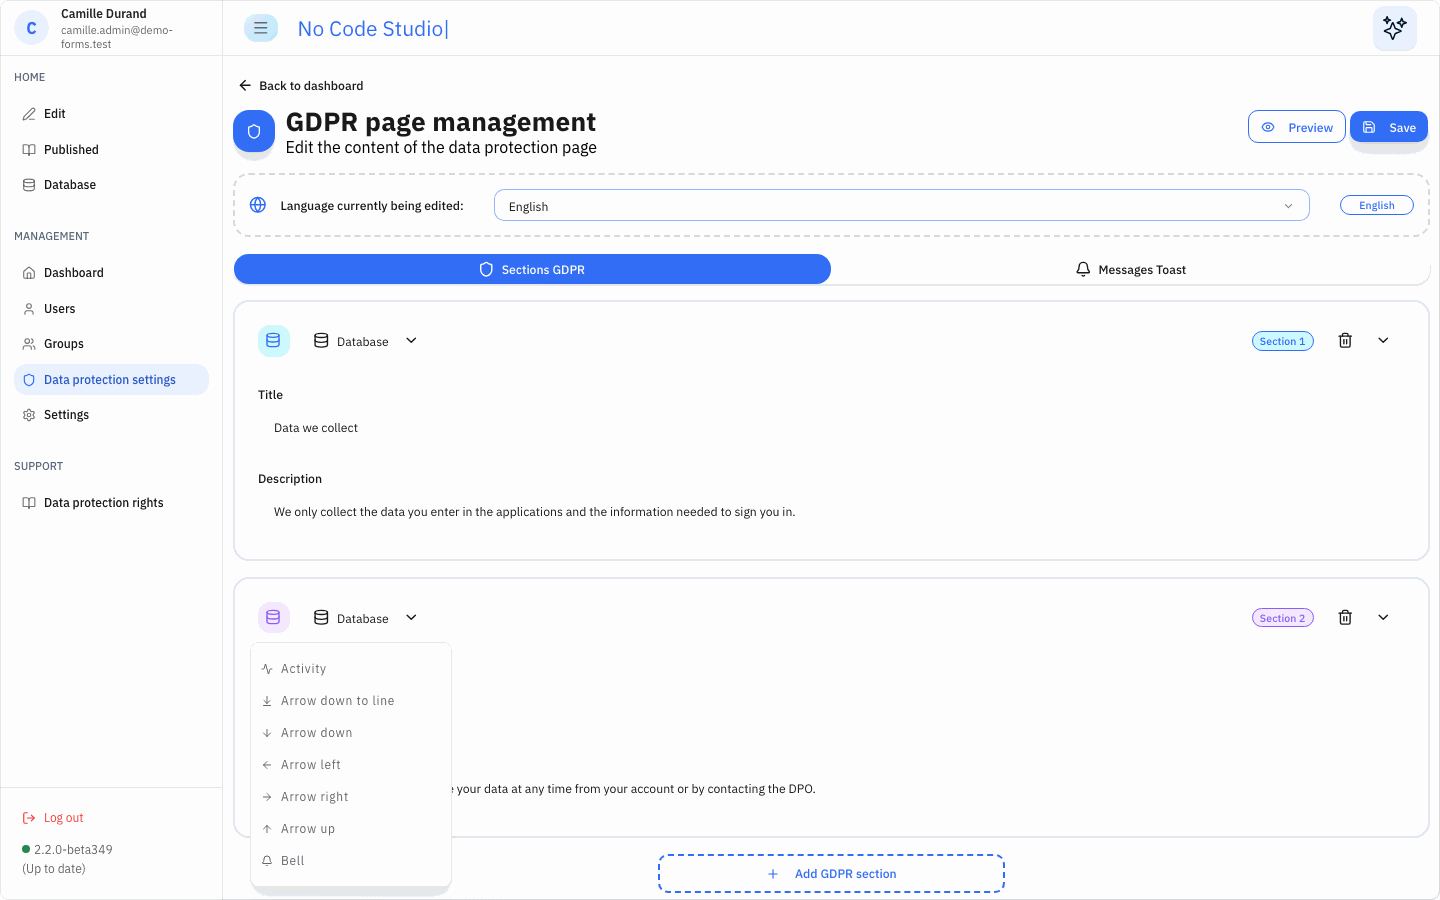
- The icon menu changes the section icon, in all languages or only in the language being edited.
- The DPO contact section holds a title, a description and the DPO e-mail address. On the public page, it shows a Contact the DPO button (e-mail) and a link to the CNIL.
Messages Toast tab
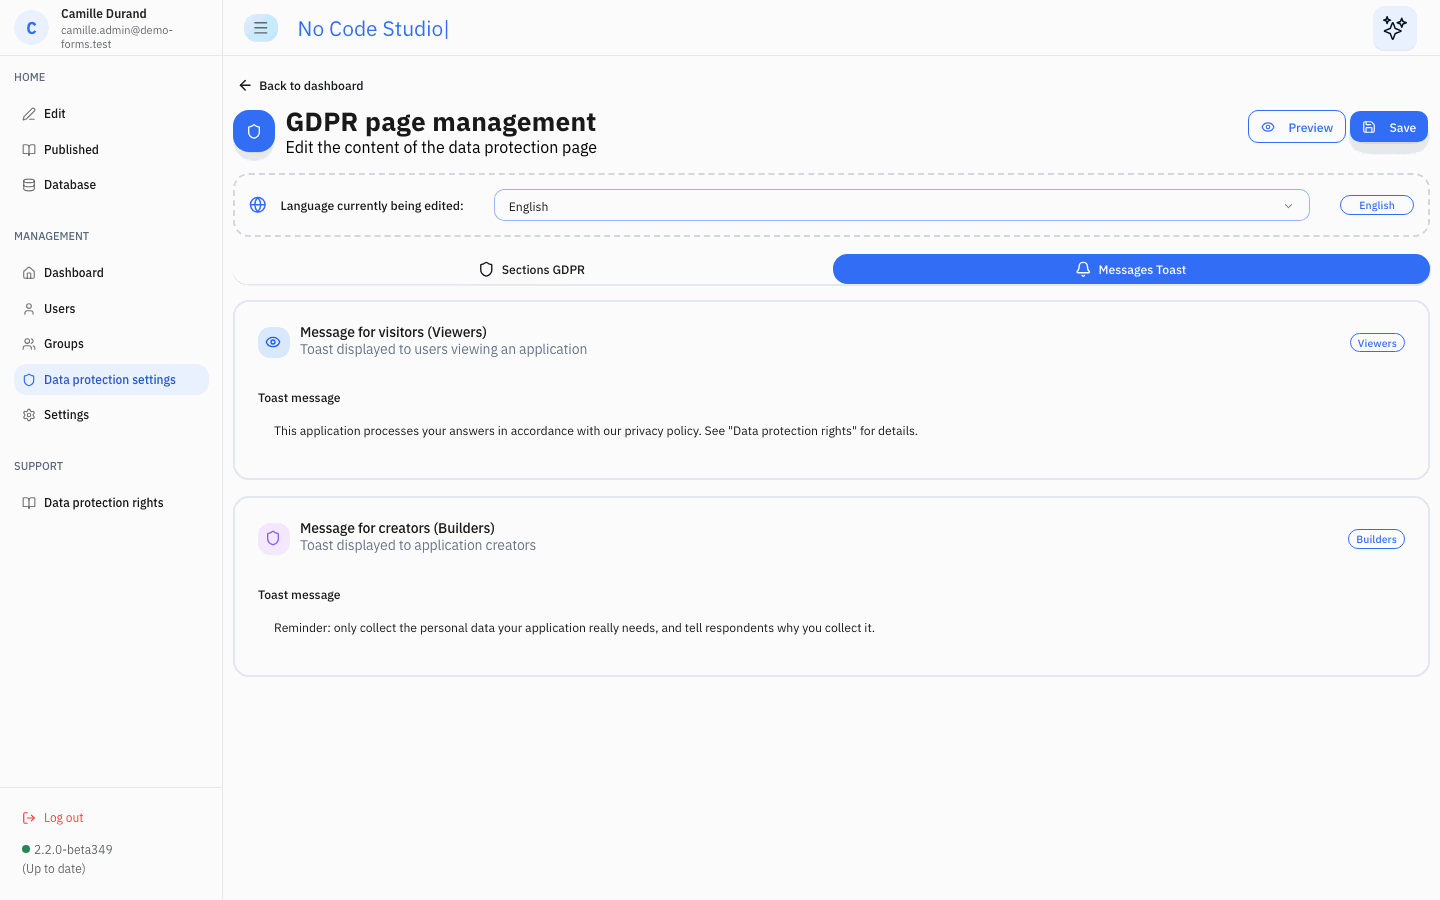
- Message for visitors (Viewers): displayed to users who open a published application, to inform them about the privacy policy.
- Message for creators (Builders): displayed to application creators when they create an application, to remind them of their GDPR responsibilities.
Result and legacy configuration
The Data protection rights page shows the sections and the DPO contact of the user’s language.
If the global symbol C8Oforms.GDRP-MENU (page content) or C8Oforms.GDRP-TOAST (toasts) is defined on the server, the corresponding part is locked and the page shows “Legacy configuration active”. Delete the symbol in the Convertigo administration console, then reload the page to use the editor.
Statistics: application mapping and tracking changes
The Dashboard’s Published applications and Form responses cards, and its Application Mapping and Change Tracking quick actions, open two statistics pages.
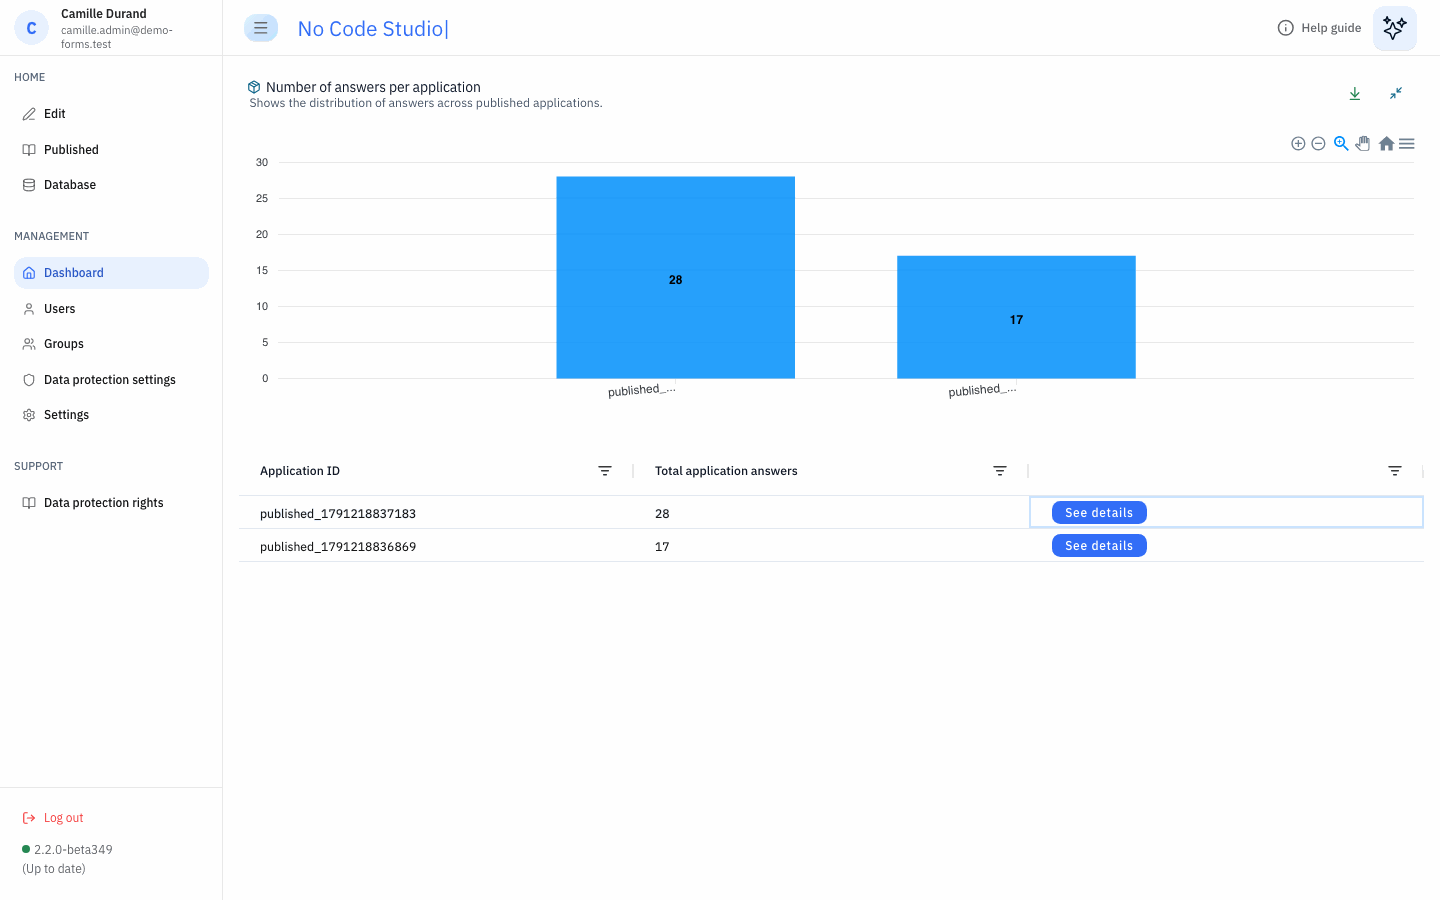
Each statistics panel shows a chart and its data grid:
- the chart toolbar zooms, pans and downloads the chart as SVG, PNG or CSV;
- the download icon exports the grid as CSV;
- the expand icon shows the panel full page.
Application mapping
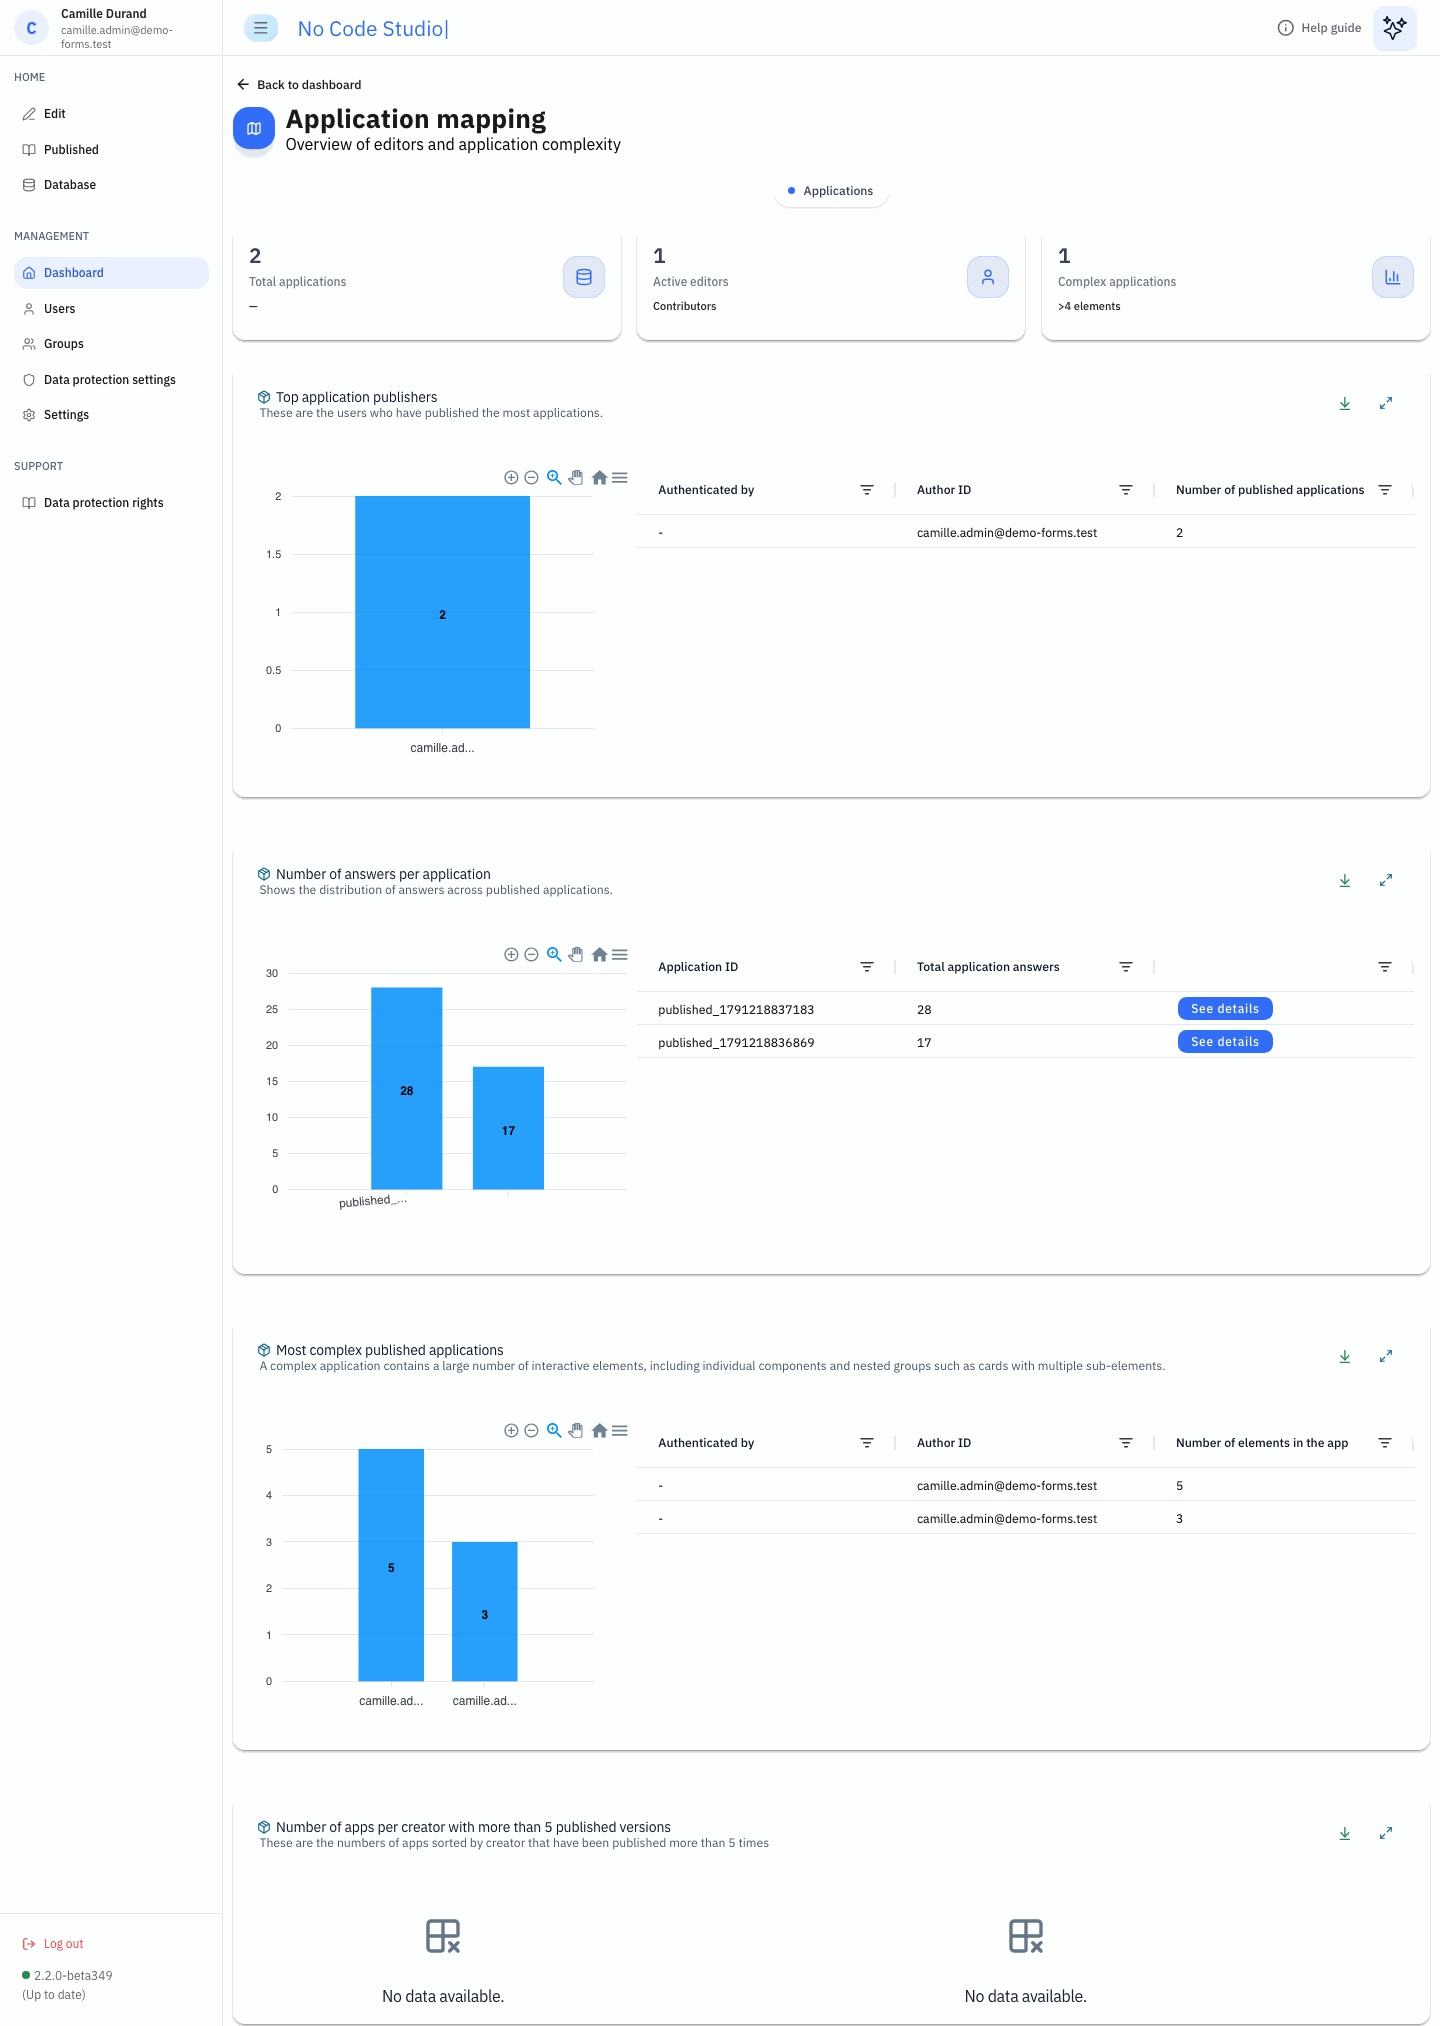
“Overview of editors and application complexity”.
- Cards: total published applications, active editors (users who published at least one application), complex applications (applications with more elements than the average).
- Top application publishers: number of published applications per user.
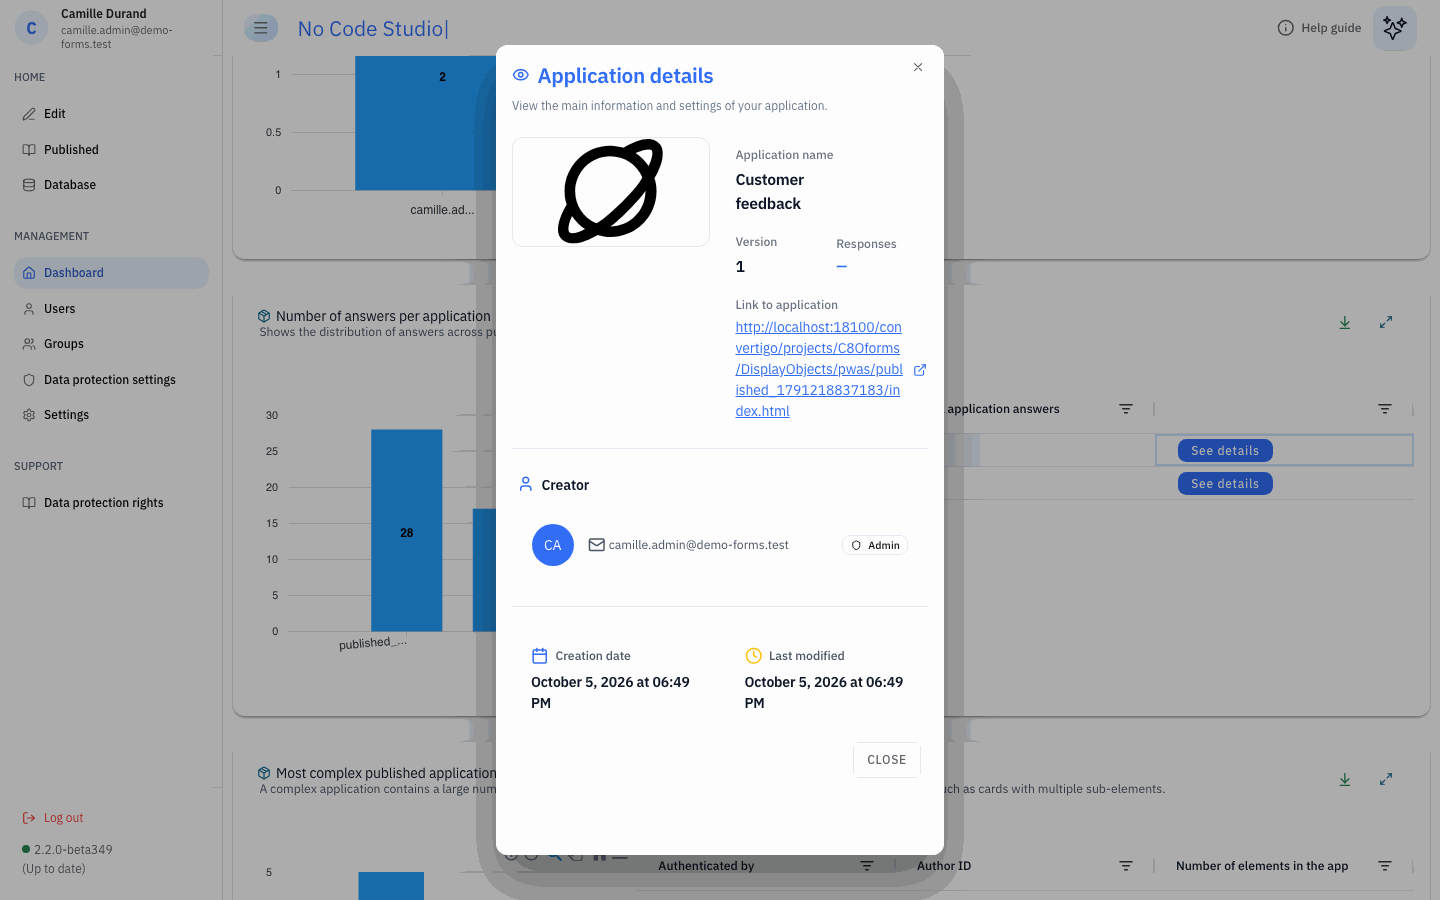
- Number of answers per application: responses per published application. See details opens the application details: name, version, link to the published application, creator, creation and last modification dates.
- Most complex published applications: number of elements per published application. A card counts its inner elements.
- Number of apps per creator with more than 5 published versions.
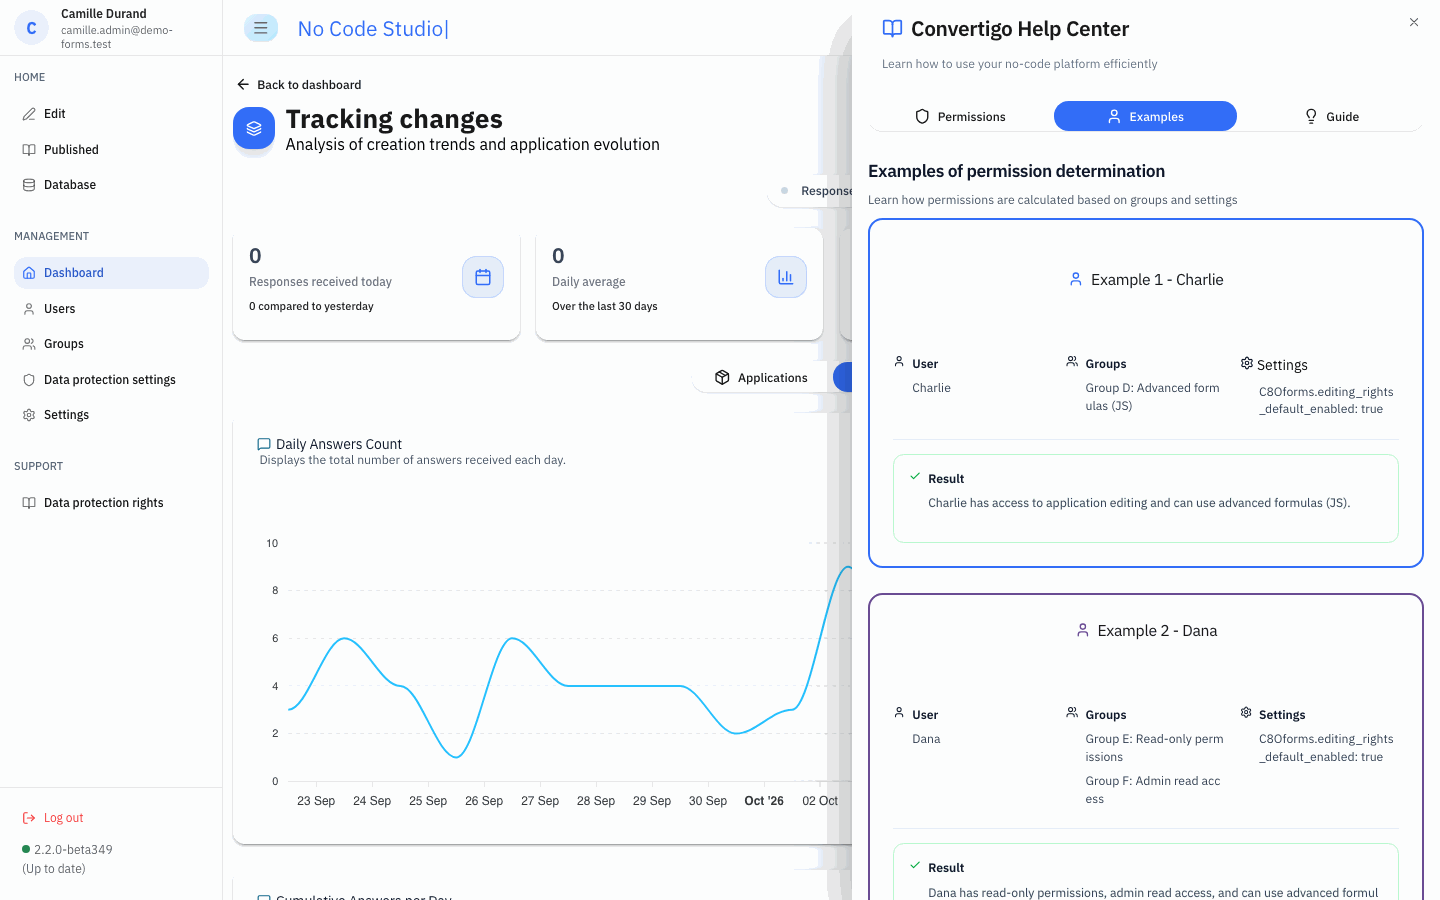
Tracking changes
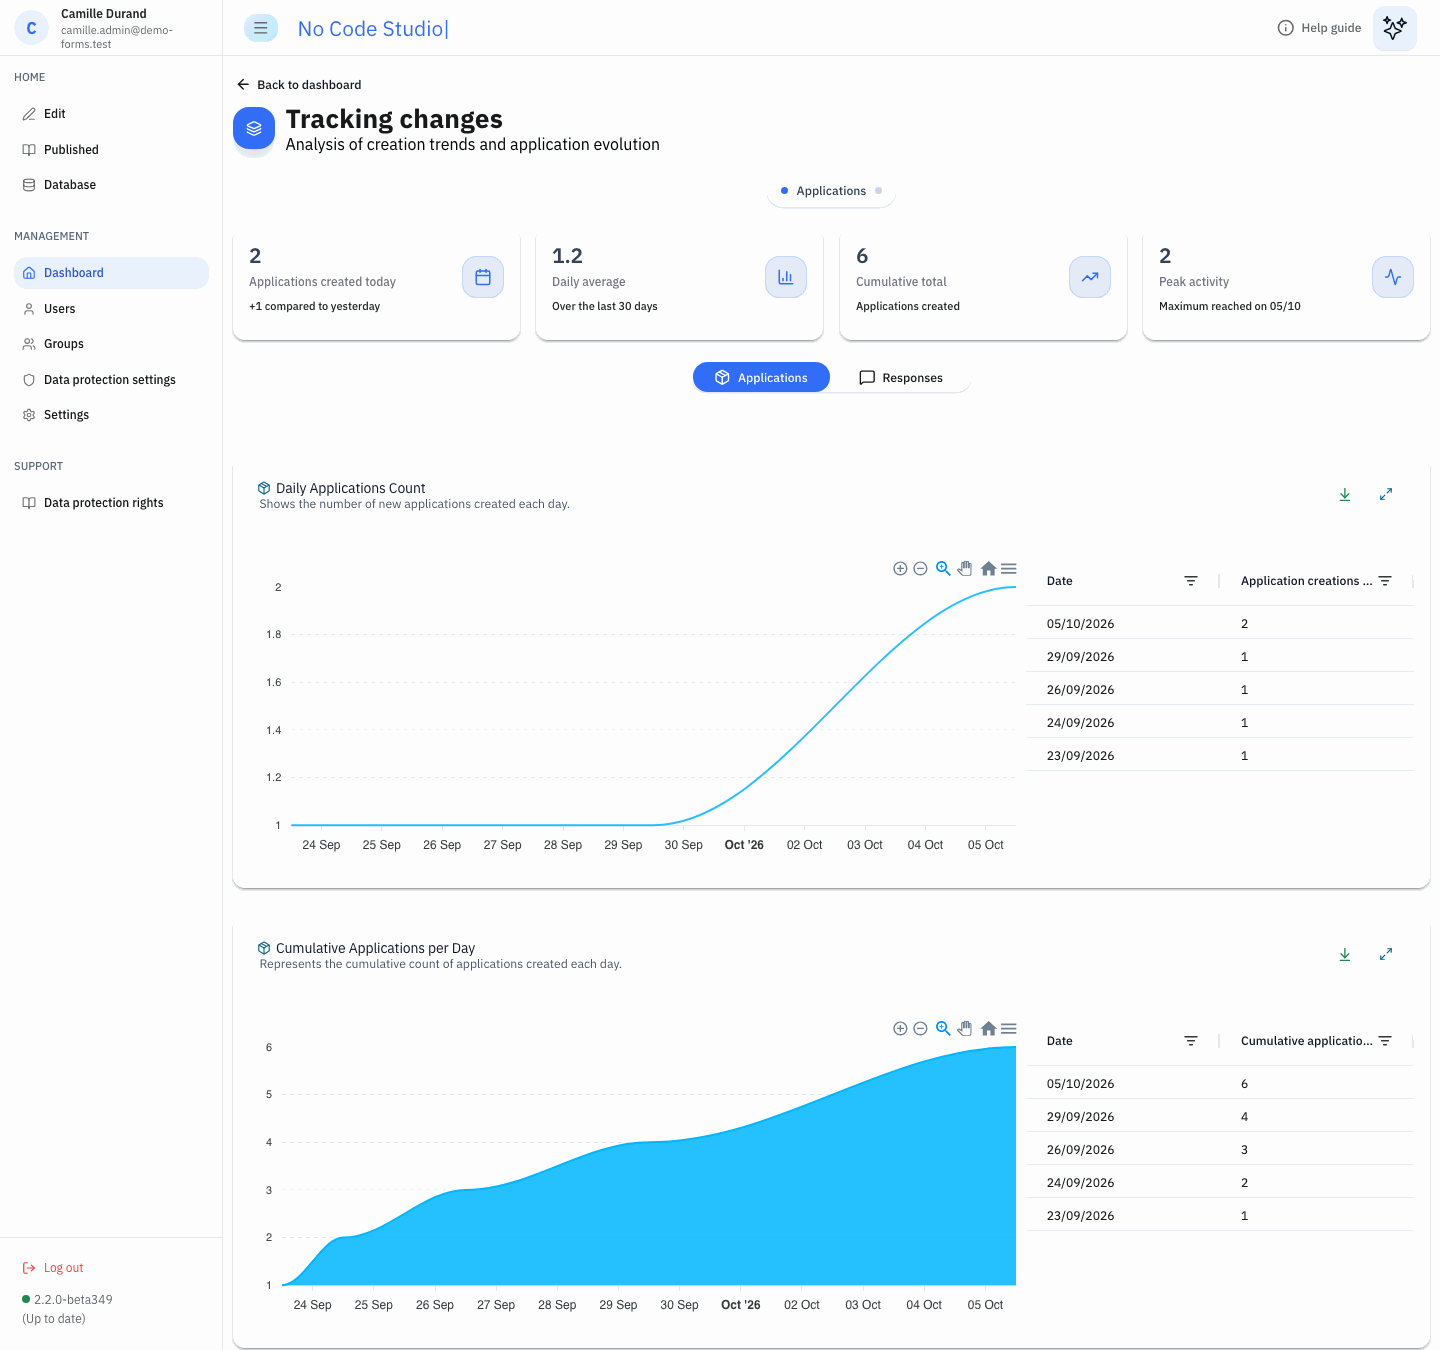
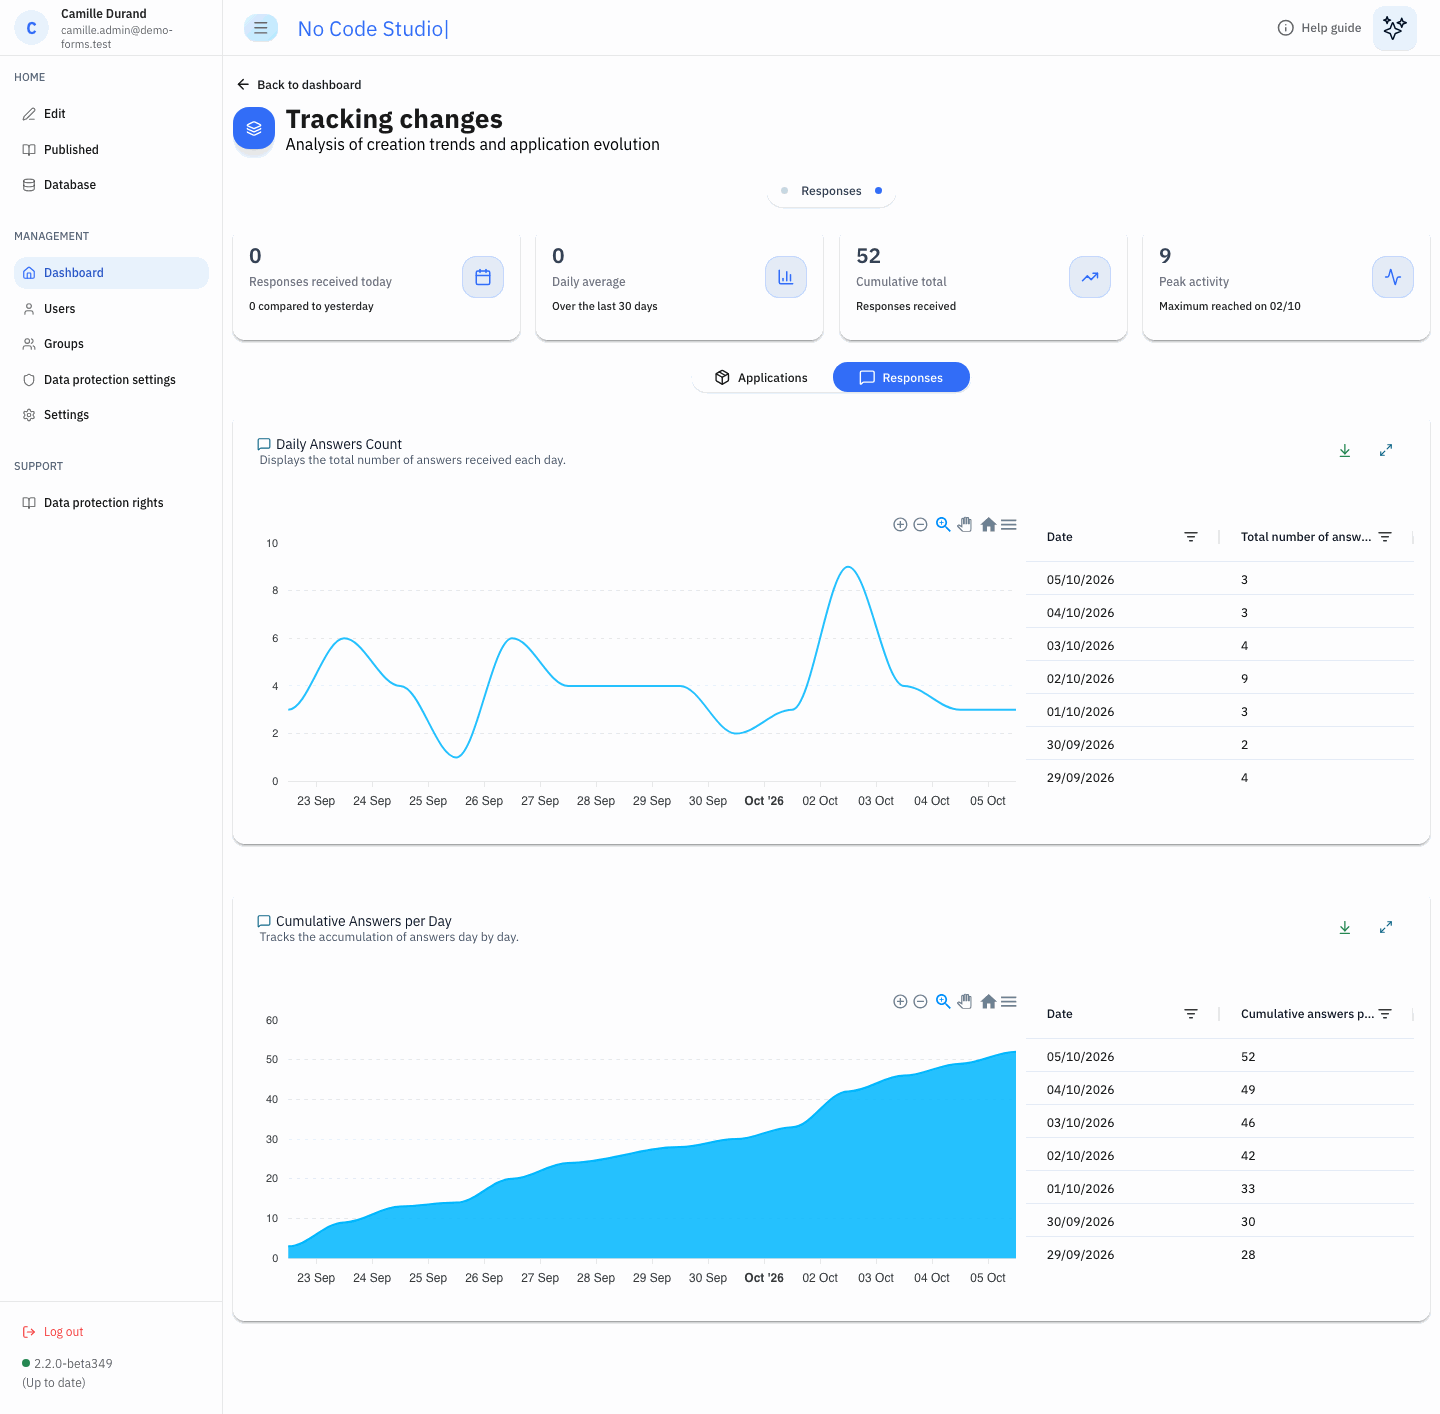
“Analysis of creation trends and application evolution”, with two tabs:
- Applications: applications created today (compared with yesterday), daily average over the last 30 days, cumulative total, peak day; charts Daily Applications Count and Cumulative Applications per Day.
- Responses: the same indicators for form responses; charts Daily Answers Count and Cumulative Answers per Day.
Help Center
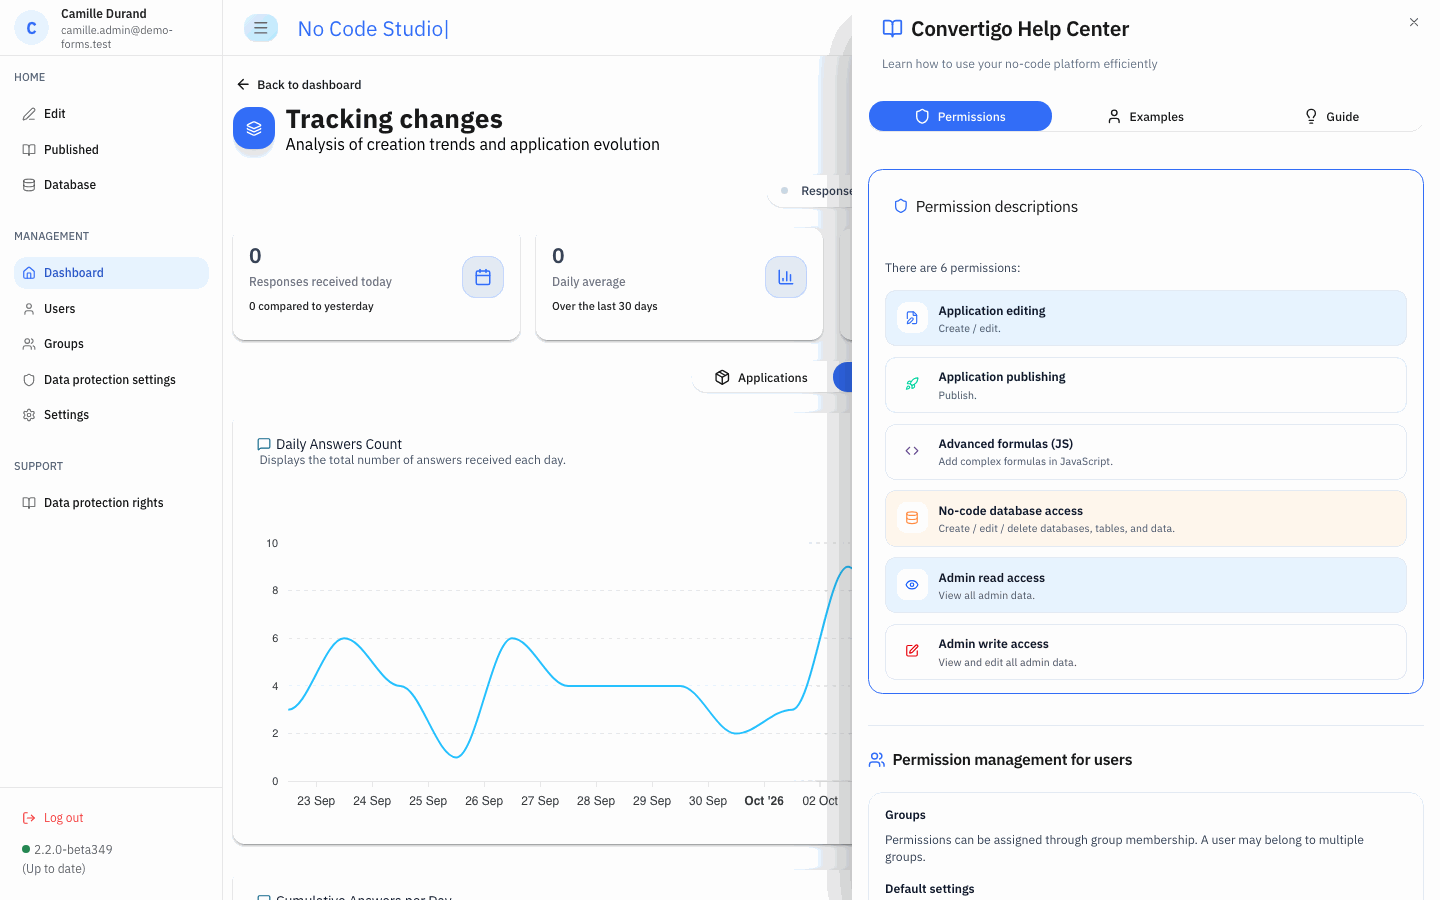
The Help guide button at the top of the Dashboard, Users, Groups and statistics pages opens the “Convertigo Help Center”:
- Permissions: description of the six permissions, groups and default settings;
- Examples: how permissions combine across groups and settings;
- Guide: quick start and shortcuts to the administration pages.
The default settings listed there use other symbol names than the ones read by the application: see Configuration.
Administrator features in the application list
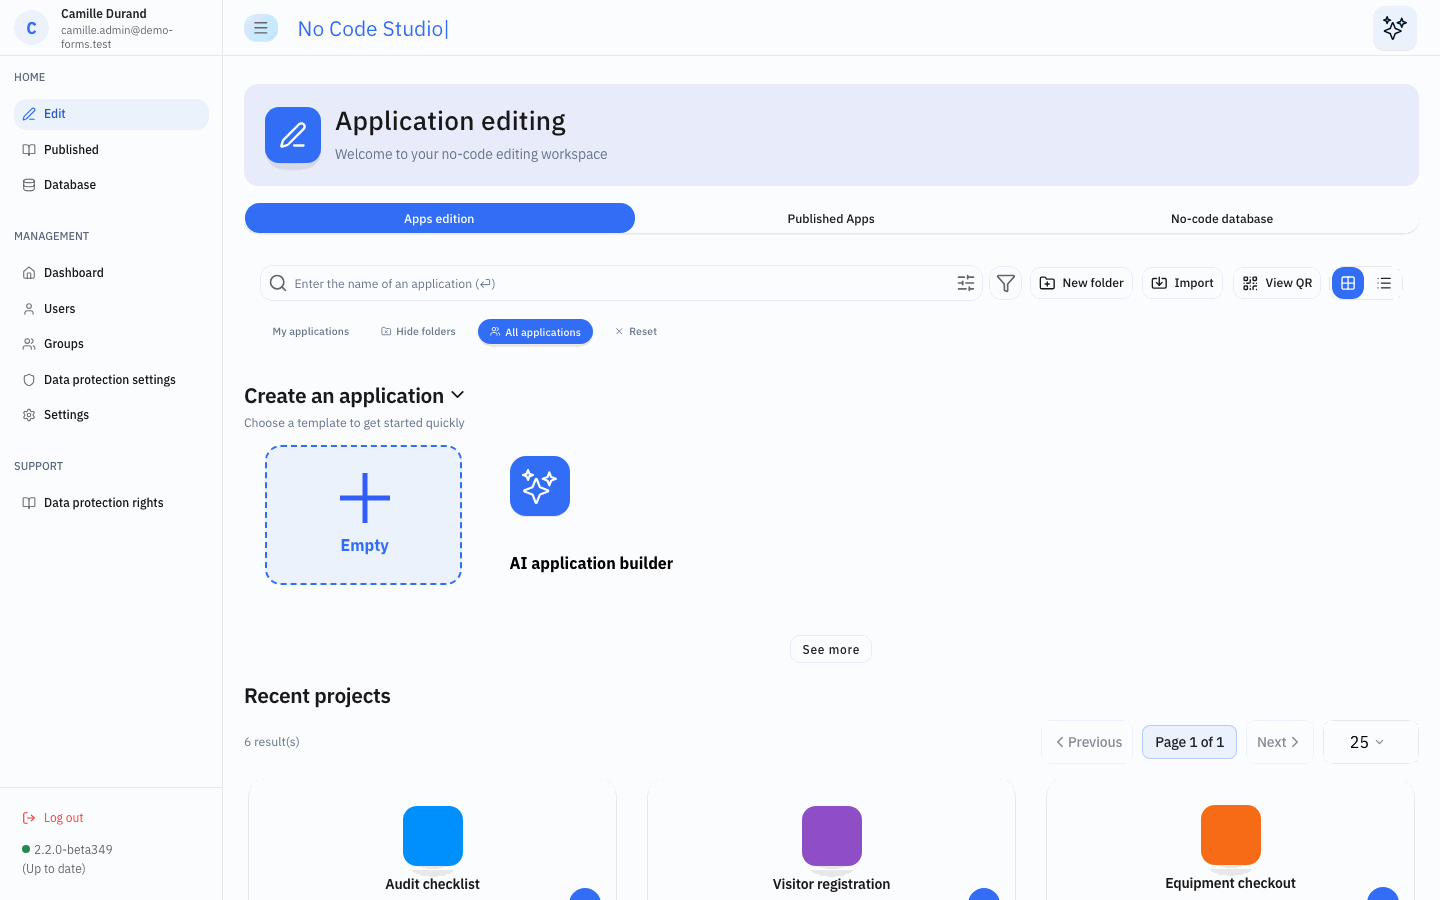
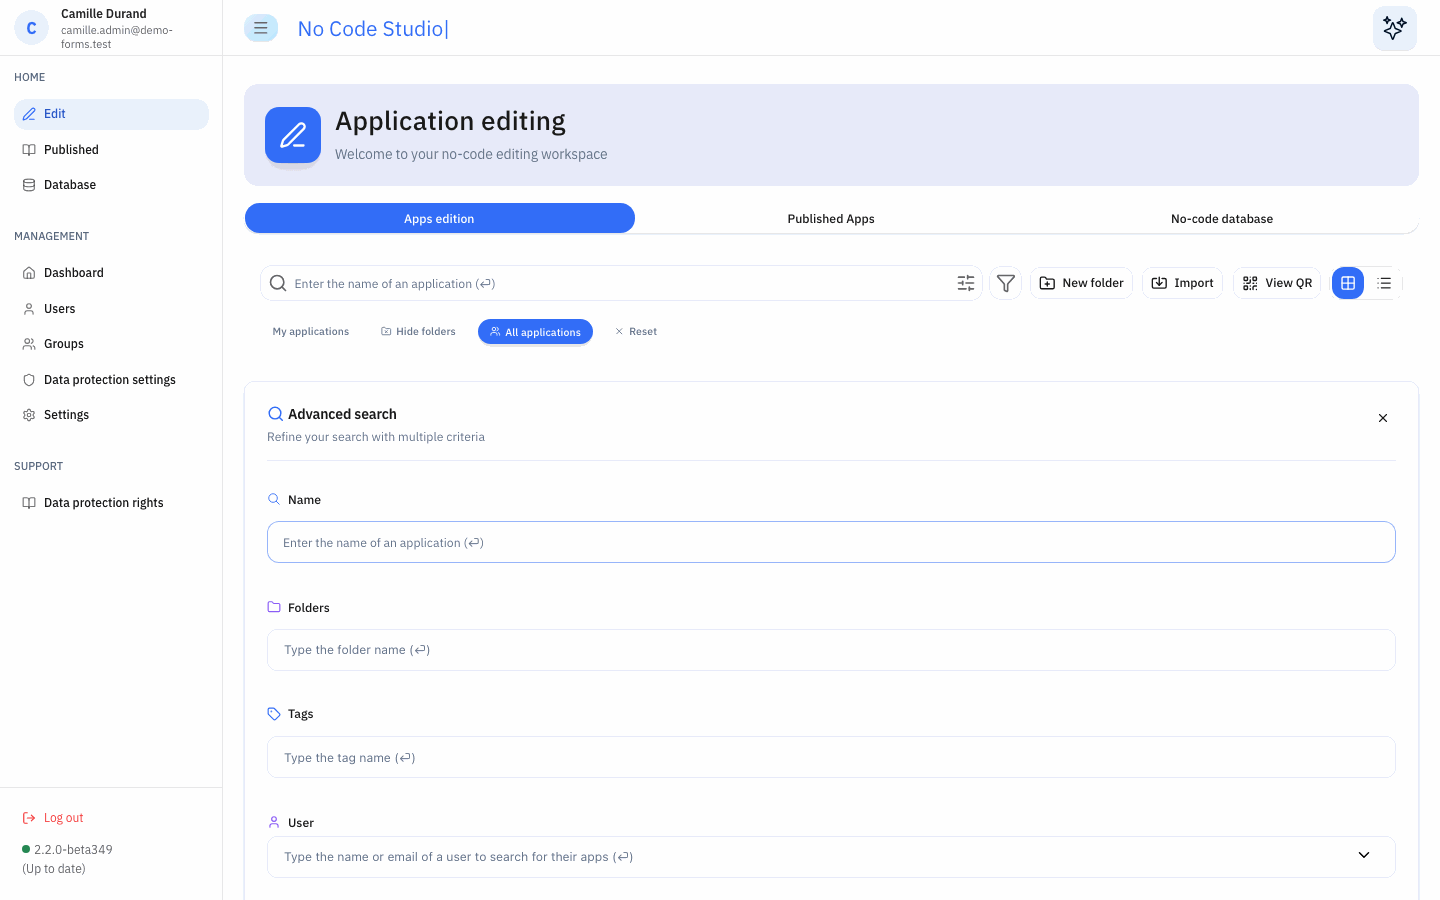
Outside the MANAGEMENT section, a full administrator also has these features in the application list (HOME > Edit):
- the All applications quick filter shows the applications of every user;
- the User field of the advanced search (“Type the name or email of a user to search for their apps”) shows the applications of one user;
- the ⋮ menu of any application offers all its actions (edit, publish, responses, CSV, access rights, delete), whoever owns it;
- the sharing dialog lists all groups.
Read-only administrators
A read-only administrator sees the MANAGEMENT section and can:
- read the Dashboard and the statistics pages, and download their CSV files;
- browse the Users and Groups pages, and view profiles;
- open the GDPR settings and preview the page.
On the Users and Groups pages, the search, filter and selection tools are hidden. The New user, Create a group and ⋮ buttons remain, but the server refuses every change and the page shows an error, such as “Unable to update user.”. Saving the GDPR settings fails in the same way.
The All applications filter and the search by user show only the read-only administrator’s own applications.
Configuration (global symbols)
These Convertigo global symbols change the administration. Set them in the Global Symbols page of the Convertigo administration console. Other No Code Studio symbols (authentication, LDAP, OAuth) are described in Installing Convertigo No Code Studio Standalone.
| Symbol | Default | Effect |
|---|---|---|
C8Oforms.editing_rights_default_enabled |
true |
Default value of Application editing for users who do not have it set on their profile. |
C8Oforms.no_code_db_rights_default_enabled |
true |
Default value of No-code editing (database access). |
C8Oforms.formulas_default_enabled |
true |
Default value of Javascript editing. |
C8Oforms.publication_default_rights |
true |
Default value of Application publishing. |
C8Oforms.useGenericLDAP |
false |
true shows the source “LDAP” instead of “Active Directory”. |
C8Oforms.share.showAllGroups |
false |
true lists all groups in the sharing dialog for every user, not only for administrators. |
C8Oforms.GDRP-MENU, C8Oforms.GDRP-TOAST |
not defined | Legacy GDPR content. When defined, the GDPR editor is locked for that part. |
No symbol grants the administration permissions by default.
Notes and limitations
- Some labels are not translated and stay in French in every language: “Actions rapides” on the Dashboard; “Utilisateur”, “Administrateurs” and “utilisateurs sélectionnés” on the Users page; “membres” and “sélectionnés” on the Groups page; the options of the “Add to a group” dialog.
- The Help Center names the default settings
C8Oforms.publishing_rights_default_enabled,C8Oforms.advanced_formulas_default_enabled,C8Oforms.nocode_database_default_enabled,C8Oforms.admin_read_rights_default_enabledandC8Oforms.admin_write_rights_default_enabled. The application reads the symbols listed in Configuration; the two administration symbols do not exist. - Permission changes apply to a user at their next page load.
- Administrators cannot set a user’s password: No Code Studio users set it from the e-mail sent at creation, or with “Password forgotten?” on the sign-in page.
- The user and group lists cannot be exported; CSV export is available on the statistics panels.
- The administration sequences (
admin_*) check the administrator permissions on the server; the read sequences also accept read-only administrators.