Convertigo Platform enables collaborative development and DevOps operations using Continuous Integration techniques. DevOps is usually a set of tasks that can be described this way :
Coding : code development and review, source code management tools, code merging.
Convertigo enables coding using Low Code technologies. You can have more information on collaborative development & source control / code merging here.
Building : continuous integration tools, build status.
On Convertigo platform building can be made manually or using Continuous integration tools. More information on this here.
Testing : continuous testing tools that provide quick and timely feedback on business risks
Packaging : artifact repository, application pre-deployment staging.
On Convertigo platform application packaging is done using the .CAR (Convertigo ARchive) format. This can be done manually by simply exporting a project from studio , or using Continuous Integration. see here.
Releasing : change management, release approvals, release automation.
On Convertigo platform, release is simply done by deploying projects on a Convertigo server. This can be done manually using the studio’s deploy menu or by using Continuous Integration as described here.
Configuring : infrastructure configuration and management, infrastructure as code tools.
On Convertigo platform, configuration and environment settings is done via the Administration console. More information on this here.
Monitoring : applications performance monitoring, end-user experience
On Convertigo platform, performance monitoring is done via the Administration console. More information on this here.
Collaborative development
Convertigo Platform host Application and API describes in Convertigo projects.
Projects are isolated folder containing Low Code objects descriptions and application resources.
Low Code objects descriptions are based on YAML format: it’s human readable and VCS friendly. The Studio is shipped with a Git plugin, the most used VCS today.
Importing git projects
You can retrieve a Convertigo project with any standard git client.
This is the way to import a project using a git URL. We consider the project starts at the git repository root.
The simplest way is to use the Import project button form the Project view toolbar:

This wizard Clone and Import at once:
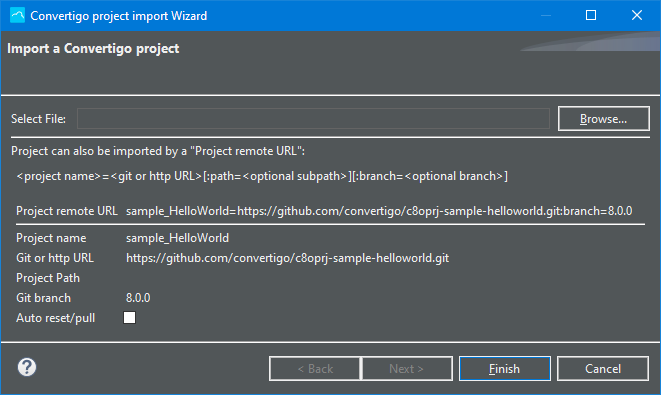
- The Project name have to be known. If you do not know this name, you can view the c8oProject.yaml file in the Git Repository and look at the head of the file:
↑convertigo: 8.0.0.m006
↓projectName [core.Project]:
The project name is at the 2nd line, in this case ‘projectName’
- Git or http URL can be a
git://or ahttp(s)://URL of the repository. - The Project Path is needed if the Convertigo project isn’t at the repository root, to specify its sub folder.
- The Git branch allows to specify the branch to clone. If not specified, the default repository branch is used.
- The Project remote URL is the contraction of all previous settings in one String and can be used to be shared easily.
Once the Finish button pressed, the repository is automatically cloned into
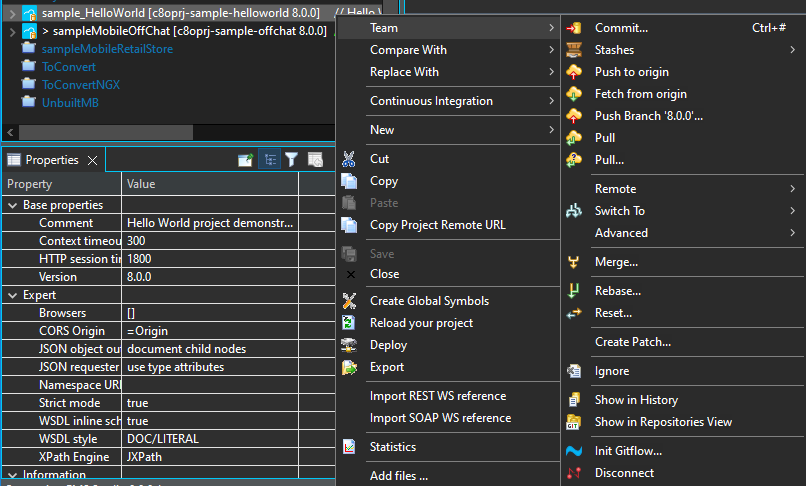
The project is linked to the repository. You can see it thanks the project icon decoration and all options available inside the Team menu:
Using the Staging & Commit views
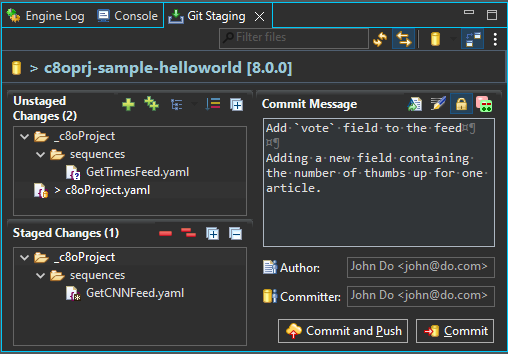
After modification done and saved in your Convertigo project, the Git Staging view shows current modifications. Files with ? are new, with > are modified and with x are deleted.
-
The unstaged part contains modified files since the last local repository state. They have to be reviewed and moved to the Staged Changes part, using drag-n-drop or menu.
-
The Staged Changes part contains file changes ready to be committed to the local repository.
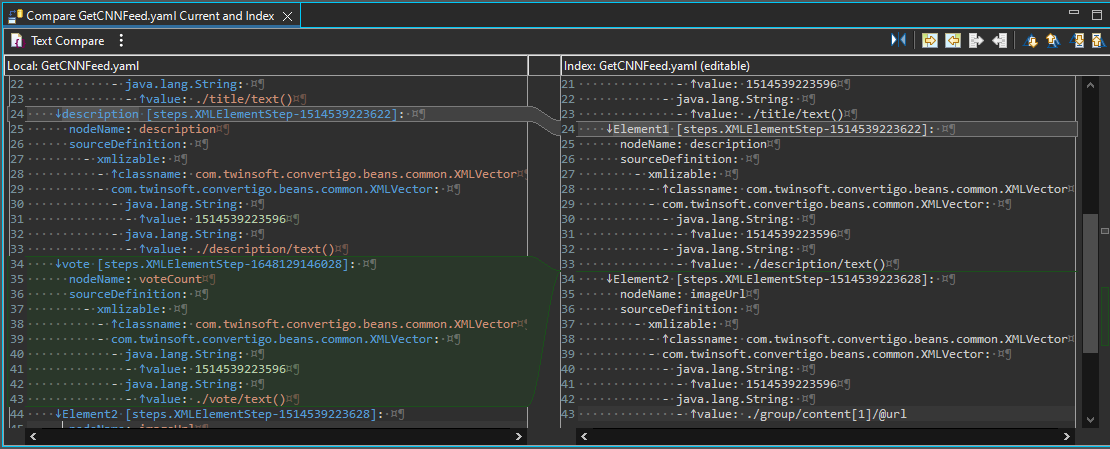
Using menu or double-click, you can compare changes for a given file, with a side-by-side comparator. Convertigo objects properties are human readable in the YAML format and you can check your change is really here:
Once all needed files validated in the Staged Changes part and comment added, you can Commit (local) and eventually Push (to remote) your modifications.
Take care to stage the c8oProject.yaml and other yaml listed because they refer each other. If you miss it, you could commit orphan code.
Don’t forget, a commit is local and have to be pushed to the remote git repository, so use the Push button or the option from the project menu.
Sharing git project
If you start a new project or have an existing one, you can share it with git using the Convertigo Studio.
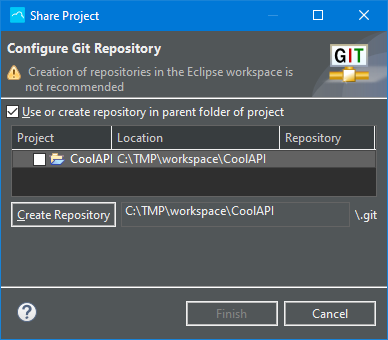
First, you have to create a local repository. Open the right-click menu on your project and select Team > Share Project….

A wizard opens. You have to check Use or create repository in parent folder of project, focus your project bellow then press the Create Repository button and finally the Finish button.
Your are ready for the initial commit. Write a comment and stage all your project files. A recommended .gitignore is ready to skip unnecessary files and folders.

Before pushing your project, you have to create a git repository (github, bitbucket, gitlab …) and copy the URL to your clipboard.
Click the Commit and Push button. The next wizard read the clipboard to initialize the git URL.
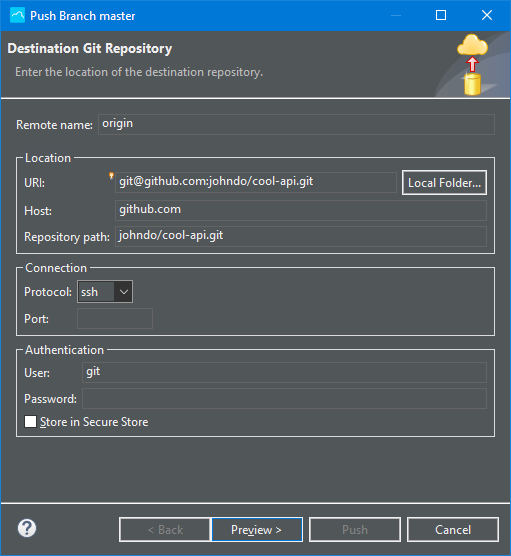
Click Preview > button and follow the wizard to the end. If successful, you can Fetch/Push your project with that remote repository.
Setting up gradle tasks
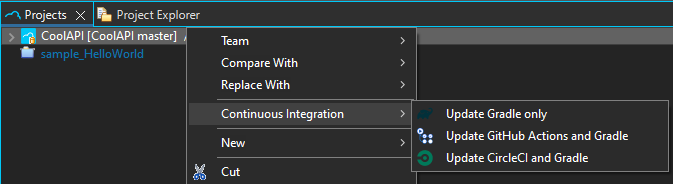
To enable Continuious Integration build, you have to add Gradle resources to your Convertigo project. Gradle is a tool use to build and to perform some tasks.
To integrate configuration files, do a right click on your project and inside the Continuous Integration menu you can choose Gradle files only, or also add configuration for GitHub Actions or CircleCI.
You can see Gradle files in the Project Explorer view:
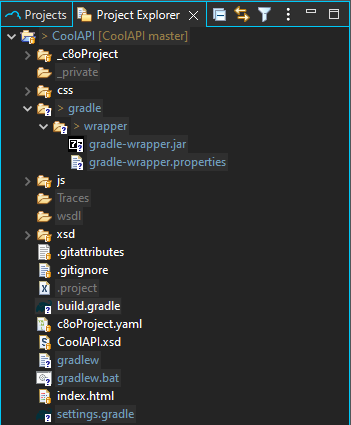
The build.gradle file is the key file to open. It’s self documented, with available options to be edited or used as command line arguments. See the online full version:

The project also contains gradlew. This is a standalone version of Gradle ready to use in your project.
It’s only need Java to be configured in your shell. It can be invocated in Window, Linux or MacOS.
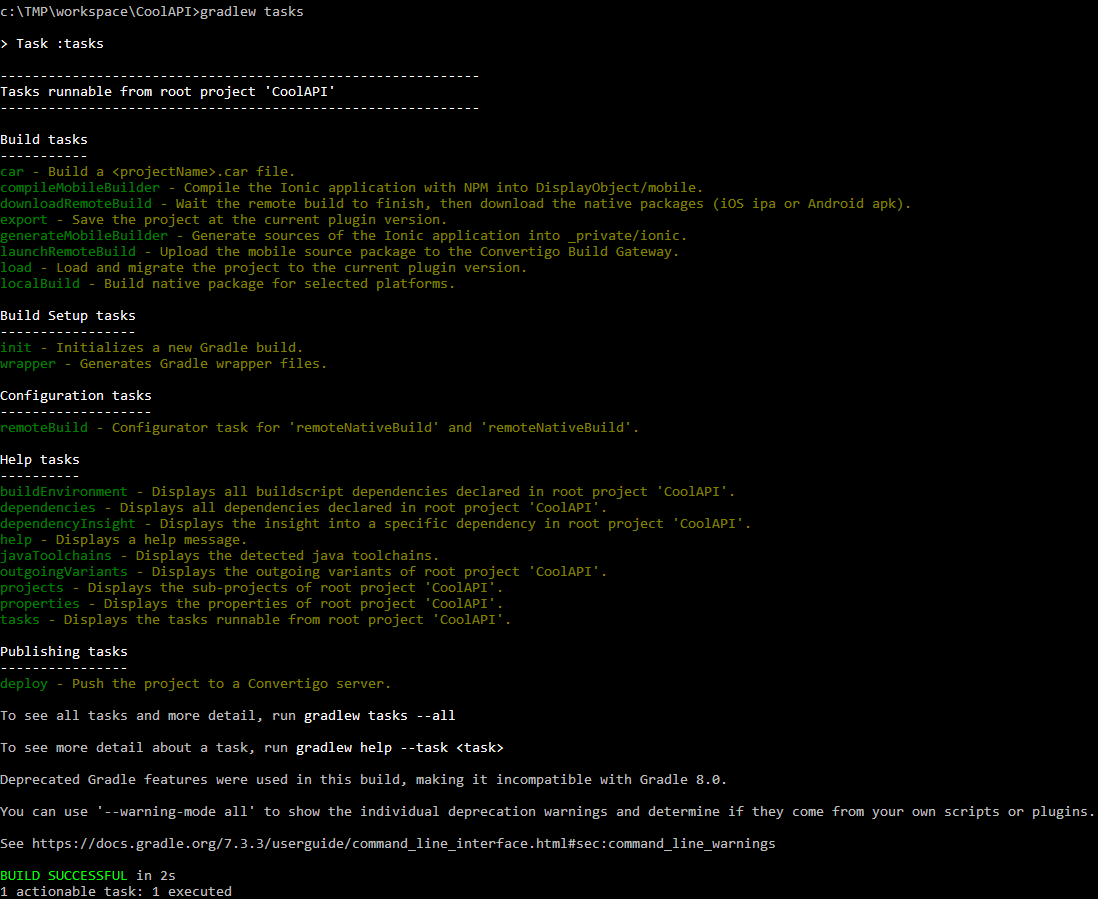
Here the command to list all available tasks:
Integrating in CI
Thanks to the Continuious Integration menu on a project, you can load template CI configuration for GitHub Actions or CircleCI.
GitHub Actions
GitHub Actions is the CI integrated with GitHub and share the same administration interface. Of course your git repository must be on GitHub.
Once Update GitHub Actions and Gradle from the Continuious Integration menu, the .github/workflows/main.yml file is created.
It can be edited from the Project Explorer view but it can be hidden the first time. You have to remove the filter to see file or folder starting with a dot.
Reveal the .github folder using the 3-dots menu and Filters and Customization... and uncheck the .* resources entry.
Now you can open and edit the .github/workflows/main.yml configuration file. See the online full version:
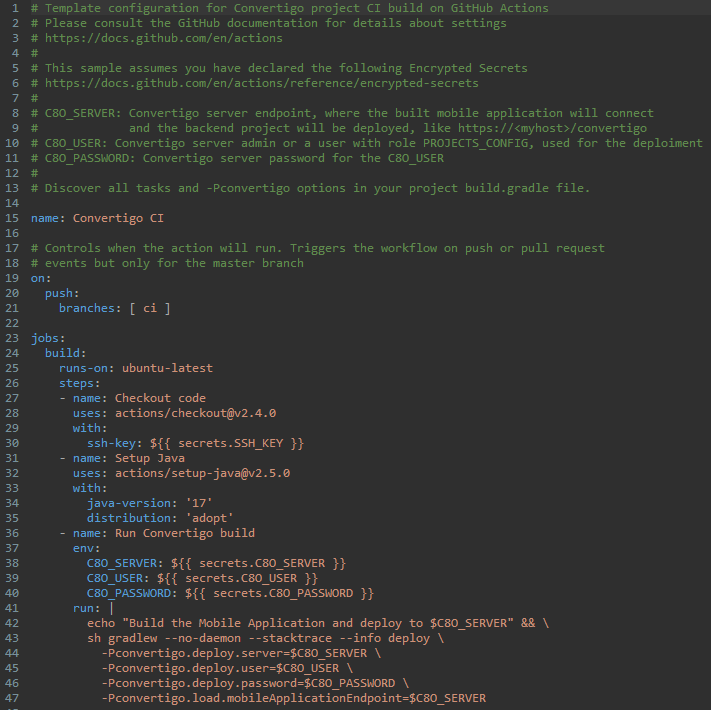
The file is self documented and must be edited.
Instead of putting your secrets like password in this file, you should configure them on your GitHub interface. See GitHub documentation about secrets here.
CircleCI
CircleCI is a popular CI. It can be configured with many git repositories.
Once Update CircleCI and Gradle from the Continuious Integration menu, the .circleci/config.yml file is created.
It can be edited from the Project Explorer view but it can be hidden the first time. You have to remove the filter to see file or folder starting with a dot.
Reveal the .github folder using the 3-dots menu and Filters and Customization... and uncheck the .* resources entry.
Now you can open and edit the .circleci/config.yml configuration file. See the online full version:
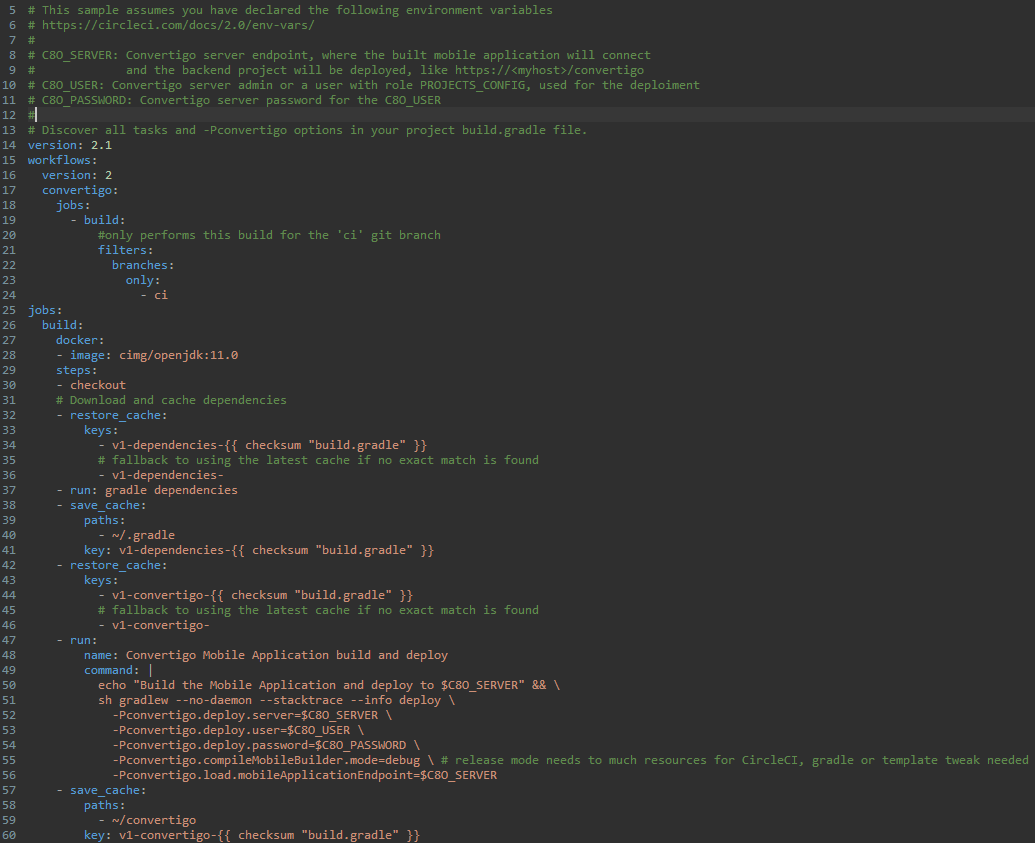
The file is self documented and must be edited.
Instead of put your secrets like password in the file, you should configure them on your CircleCI interface.
Other Continuous CI/CD Pipelines
This mechanism can apply to any other CI/CD platform such as Jenkins, AzurePipelines etc… They all work by using a configuration file you can add to you project. Read documentation about the CI/CD platform you wan to use to create this file and use the Convertigo Gradle commands to perform the tasks you need.
Building iOS & Android apps
If your project is configured with Gradle, it’s ready to build native mobile applications. The target Gradle task is localBuild.
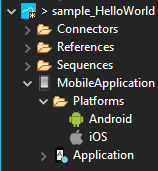
Your project must have one or many Platforms objects declared. New mobile projects are configured with an Android and an iOS platform:
Mobile builds are Cordova based. Each platforms have its configuration file that can be see through the Project Explorer view: DisplayObjects/platforms/<platform name>/config.xml.
All platforms can be built except iOS based platforms on a non-MacOS build host. You can restrict which platform to build using the -Pconvertigo.localBuild.platforms parameter or edit the value in the build.gradle:
gradlew localBuild -Pconvertigo.localBuild.platforms=[Android]
Android build
The default build mode is debug and doesn’t need signing configuration.
If you need a release build, enable this mode in the build.gradle or add the -Pconvertigo.localBuild.mode=release. You also have to configure your signing key.
You can use Android Studio to generate your signing key.
You will obtain a .keystore file, with a keystore password, a certificate alias and a certificate password.
All can be added to your build.gradle but for security reason, we recommand to add them to gradlew parameters and use secrets of your CI:
gradlew localBuild -Pconvertigo.localBuild.mode=release \
  -Pconvertigo.localBuild.androidKeystore=android.keystore \
  -Pconvertigo.localBuild.androidKeystorePassword=$ANDROID_KS_PASSWORD \
  -Pconvertigo.localBuild.androidAlias=MyAlias \
  -Pconvertigo.localBuild.androidPassword=$ANDROID_PASSWORD
iOS build
The default build mode is debug and you have to configure your signing key.
If you need a release build, enable this mode in the build.gradle or add the -Pconvertigo.localBuild.mode=release. You also have to configure your signing key.
Mac OS code signing must be configured for your CI. Configure Application signing with GitHub Actions.
Once configured, you have to configure Provisioning Profile file path and the __ iOS Sign Identity__.
gradlew localBuild -Pconvertigo.localBuild.mode=release \
  -Pconvertigo.localBuild.iosProvisioningProfile=ios.mobileprovision \
  -Pconvertigo.localBuild.iosSignIdentity="iPhone Developer"