General presentation of the Administration Console
Configure Convertigo Studio or Convertigo Server engine settings by using Convertigo Administration Console, a web application that is accessible online and through Convertigo Studio.
This section introduces you to Convertigo Administration Console:
Accessing the Administration Console
This section explains step by step how to connect to your Convertigo Administration Console. Convertigo Server administrators can access the Administration Console of the Convertigo Server’s engine. Developers can access the Administration Console of the engine embedded in their Convertigo Studio.
To access Convertigo Administration Console
As a Web application, Convertigo Server Administration Console is accessible through a Web browser. To access the Administration Console:
1. Launch a standard Web browser (Mozilla Firefox for example).
2. In the URL address field, type in the URL in the following format:

For example, to access a local Convertigo Studio or Convertigo Server administration:
- ConvertigoServer = localhost:18080 (or localhost:28080 for local server installation)
- ConvertigoAppName = convertigo
The result as seen in a Mozilla Firefox URL address bar:

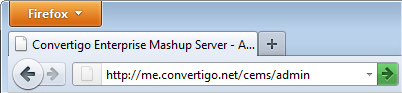
For example, to access a Convertigo Cloud administration:
- ConvertigoServer = me.convertigo.net
- ConvertigoAppName = cems
As seen in a Mozilla Firefox URL address bar:
When validating the URL, the Administration Console’s Authentication page opens. You have to be authenticated to access the Administration Console.
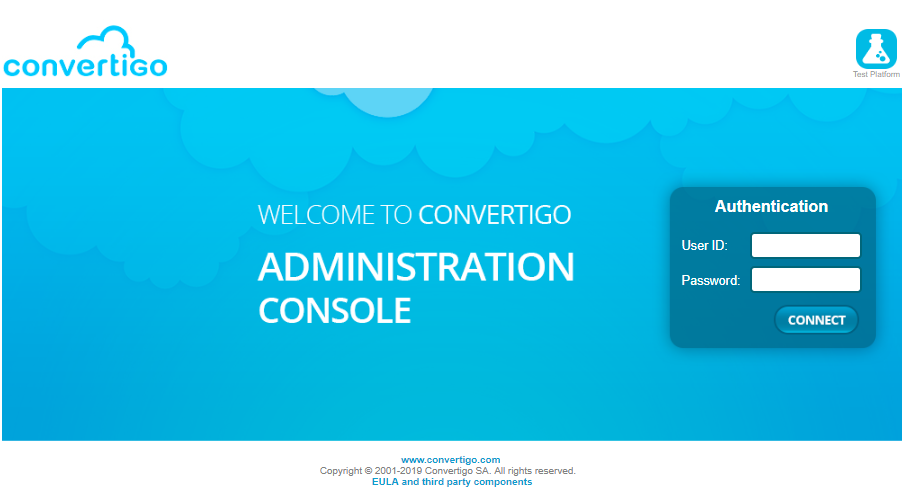
3. Enter the Convertigo Server login credentials in the User ID and Password fields.
For example, in case of a Convertigo Studio or a default Convertigo Server installation, default username/password is admin/admin. In case of a private Convertigo Cloud, credentials were delivered to you by email.
4. Click on the Sign in button or press Enter on your keyboard.
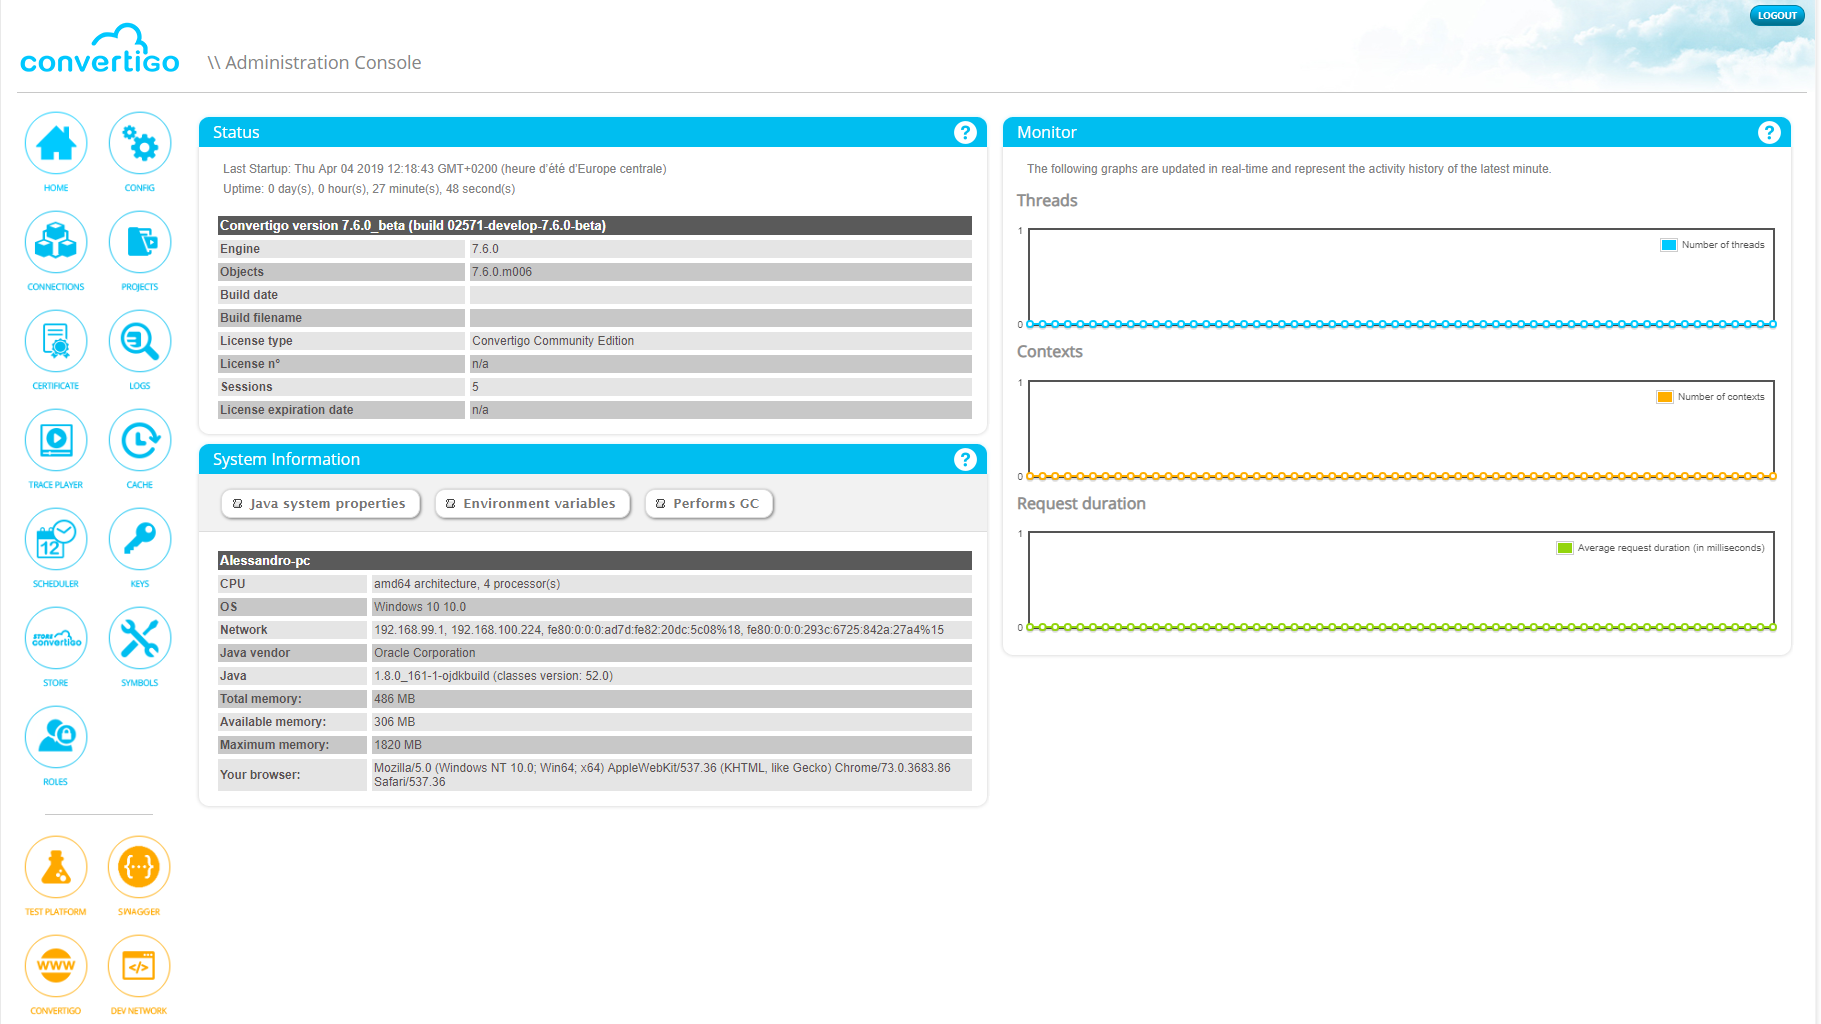
Once logged in, the Administration Console Home page opens:
Home page
The Administration ConsoIe Home page displays two main parts:
- the Left menu contains links to the Convertigo Server Administration pages and some external links are also present leading to the Convertigo website, the documentation, the Test Platform, etc.:

- and, a part to the right that contains three widgets:
- Status widget
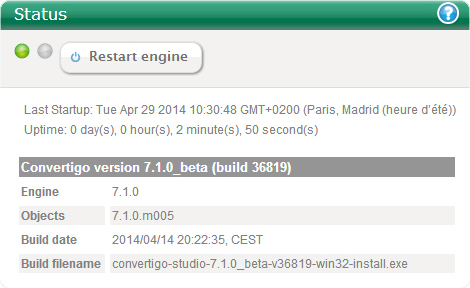
This widget provides you with information about the Convertigo engine, started or not, thanks to the two bullets (green/red) on the top of the widget.
It allows you to restart the Convertigo engine by pressing the Restart engine button.
Below, the widget displays information about the the starting time of the Convertigo engine, as well as versioning information about Convertigo, Convertigo build number, engine and objects. This information can be necessary to understand some situations and may be required in support cases.
- System Information widget
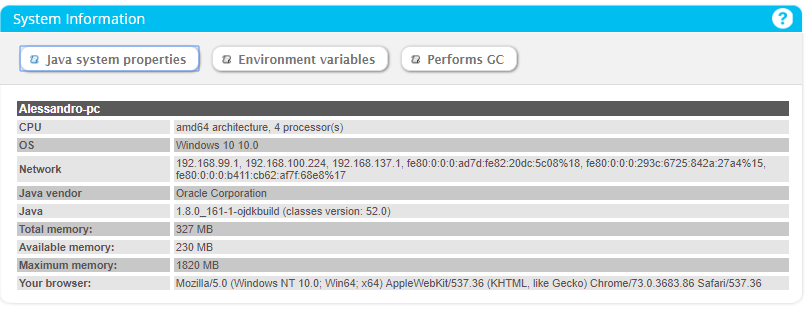
This widget presents the system properties of the host and the browser you’re using. You can also see details about Java properties in a pop-up by clicking on the Java system properties button.
- Monitor widget
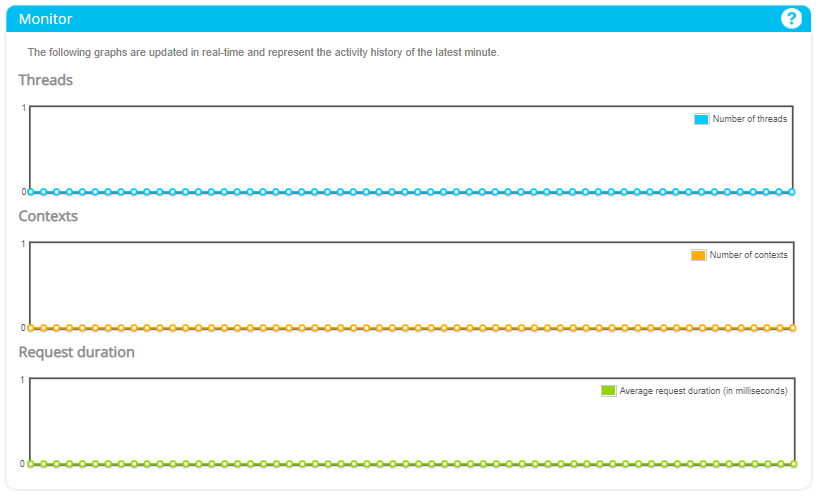
This widget shows the engine activity in real-time: the number of threads in activity, the number of active contexts and the average request duration.
What’s next
The following sections present information about the Administration Console pages that can be reached through the links on the Left menu.
For now, this documentation is not complete. Its content will be expanded soon.
Configuration
The Left menu contains a link to the Configuration page. This page enables configuring several settings of the Convertigo engine.
This section explains step by step how to access to the Configuration page, its categories, how to edit a Convertigo engine property, and presents the settings that can be configured on it, in the several tabs that compose the page:
- Configuration page
- Main parameters
- Accounts
- Logs
- Real-time activity monitoring
- XML generation
- HTML parser
- HTTP client
- Network
- Proxy
- SSL
- Cache
- Legacy Carioca portal
- Analytics
- Notifications
- Mobile builder
- Full sync
Configuration page
- Accessing the Configuration page
- Presentation of the Configuration page
- Using the Configuration page
Accessing the Configuration page
The following procedure explains how to access the Configuration page of the Convertigo Administration Console.
To access Configuration page in the Administration Console
- Follow the procedure To access Convertigo Administration Console to access Convertigo Administration Home page.
- Click the Configuration button on the Left menu:

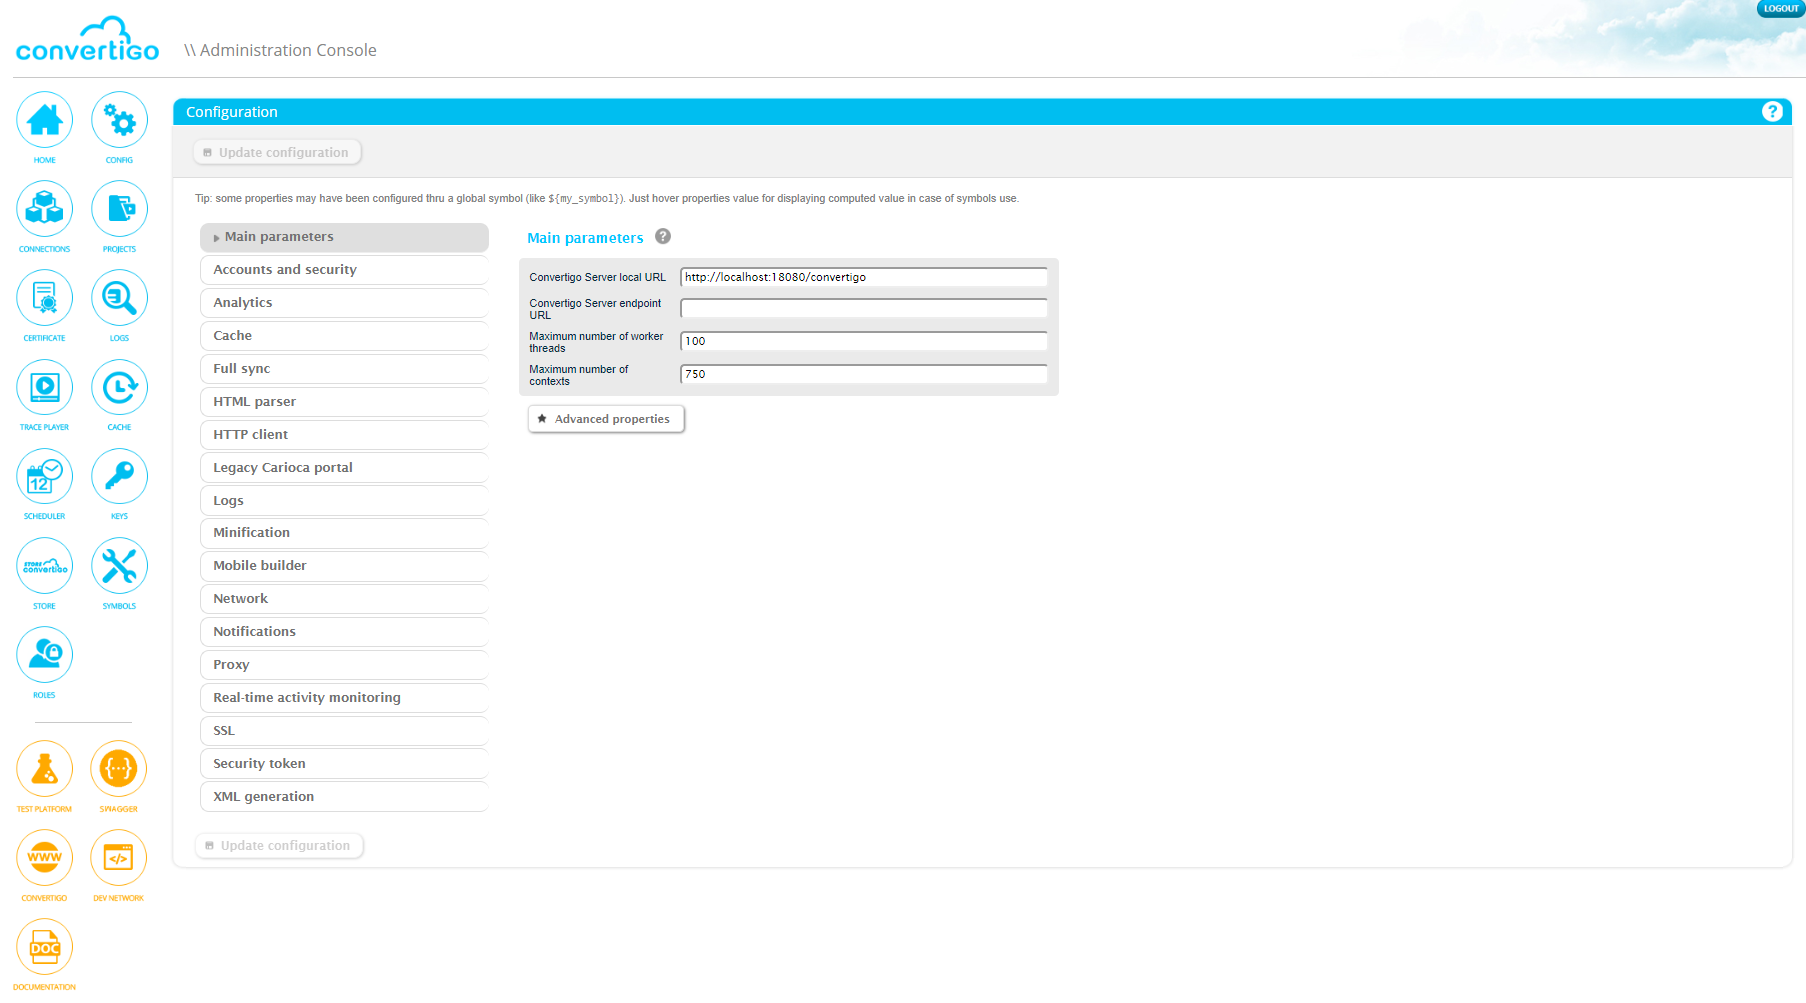
The Administration Console Configuration page opens:
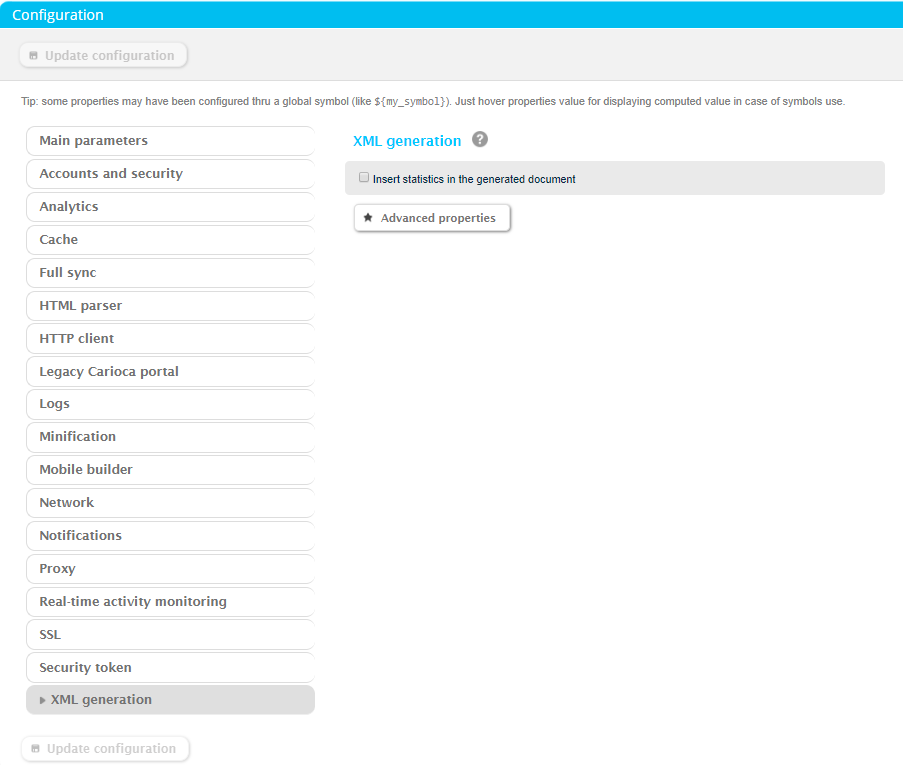
Presentation of the Configuration page
The Configuration page allows you to configure specific properties of the Convertigo engine, organized in categories. This page displays two main parts:
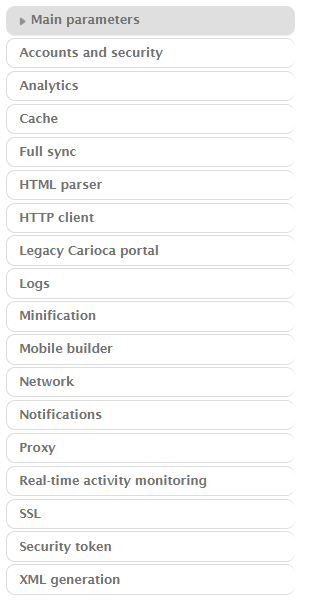
- the left part contains a list of tabs corresponding to configuration categories:
- and the right part contains the properties of the selected category tab (for example here the Main parameters tab properties) :
Using the Configuration page
The following procedures explain:
- how to access a configuration category with its editable properties,
- how to access the advanced properties of a category,
- how to edit a Convertigo engine property using the Configuration page.
To access a configuration category in the Configuration page
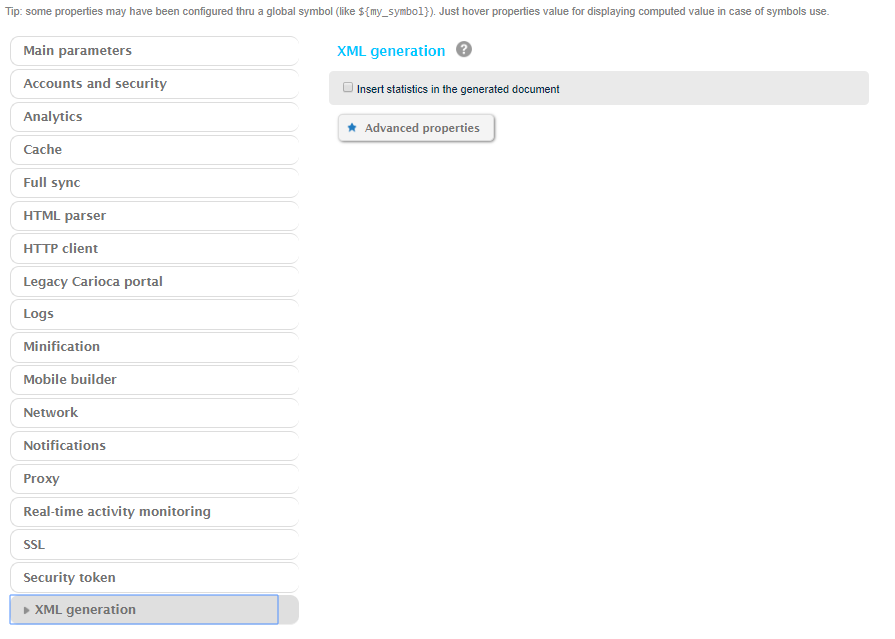
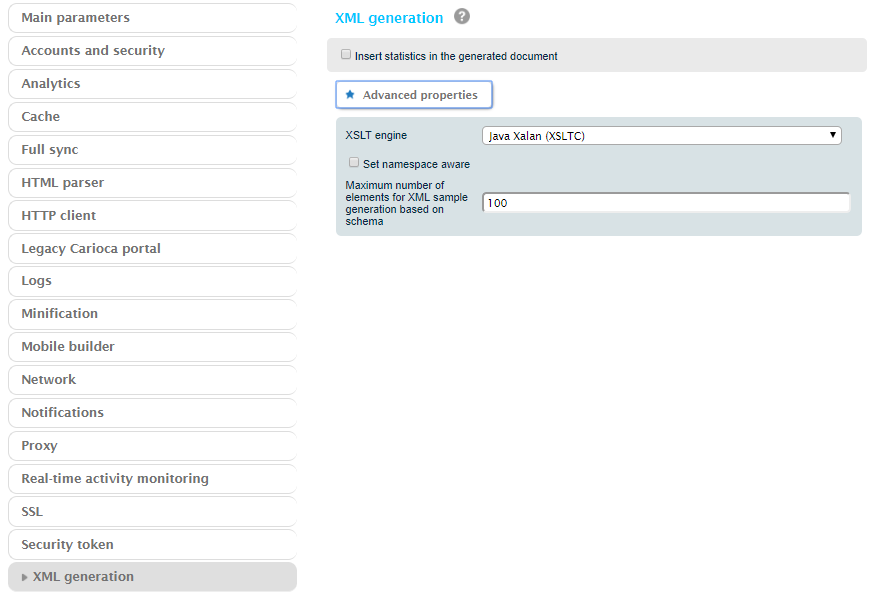
- In the left part of the Configuration page, click on the tab that corresponds to the needed category, for example here click on the XML generation category tab:
The corresponding properties are displayed on the right part of the page:
The next procedure explains how to access to the advanced properties of a category.
To access the advanced properties of a configuration category
- Access the appropriate category using the procedure To access a configuration category in the Configuration page.
- In the right part of the Configuration page, click on the Advanced properties button at the bottom of the category properties:
The advanced properties of the currently selected tab are displayed in a blue background area below the Advanced properties button:
The next procedure explains how to edit a Convertigo engine property in the Configuration page.
To edit a Convertigo Engine setting using the Configuration page
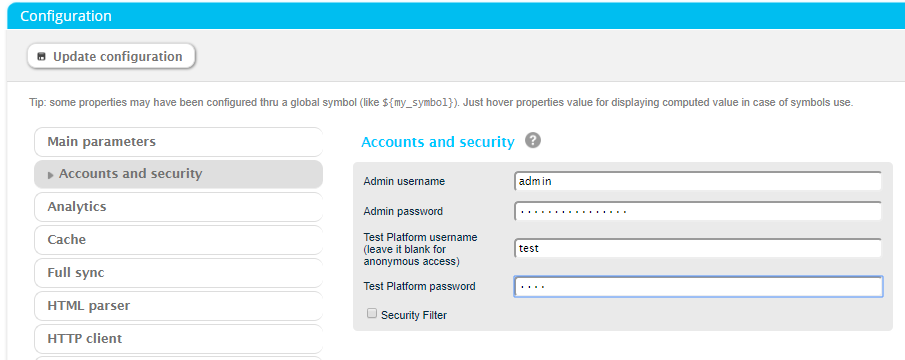
1. Access the category tab that contains the setting you need to change by following one of the procedures To access a configuration category in the Configuration page or To access the advanced properties of a configuration category. For example here let’s access the Accounts category:
The tab opens (for example here the Accounts tab):
2. On the right part of the Configuration page, change the value of the engine property you want to edit in the corresponding field. (For example here we add a Test Platform username and Test Platform password in the appropriate fields.)
3. Click on the Update configuration button located on the top (or bottom) of the Configuration page:
A pop-in appears to confirm that the new parameters have been taken into account:
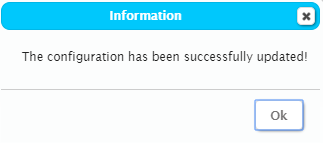
4. Click on the Ok button to close the pop-in.
The engine setting is updated. Beware that sometimes, the Convertigo engine needs to be restarted for the new property to be taken into account. This is specified on such properties documentation.
What’s next
The following sections present in details the tabs present in the Configuration page and the specific settings that can be configured on each tab.
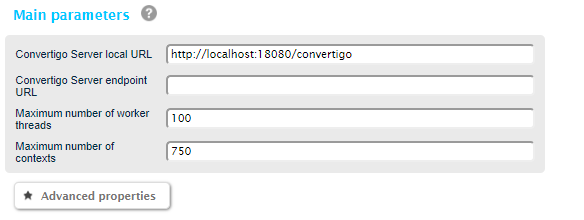
Main parameters
Edit your Convertigo Server main parameters in Main parameters tab. This tab can be opened by following the procedure To access a configuration category in the Configuration page.
This tab includes an Advanced properties section that can be opened by following the procedure To access the advanced properties of a configuration category.
In the Advanced properties section, configure the main advanced Convertigo configuration parameters.
Properties
- Convertigo Server local URL : local Convertigo Server URL, this URL informs Convertigo Server of its local access URL, including the domain or IP address of the server, and the listening port of the server (configured in the application server).
- This URL is used by several functionalities of Convertigo Server and it is very important that it is correctly configured, otherwise these functionalities would not work correctly (for example: Call Sequence or Call Transaction steps not using internal invoke, Scheduler, WSDL generation, etc.). This URL should be configured at the end of the Convertigo Server installation.
- In case of Convertigo Studio, this URL is used in addition to define the listening port of the embedded server, as well as for the transaction or sequence executions using the “Execute” functionality.
- Convertigo Server endpoint URL : public Convertigo Server URL, this URL informs Convertigo Server of its external access URL, including the domain or IP address of the server, and the listening port of the server (configured in the application server).
- This URL is used by the SiteClipper to compute the right full links.
- Maximum number of worker threads : Maximum number of simultaneous worker threads Convertigo will open in the application server. Though there is no theoretical limit to this, some application servers seem to be unstable when too many worker threads are in use. Convertigo limits itself to prevent server collapse.
For every request sent to Convertigo, a thread of the application server (Tomcat by default) manages the request and transfer it to Convertigo. Convertigo engine creates a worker thread to execute the request. Once the request is performed, the worker thread is released and can be used again.
The arbitrary limit set with the Maximum number of worker threads property is never exceeded. When this limit is reached, every new request to Convertigo is rejected (the Convertigo engine throws an Exception) until a worker thread has finished performing its request and is available for a new one.
- Maximum number of contexts : Maximum number of simultaneous contexts Convertigo will create. This parameter allows the Convertigo server to protect itself from massive context creation policies. Too many contexts created in a server could lead to OutOfMemory errors, resulting in completely blocked server. Convertigo limits its number of contexts to prevent server collapse.
For every request sent to Convertigo, a context is created (or re-used if the request specifies a context name). Inside this context, a worker thread is created by Convertigo engine to execute the request.
Once the request is performed, the worker thread is released and can be used again by Convertigo engine, the context is not always released or re-used, it can remain open without requests to execute for a while (without worker thread working).
The arbitrary limits set with the Maximum number of worker threads and Maximum number of contexts properties are not managing the same objects. They are not reached at the same time nor in the same conditions. Depending on the projects and environments, one of these properties or both may be used.
When one of these limits is reached, every new request to Convertigo is rejected (the Convertigo engine throws an Exception) until a worker thread has finished performing its request or a context is destroyed and/or is available for a new request.
-
Git container (autoimport) : When a project is deployed to a Convertigo server, the server will check all the projects’s reference objects. It it finds in a reference a link to a git repository, he will clone the repository containing the referenced project and will import automatically the referenced project.
By default the project will be cloned in the workspace/git directory, but you can override this by modifying the property.
-
Enable XSRF protection for Administration Console : XSRF (Cross Site Request Forgery ) is a common attack used on web applications. You can protect your administration console by enabling this setting. The protection will be done by issuing a session life-time token that that the console will use each time it invokes and admin service.
-
Enable XSRF protection for projects : XSRF (Cross Site Request Forgery ) is a common attack used on web applications. You can protect your PWA and Web applications by enabling this setting. The protection will be done by issuing a session life-time token that that the Application will use each time it invokes and admin service.
Advanced properties
-
Product version check : Activated by default, this option enables the verification of Convertigo version number in projects that attempt to be deployed. This helps users not to deploy projects that were created in a greater version of Convertigo in an older version of Convertigo. Indeed, in this case, the projects may not be compatible, due to the add of objects or objects’ properties in the software, that an older version of Convertigo cannot handle. In the opposite case, a new version of Convertigo is always compatible with older version, that makes projects to be importable in newer version of Convertigo, possibly including an automatic migration of projects if need be.
-
Use the Java Thread.stop() method in order to finish threads : When a transaction or sequence timeout is reached, its thread is gracefully stopped. In some case, the transaction/sequence thread is locked (by reading blocking socket, or whatever) and cannot be gracefully stopped. Enabling this property allows Convertigo to use the deprecated Thread.stop() method in these cases to end the transaction/sequence thread.
-
(Linux only) Launch Xvnc server using DISPLAY environment variable at startup : On Linux operating systems, the HTML Connector and the Legacy Connector monitors need an X server. Convertigo uses the X server corresponding to the DISPLAY environment variable value. If there is no X server on this DISPLAY :
- if this property is set to true, an Xvnc server is launched on that DISPLAY
- if this property is set to false, the HTML connector is not available and a message is traced in log files
- (Linux only) Depth parameter for the Xvnc, default is 16 : Set the color depth of the Xvnc visual to provide, in bits per pixel. Must be a value between 8 and 32.
- (Linux only) Geometry parameter for Xvnc, default is 320x240 : Set virtual desktop width and height, in pixels.
- Time allowed for pool management task in seconds (-1 for disable) : This property defines the time in seconds allowed to the pool manager to start its contexts. If this time is reached, the pool manager does not start a new context and lets the context manager work before continuing its activities. Setting this property to -1 disables time checking: the pool manager starts all needed contexts before it lets the context manager work.
- Enable the compatibility mode for projects data (required for JSP usage); engine restart required : Activate this option if you need to use an old Convertigo project using JSP pages in a new Convertigo Server. Indeed, some old projects may have used specific code in JSP pages of the project, to deliver content and functionalities to the client application. Since Convertigo 5.0, the JSP pages usage in Convertigo has been replaced by a JavaScript framework named Convertigo Weblib.
- Use same JSESSIONID for sequences and steps : This option, activated by default, makes the sequence automatically re-use the client session cookie (JSESSIONID) of its context as its own JSESSIONID, used in contexts created by Call Transaction and Call Sequence steps. This is useful mainly when a context has to be maintained between several transaction calls.
- Add XML encoding charset for SOAP requests : This option, when activated, adds the following XML encoding charset declaration in client SOAP requests:
<?xml version="1.0" encoding="UTF-8"?>-
Throw HTTP 500 in case of unrecoverable servlet error : This option, activated by default, makes Convertigo Server return an HTTP 500 response to the requesting client when an unrecoverable servlet error occurs (no available pool, busy server, unable to connect to target resource, etc.). Unchecking this option makes Convertigo Server answer an HTTP 200 response containing the same content in such cases.
-
Hide detailed information in case of unrecoverable servlet error : When activated, this option makes Convertigo Server hide error information (the Java Exception stack trace, the detailed information of the error, etc.) where they can be displayed (engine logs, response XML, etc.) when an unrecoverable servlet error occurs (no available pool, busy server, unable to connect to target resource, etc.). This option is not activated by default.
-
Throw HTTP 500 in case of SOAP fault : This option, activated by default, makes Convertigo Server return an HTTP 500 response to the requesting SOAP client when a SOAP fault exception is thrown (by the project managing an error or by the Web service requester of Convertigo). Unchecking this option makes Convertigo Server answer an HTTP 200 response containing the same content in such cases.
-
Automatically performs a dated zip backup of replaced projects : This option, activated by default, makes Convertigo Server archive the deployed project version to a zip file with the date in the filename, next to a project folder, just before a new version deployed.
-
CORS Policy : This option, =Origin by default, makes Convertigo Server return the Access-Control-Origin header according to this setting for CORS requests. The value =Origin use the value from the request Origin header. It can be a specific host or many hosts separated by #. This property can be overridden by project using the CORS Origin project property.
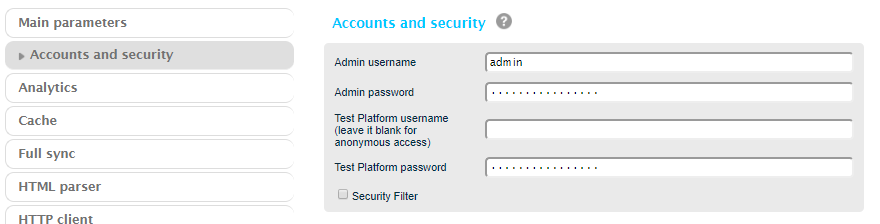
Accounts
Edit your Convertigo Server accounts in Accounts tab. This tab can be opened by following the procedure To access a configuration category in the Configuration page.
Two types of account are editable:
- the Administrator account: Enter the administrator’s username and password in the Admin username and Admin password fields. This account is used to access the Administration Console of the Convertigo Server. Default values are admin/admin.
- the Test account: Enter the tester username and password in the Test Platform username and Test Platform password fields. This account is used to access the Test Platform of projects running in the Convertigo Server. Leaving the username field blank deactivates the Convertigo tester account for authentication process (anonymous access).
Advanced properties
2 other fields can be used to customize password validating policy when changing the admin or testplatform account and also accounts for the Roles part.
Logs
Control your log settings under the Logs tab. This tab can be opened by following the procedure To access a configuration category in the Configuration page.
This tab includes an Advanced properties section that can be opened by following the procedure To access the advanced properties of a configuration category. In the Advanced properties section, configure the advanced log settings.
More information about log management is coming soon.
Real-time activity monitoring
Edit your real-time monitoring settings under the Real-time activity monitoring tab. This tab can be opened by following the procedure To access a configuration category in the Configuration page.
Two options are available in this tab:
- Display running connectors in monitor of Legacy connectors : When activated, this option displays a graphical rendering of the legacy connectors currently in use in the active contexts of the Convertigo Server, in the Legacy connectors monitor.
- Trace in logs the screen dumps of the running Legacy connectors : When activated, this option makes a text screen dump of each mainframe screen Convertigo detects in the legacy connectors currently in use in the active contexts. These screen dumps are output in context logger, it only works when context logger is activated at minimum INFO level.
XML generation
Edit the parameters of XML generation of the transactions and sequences results in XML generation tab. This tab can be opened by following the procedure To access a configuration category in the Configuration page.
This tab includes an Advanced properties section that can be opened by following the procedure To access the advanced properties of a configuration category.
In the Advanced properties section, configure the advanced parameters of XML generation of the transactions and sequences results.
Properties
- Insert statistics in the generated document : This option, when activated, adds statistics about the time of execution of the transaction or sequence in the output response. These statistics, which data accuracy is not guaranteed, are :
- inserted as a commentary into the response (the syntax depends on the requester: XML, SOAP, etc. and are not available some times: for JSON requester for example)
- and are visible only when calling the transaction or sequence from a client (not visible in Studio execution).
Advanced properties
- XSLT engine : This option allows you to choose an XSLT engine used by Convertigo Server to perform the XSL transformations of the XML responses of transactions or sequences that are bound to a stylesheet.
HTML parser
Edit the parameters of the HTML parser, based on Mozilla XULRunner, in HTML parser tab. This tab can be opened by following the procedure To access a configuration category in the Configuration page.
This tab includes an Advanced properties section that can be opened by following the procedure To access the advanced properties of a configuration category. In the Advanced properties section, configure the advanced parameters of the HTML parser, based on Mozilla XULRunner.
Properties
- Max connections (from 1 to 65535) : This preference limits the total number of HTTP connections Convertigo can open using XULRunner. If more connections are needed, they are queued until a connection “slot” is available. This preference takes values between 1 and 65535 inclusive.
- Max connections per server (from 1 to 255) : This preference limits the total number of HTTP connections Convertigo can make using XULRunner to a single server. If more connections are needed, they are queued until a connection “slot” is available. This preference takes values between 1 and 255 inclusive.
- Max persistent connections per server (from 1 to 10) : This preference limits the total number of HTTP keep-alive connections Convertigo can make using XULRunner to each site, if a proxy server is not configured. If more connections are needed, they are queued until a connection “slot” is available. This preference takes values between 1 and 10 inclusive.
- Override User-Agent : This option defines a user-agent string to replace the standard XulRunner user-agent, which is for example: Mozilla/5.0 (X11; U; Linux i686 (x86_64); en-US; rv:1.9.0.17), with “X11; U; Linux i686 (x86_64)” being a variable part depending on the operating system.
Advanced properties
- Override Accept-Language header : This option defines an accept-language header value to replace the standard XulRunner accept-language header value, which is for example: en-us,en;q=0.8,fr-fr;q=0.5,fr;q=0.3.
- Allow image : General parameter that enables or disables the Image rendering property of the browser. This value can be overridden using a Browser property change statement in HTML transactions.
- Allow plugin : General parameter that enables or disables the Plugin feature property of the browser. This value can be overridden using a Browser property change statement in HTML transactions.
- Check cache validity (false could increase latency) : This preference defines how often to check for a new version of a cached page. Default value is true, meaning it checks for a new version when the cached page is out of date. If set to false, checking for a new version of a page is done once per session (a session starts when the first application window opens and ends when the last application window closes).
- Enable screen rendering during parse (should be disabled) : This preference defines whether the application will interrupt parsing a page to respond to UI events. If true, parsing can be interrupted to process UI events. Default value is false, parsing cannot be interrupted, the application will be unresponsive until parsing is complete.
- XulRunner path : This preference allows you to change the XULRunner used by Convertigo (should never be changed except for very advanced users).
- XulRunner work directory : This preference allows you to change the XULRunner working directory (should never be changed except for very advanced users).
HTTP client
Edit the parameters of the HTTP client in HTTP client tab. This tab can be opened by following the procedure “To access a configuration category in the Configuration page”.
- Maximal number of HTTP connections (from 1 to 65535) : This preference limits the total number of HTTP connections Convertigo can open using HTTP client. If more connections are needed, they are queued until a connection “slot” is available. This preference takes values between 1 and 65535 inclusive.
- Maximal number of HTTP connections per host (from 1 to 255) : This preference limits the total number of HTTP connections Convertigo can make using HTTP client to a single server. If more connections are needed, they are queued until a connection “slot” is available. This preference takes values between 1 and 255 inclusive.
Network
Edit the network parameters in Network tab. This tab can be opened by following the procedure “To access a configuration category in the Configuration page”.
- Use DNS reverse search for finding host names : If checked, this option makes Convertigo perform reverse DNS checks on client IP addresses. Resolved client names will then be used along with IP in log files and Connections page.
- Maximum allowed size of a complete multipart request (in bytes). Value -1 indicates no limit : This parameter allows to define the maximum allowed size of a multipart request to Convertigo, in bytes. Default value is -1, indicating that the request size is not limited.
- Maximum allowed size of a single uploaded file (in bytes) : This parameter allows to define the maximum allowed size of one uploaded file when sending a multipart request to Convertigo, in bytes.
The transactions/sequences variables can be defined as a file upload using the Is a file upload property.
Proxy
Configure the Convertigo Server unified proxy in the Proxy tab. This tab can be opened by following the procedure To access a configuration category in the Configuration page.
- Proxy mode: In this parameter, three different modes are available to configure the proxy:
- disabled: No proxy.
- automatic: Using this mode, it is possible to automatically configure the proxy through a proxy auto-configuration (PAC) file. The URL of this file has to be set in Autoconfiguration proxy url parameter.
- manual: The proxy must be configured manually by filling different fields:
- Proxy port: Port which has to be used by the proxy,
- Proxy host: Address of the proxy server,
- Do not apply proxy settings on: In this field, it is possible to configure the domains to which the proxy should not be applied.
- Proxy authentication method: This parameter allows to choose what authentication method the proxy should use. The value is to be chosen amongst the following values:
- anonymous
- basic
- NTLM
- Username and Password: Finally, these parameters allow to set the credentials to be used by the proxy.
Previously, each connector had its own proxy configuration, configured through its properties. Now that the proxy is unified, only one configuration exists for these connectors.
The proxy configuration set thanks to this administration page will be used by all HTTP, HTML and Site Clipper connectors of all Convertigo projects on the server.
Examples
Configuring a proxy with basic authentication
- Proxy mode: manual
- Proxy port: 3128
- Proxy host: 192.168.100.9
- Proxy authentication method: basic
- Username: steph
- Password: 123
In case of NTLM authentication, if the proxy is related to LDAP, the username must be preceded by domain name.
Auto-Configuring proxy
- Proxy mode: automatic
- Autoconfiguration proxy url: http://192.168.100.141:18080/qualif/proxy.pac
SSL
Edit the communication security parameters in SSL tab. This tab can be opened by following the procedure To access a configuration category in the Configuration page.
- SSL debug output (requires JVM restart) : This option, when activated, makes the Java machine write traces about SSL dialogs in Convertigo in stdout console.
- SSL issuers : This parameter allows to enter a list os SSL issuers to be added to the standard issuers list, used to validate client certificates.
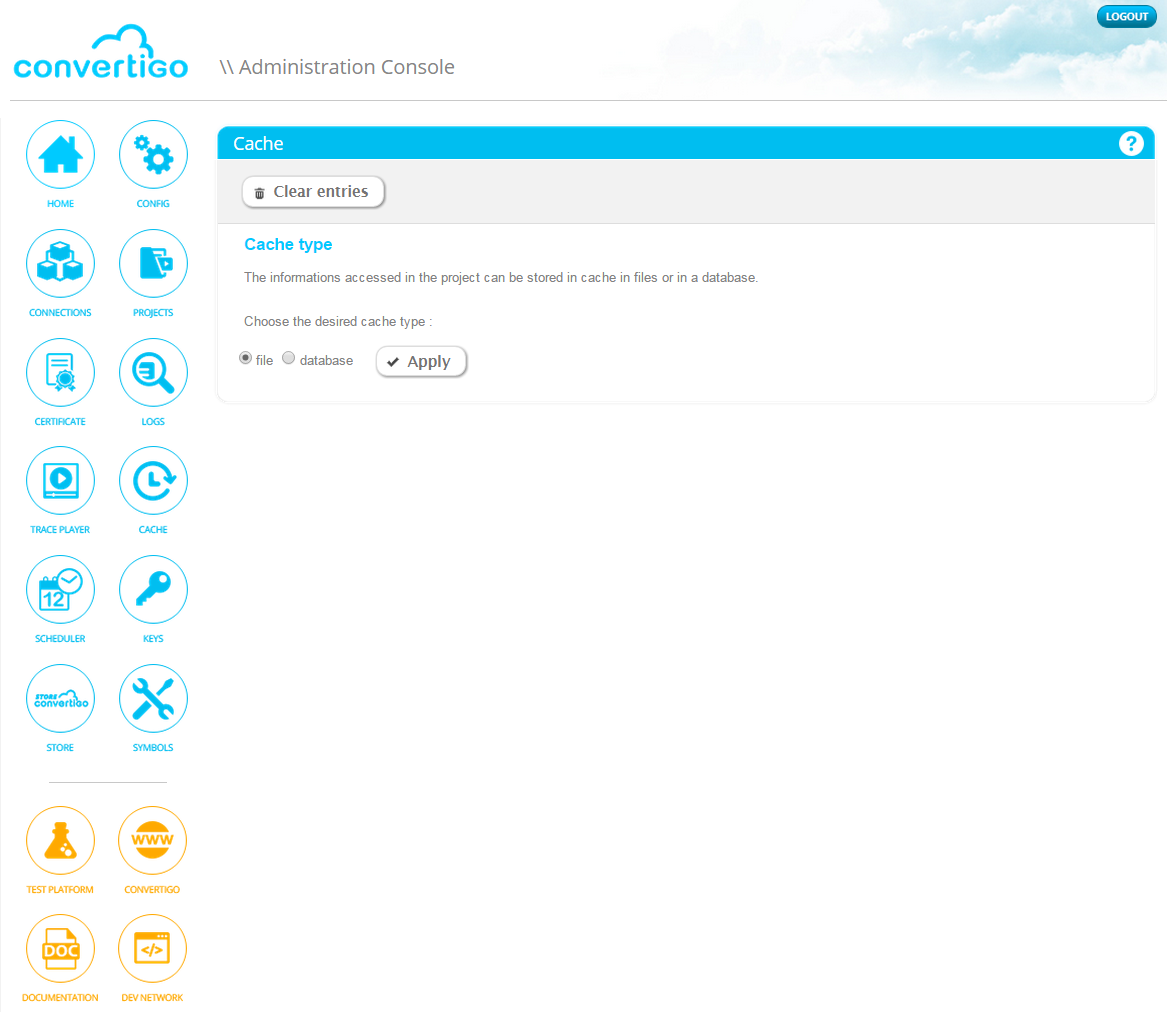
Cache
Edit the cache parameters in Cache tab. This tab can be opened by following the procedure To access a configuration category in the Configuration page.
- Cache manager class : This parameter allows you to override the cache management Java class by a class of your own in case of file cache type set in the Cache page of the Administration Console.
- File cache directory : This parameter defines the folder where cache files have to be saved, in the case of file cache type set in the Cache page of the Administration Console.
- Cache scan delay (in seconds) : This parameter defines the time in seconds to wait between two cache cleaning processes. It is taken into account for both file and database cache types.
- Disable Cache : This option, when activated, deactivates cache feature for the whole server. The running projects can then be tested out of any cache environment.
Legacy Carioca portal
Edit the Carioca portal parameters in Legacy Carioca portal tab. This tab can be opened by following the procedure To access a configuration category in the Configuration page.
- Default user name and Default user password : These parameters define the default credentials used by Convertigo when no Carioca portal is used for accessing to projects.
- Default session key life time (in seconds) : This property defines the time of living of a Carioca session key, in seconds.
- Carioca access URL : This property defines the URL of the Carioca portal used to access to Convertigo. By default, it is set to the local minime, which is a local mini-Carioca portal used when no Carioca portal is used for accessing to projects.
Analytics
Enable the analytics feature in Analytics tab. This tab can be opened by following the procedure To access a configuration category in the Configuration page.
This tab includes an Advanced properties section that can be opened by following the procedure To access the advanced properties of a configuration category. In the Advanced properties section, configure the advanced parameters of the analytics feature, i.e. all properties defining the database into which the tickets are stored.
Properties
- Enable analytics : This option, when checked, enables the analytics feature in Convertigo Server.
Technically, Convertigo uses Hibernate (version 4.3) to connect to this database. The following properties, that allow configuring the connection to the analytics database, are based on Hibernate configuration.
For more information, see the Hibernate documentation
Advanced properties
- SQL Dialect : This parameter defines the Hibernate SQL Dialect to use to optimize SQL requests to the analitycs database with correct syntaxes.
- JDBC driver : This parameter defines the JDBC driver to use for connecting to the analytics database. Any driver already existing in Convertigo for SQL connector can be used, until it corresponds to the defined Dialect. You can refer to appendix SQL drivers and related jar files or to the SQL connector documentation in the Reference Manual for more information about existing drivers.
Request for Convertigo support for installing a new SQL driver in Convertigo.
-
JDBC URL : This parameter defines the JDBC URL to use for connecting to the analytics database. The URL depends on the specified driver. You can refer to appendix “SQL drivers and related jar files” for more information about existing drivers and to the SQL connector documentation in the Reference Manual for more information about existing drivers and related connection URLs.
-
JDBC username and JDBC password : These parameters define the username and password to use for connecting to the analytics database.
Notifications
Enable the notifications feature in Notifications tab. This tab can be opened by following the procedure To access a configuration category in the Configuration page.
This tab includes an Advanced properties section that can be opened by following the procedure To access the advanced properties of a configuration category. In the Advanced properties section, configure the advanced parameters of the notifications feature.
Properties
- Notify project deployement : This option, when checked, enables the notification by email of information about projects deployement on the Convertigo Server.
Advanced properties
- Target email : this property defines the email address to which notifications will be sent.
- STMP host : this property defines the SMTP host of target email.
- STMP port : this property defines the SMTP port of target email, default is 465.
- STMP user : this property defines the SMTP username of target email.
- STMP password : this property defines the SMTP password of target email.
Mobile builder
Edit the mobile builder parameters in Mobile builder tab. This tab can be opened by following the procedure To access a configuration category in the Configuration page.
This tab includes an Advanced properties section that can be opened by following the procedure To access the advanced properties of a configuration category. In the Advanced properties section, configure the advanced parameters of the mobile builder feature.
Properties
- Mobile builder authentication token : This property defines the authentication token of the Mobile builder account to use to build the mobile application. The Mobile builder account is nothing more than a PhoneGap build account. It is referenced now by an authentication token. When building a mobile application, a Mobile builder account (PhoneGap build account) is mandatory. Convertigo provides one by default, used by default in Convertigo engine. This Mobile builder authentication token property allows you to define your own Mobile builder authentication token. It will be used by default for all mobile applications built by the Convertigo. It can still be overridden by the Mobile builder authentication token property in each Mobile application object in Convertigo projects.
- Android certificate title, Android certificate password and Android keyStore password : These properties define the Android certificate to use for building Android mobile applications. When building a mobile application for Android platform, an Android certificate (including title and password) is mandatory. When using default Convertigo’s Mobile builder account, Convertigo’s Android certificate is used. When using your own Mobile builder account, default PhoneGap Android certificate is used. These Android certificate title, Android certificate password and Android keyStore password properties allow to override the defaults Android certificate title, password and keystore password. They will be used by default for all Android mobile applications built by the Convertigo. They can still be overridden by the Android certificate title, Android certificate password and Android keyStore password properties in each Android mobile platform object in Convertigo projects.
- BlackBerry key title and BlackBerry key password : These properties define the BlackBerry key to use for building BlackBerry mobile applications. When building a mobile application for BlackBerry platform, a BlackBerry key (including title and password) is mandatory. When using default Convertigo’s Mobile builder account, Convertigo’s BlackBerry key is used. When using your own Mobile builder account, default PhoneGap BlackBerry key is used. These BlackBerry key title and BlackBerry key password properties allow to override the defaults BlackBerry key title and password. They will be used by default for all BlackBerry mobile applications built by the Convertigo. They can still be overridden by the BlackBerry key title and BlackBerry key password properties in each BlackBerry mobile platform object in Convertigo projects.
- iOS certificate title and iOS certificate password : These properties define the iOS certificate to use for building iOS mobile applications. When building a mobile application for iOS platform, an iOS certificate (including title and password) is mandatory. When using default Convertigo’s Mobile builder account, Convertigo’s iOS certificate is used. When using your own Mobile builder account, default PhoneGap iOS certificate is used. These iOS certificate title and iOS certificate password properties allow to override the defaults iOS certificate title and password. They will be used by default for all iOS mobile applications built by the Convertigo. They can still be overridden by the iOS certificate title and iOS certificate password properties in each iOS mobile platform object in Convertigo projects.
- Window Phone publisher ID title : This property defines the Windows Phone publisher ID to use for building Windows Phone mobile applications. When building a mobile application for Windows Phone platform, a Windows Phone publisher ID (including its title) is mandatory. When using default Convertigo’s Mobile builder account, Convertigo’s Windows Phone publisher ID is used. When using your own Mobile builder account, default PhoneGap Windows Phone publisher ID is used. This Window Phone publisher ID title property allows to override the defaults Window Phone publisher ID title. It will be used by default for all Window Phone mobile applications built by the Convertigo. They can still be overridden by the Window Phone publisher ID title property in each Window Phone mobile platform object in Convertigo projects.
Advanced properties
- Mobile builder platform URL : This property defines the URL of the Convertigo mobile builder platform to use when building the mobile applications. This platform is delivered by Convertigo and should not be modified.
Full sync
Edit the Full sync parameters in Full sync tab. This tab can be opened by following the procedure To access a configuration category in the Configuration page.
- Couch DB URL for FullSync: This property defines the URL of the Couch DB server used by Convertigo as the main repository for data replication.
- Couch DB username for FullSync: This property defines the default username used by Convertigo for synchronization operations
- Couch DB password for FullSync: This property defines the default password used by Convertigo for synchronization operations
Advanced properties
- Couch DB prefix for all FullSync databases: This property defines a prefix for the real CouchDB DB name for each FullSync connectors of the server. Set to myprefix, the myfs FullSync connector will be myprefix_myfs CouchDB database. Useful for a shared CouchDB cluster; acts like a namespace. Empty prefix means no prefix at all.
- Name must begin with a lowercase letter (a-z)
- Lowercase characters (a-z)
- Digits (0-9)
- Any of the characters _, $, (, ), +, -, and /
Connections
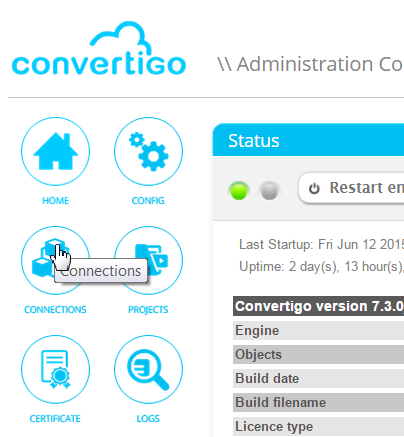
The Left menu contains a link to the Connections page. This page displays all of your running connections on the Convertigo Server in real-time. This section introduces the Connections page and details the different following elements:
Connections page
Navigate the Left menu using the link to the Connections page. For an example on how to navigate the Left menu, see To access a configuration category in the Configuration page.
The Connections page displays in the Connections table all of your running connections on the Convertigo Server in real-time

What’s next
The following section presents in details the Connections table which allows you to view and delete existing connections.
Connection table
The Connections table lists the existing connections since the Convertigo server’s start-up.
In the upper left corner appears a summary specifying:
-
the number of current connections compared to the maximum configured for the server
-
the number of current threads in use compared to the maximum configured for the server
-
the idle time of an HTTP session configured for the server
For each connection, the Connections table includes the following columns:
- Delete : use the
 button to delete the connection or use the
 top button to delete all the connections.
- State : the connection context’s state,
 connected or
 disconnected
- Context : the connection’s context ID
- Project : the project’s name of the requested object associated with the connection
- Connector : the connector’s name of the requested object associated with the connection.
-
In case the object is a Convertigo sequence, the name is empty.
- Requested : the name of the requested object associated with the connection.
- Status : the status of the request associated with the connection, finished or in progress
- User : the name of the user associated with the connection
- the creation date of the connection’s context :

- the last access date of the connection’s context :

- the inactivity duration since the connection’s context was last accessed :

- Client computer : the client IP address that initiated the connection
Projects
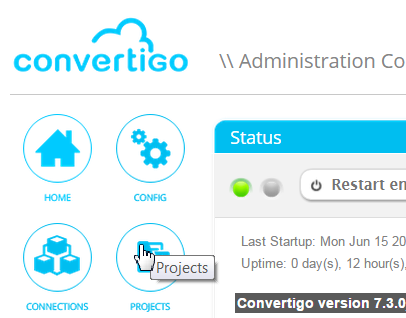
The Left menu contains a link to the Projects page. This page contains information related to the projects currently deployed on the Convertigo Server.
This section introduces the Projects page and details the different following elements:
Projects page
Navigate the Left menu using the link to the Projects page. For an example on how to navigate the Left menu, see To access a configuration category in the Configuration page.
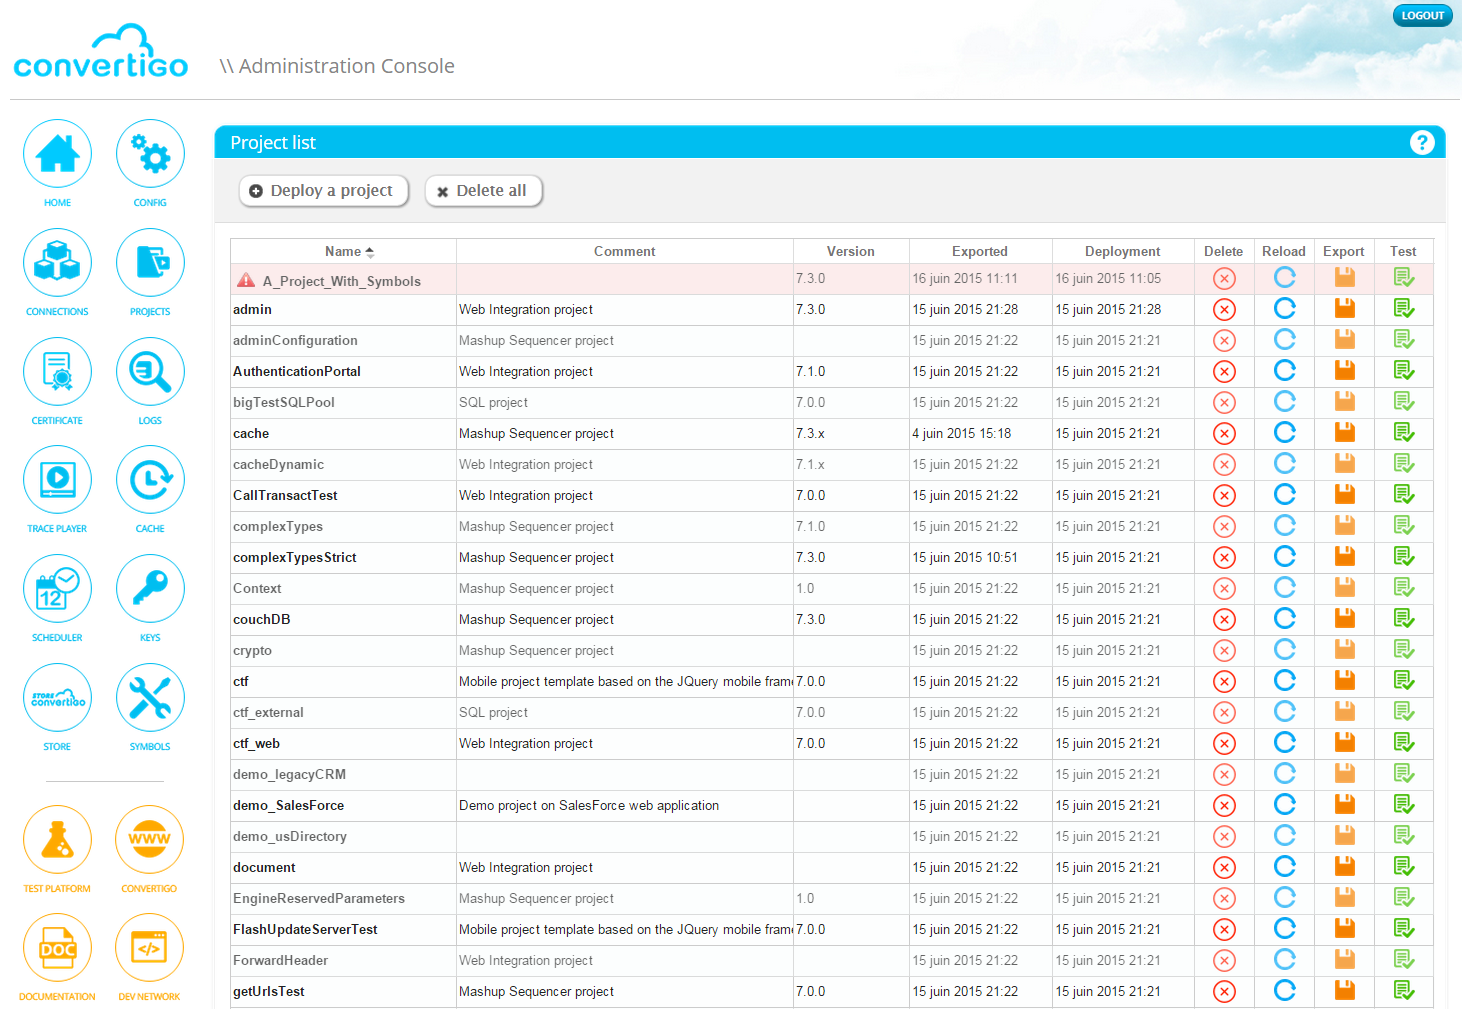
The Projects page displays in the Projects table all the deployed projects on the Convertigo Server
What’s next
The following section presents in details the Projects table which allows you to deploy, reload, export, delete, edit and test projects.
Projects table
The Projects table lists the projects deployed on the Convertigo server.

This section is separated in the following paragraphs:
- Description of the Projects table
- Deploying a project
- Reloading a project
- Exporting a project
- Editing a project
- Deleting a project
- Testing a project
Description of the Projects table
Some projects may use Global symbols which may be undefined for the server.
In such a case, the project’s line appears in red color in the table and an alert icon preceeds the project’s name.

Following paragraph explains how to define those symbols.
For each project, the Projects table includes the following columns:
- Name : The project’s name.
For more information, see "Editing a Project".
- Comment : An optional description about the project.
- Version : An optional user defined version for the project.
- Exported : The date of the last project’s export.
- Deployment : The date of the last project’s deployment on the server.
- Delete : A button to click on to delete the project. See Deleting a project
- Reload : A button to click on to reload the project. See Reloading a project
- Export : A button to click on to export the project. See Exporting a project
- Test : A button to click on to test the project. See Testing a project
Deploying a project
Deploying a project which is already deployed on the Convertigo server, ends with its archiving prior to its deployment.
To deploy a project
In the Projects table, the + Deploy a project top left button allows you to deploy a project.
1. Click on the top button
 of Projects table
A popup window opens, for deployment option(s) and project choosing:

2. Click:
- on Assembly XSL option if needed
- on Browse and Deploy to browse for a project or click on Cancel to abort.
3. After clicking the Browse and Deploy button, a browse window opens for a Convertigo archive (.car file) selection:
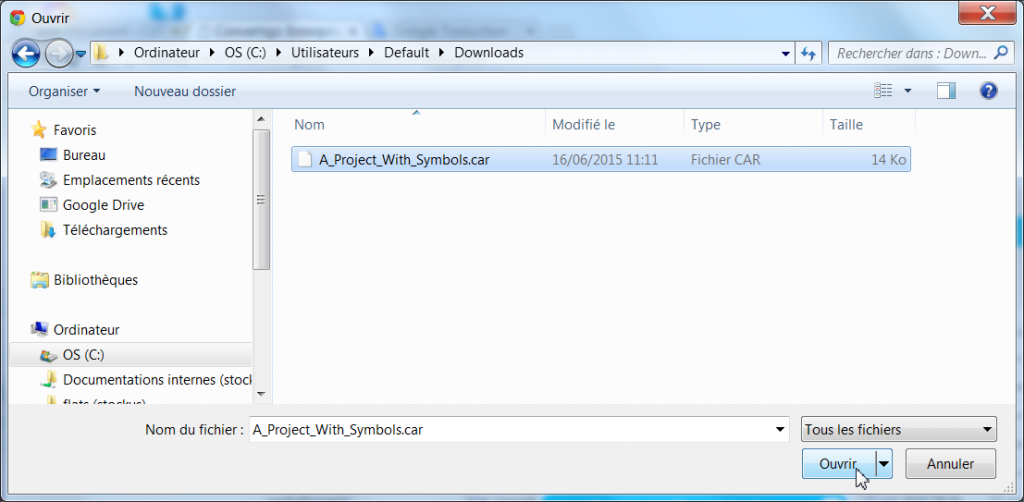
Select a .car file and click on Open to start the project deployment or click on Cancel to abort project deployment.
4. After clicking the Open button, the project deployment starts.
A popup window opens, informing if the deployment was successful or not:
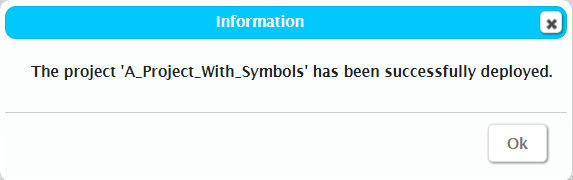
Click on Ok to close the window.
5. After clicking the Ok button, the Project deploy window is still open:
Click on Cancel to close the window or on Browse and Deploy if you want to deploy another project.
6. After clicking the Cancel button, the successfully deployed projects are visible in the Projects table.
Their deployment date has been updated in the Deployment column.
Reloading a project
To reload an existing project
In the Projects table, the Reload column contains a button that allows you to reload an existing project.
1. Click on the button
 of the project line
A popup window opens, asking for a confirmation before reloading the project:
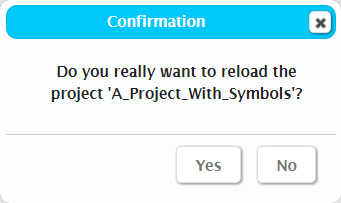
2. Click on Yes to reload the selected project or click on No to abort the project reload.
3. After clicking on the Yes button, a message appears to inform if the project has been successfully reloaded or not on the server.
Exporting a project
Windows XP : Documents and SettingsusernameMy DocumentsDownloads
Windows Vista/ Windows 7/ Windows 8 : UsersusernameDownloads
Mac : /Users/username/Downloads
Linux : homeusernameDownloads
To export an existing project
In the Projects table, the Export column contains a button that allows you to export an existing project.
1. Click on the button
 of the project line
A Convertigo archive of the project (.car file) is generated and downloaded to your computer.
Editing a project
For more information about archiving, see "Deleting a project"
To edit an existing project
In the Projects table, the Name column display the name of the project in a clickable cell which allows you to edit the project.
1. Click on the name of the project line

2. Scroll down to the bottom of the Projects page.
A new table has appeared, the Project table:
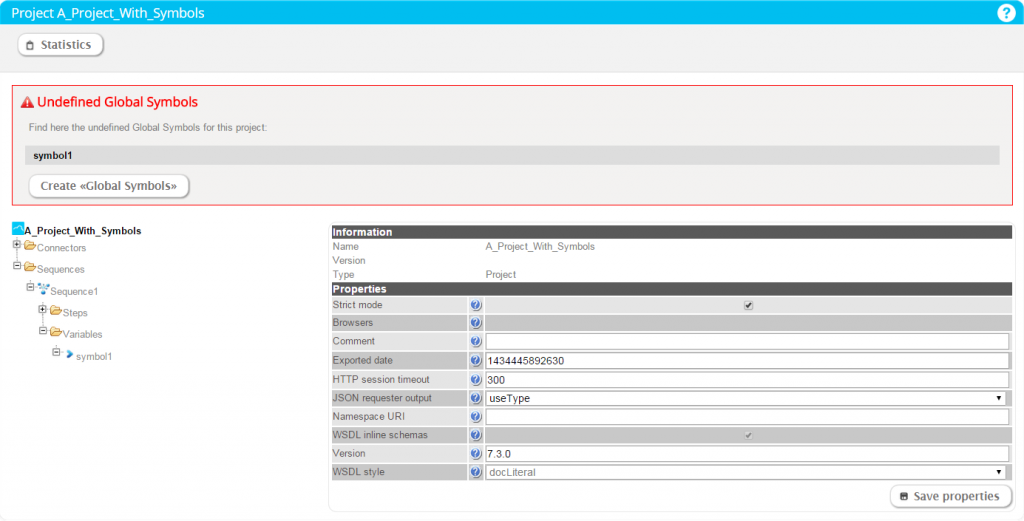
This table may have two panels:
- The first Symbols panel appears only if the project has undefined Global symbols.
It allows to define project undefined symbols for the server so that the project works as expected.
3. If needed, in the Symbols panel click on the button
 to define symbols for the server.
Once clicked, a pop window opens to inform if the symbols were successfully declared on the server or not.
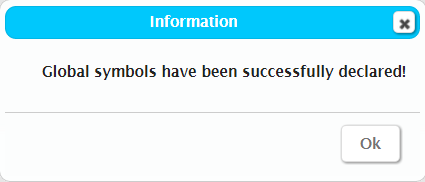
Click on Ok button to close the window and make the Projects page reload. You need to edit again the project to see that the Symbols panel has disappeared when the symbols have been created.
- The second Objects panel always appears.
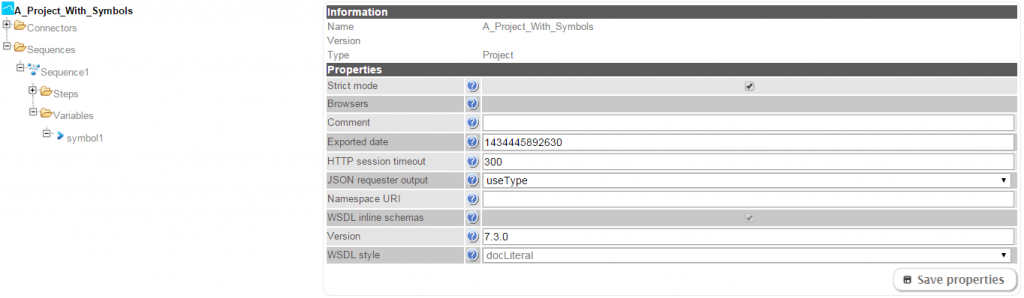
It presents on the left side the tree structure of the project so that you can browse through its objects, and on the right side the Properties table of a selected object in tree. It allows to modify object’s properties values if needed and save them.
4. If needed, in the Objects panel modify the project through its objects properties. To do so :
- browse the project tree structure to an object and select it.
- modify the object properties values in the Properties table
- click on the
 button to save your changes.
A pop window opens to inform if the project was successfully updated on the server or not.
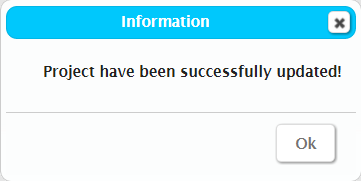
Click on Ok button to close the window. The Objects panel remains to allow other changes. Scrolling up to the Projects table, you may notice that the value in the Exported column has changed.
Deleting a project
Its name is like project_YYYY_MM_DD.zip or project_YYYY_MM_DD_x.zip if there is more than one archive.
To delete an existing project
In the Projects table, the Delete column contains a button that allows you to delete an existing project.
1. Click on the button
 of the project line
A popup window opens, asking for a confirmation before deleting the project:
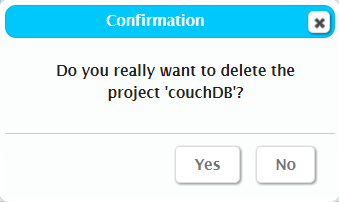
2. Click on Yes to delete the selected project or click on No to abort the project deletion.
3. After clicking on the Yes button, the project is deleted from the server and does not appear anymore in the Projects table.
To delete all projects
In the Projects table, a Delete all button appears at the top that allows you to delete all existing projects.
1. Click on the top button
 of the Projects table
A popup window opens, asking for a confirmation before deleting the projects:
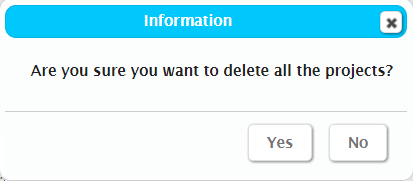
2. Click on Yes to delete all projects or click on No to abort the projects deletion.
3. After clicking on the Yes button, all projects are deleted from the server and the Projects table is empty.
Testing a project
To test an existing project
In the Projects table, the Test column contains a button that allows you to test an existing project.
- Click on the button
 of the project line
You are then redirected to the Convertigo Test Platform.
Certificates
The Left menu contains a link to the Certificates page. This page provides information about adding, deleting and reviewing authentication certificates.
More information on Certificates page is coming soon.
Logs
The Left menu contains a link to the Logs page. This page provides traces of Convertigo engine executions, updated in real-time. More information on Logs page is coming soon.
Trace Player
The Left menu contains a link to the Trace player page. This page displays the saved Legacy screens traces and permits you to configure the playing of these traces. More information on the Traces player page is coming soon.
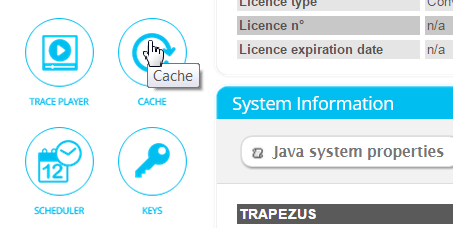
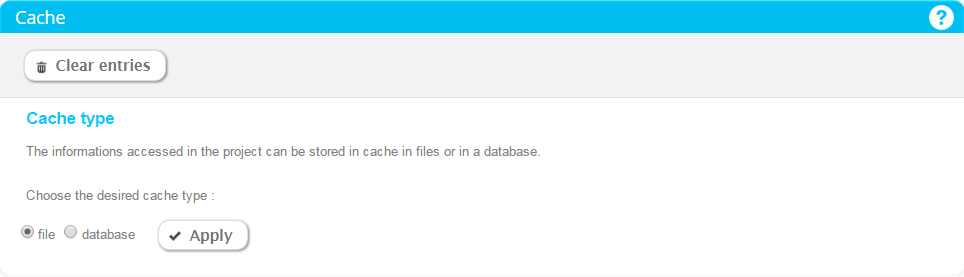
Cache
The Left menu contains a link to the Cache page. This page allows you to configure the cache feature.
This section introduces the Cache page and details the different following elements:
Cache page
Navigate the Left menu using the link to the Cache page. For an example on how to navigate the Left menu, see To access Configuration page in the Administration Console.
The Cache page displays in the Cache table the current cache configuration on the Convertigo server.
What’s next
The following section presents in details the Cache table which allows you to configure the cache for the Convertigo server.
Cache table
The Cache table displays the current cache configuration on the Convertigo server.
This section is separated in the following paragraphs:
Introducing the cache feature
The Cache feature is the ability to store the data returned by Transaction or Sequence objects in a persistent way so that the remote backend isn’t requested when it’s not needed.
This can be done through a file based persistence or a database based persistence.
By default the Cache is a file based persistence.
Configuring the cache
To configure the cache to file
1. Choose the file option and click on the Apply button.
A popup window opens informing if the cache was successfully configured or not :
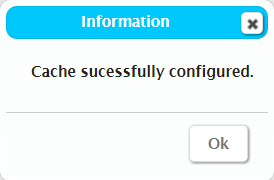
2. Click on the Ok button to close the window.
To configure the cache to database
1. Choose the database option and fill in the Configuration panel which has appeared :
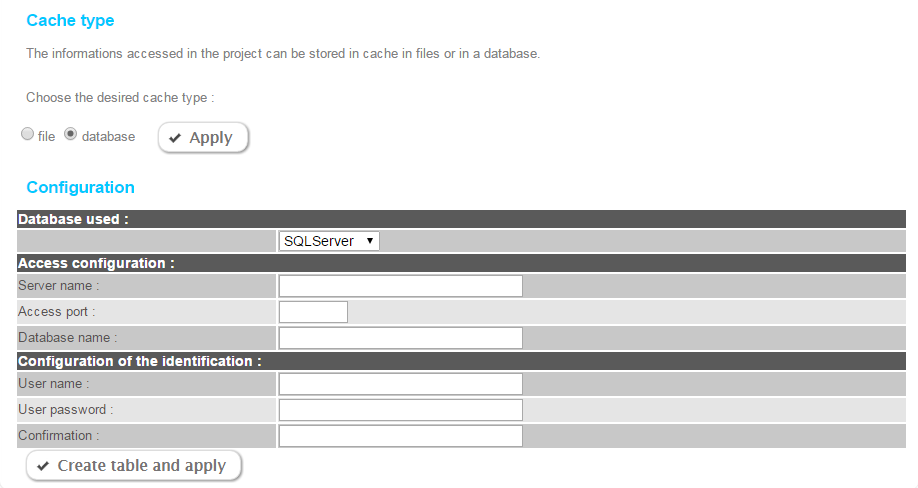
2. Click on the Create table and Apply button if it’s the first time the Cache is configured for this database, else click on the Apply button.
A popup window opens informing if the cache was successfully configured or not:
3. Click on the Ok button to close the window.
Clearing cache entries
To clear all stored cache entries
1. Click on the Clear entries button.
A popup window opens informing if the entries were successfully cleared or not:
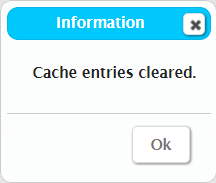
2. Click on the Ok button to close the window.
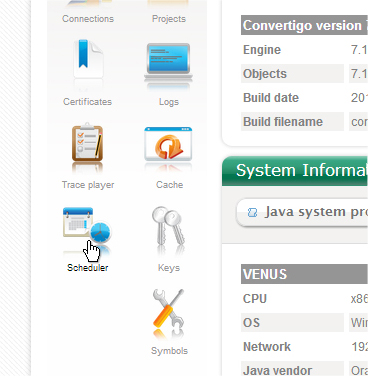
Scheduler
The Left menu contains a link to the Scheduler page. This page gives you the tools to schedule automatic executions of transactions and/or sequences.
This section introduces the Scheduler page and details the different elements of the scheduling functionality:
Scheduler page
Navigate the Left menu using the link to the Scheduler page. For an example on how to navigate the Left menu, see To access Configuration page in the Administration Console.
The Scheduler page contains three individual tables:
- Jobs,
- Schedules,
- Scheduled Jobs.

Scheduling a Convertigo sequence or transaction execution consists in creating a scheduled job, which results in the association of a job, also known as task, and a schedule, also known as a time trigger.
What’s next
The following sections present in details the three tables on the Scheduler page which are the tools to create jobs, schedules and scheduled jobs.
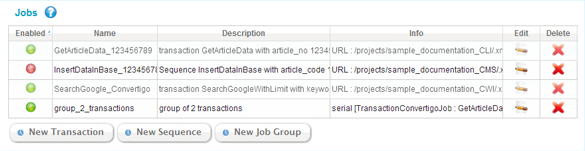
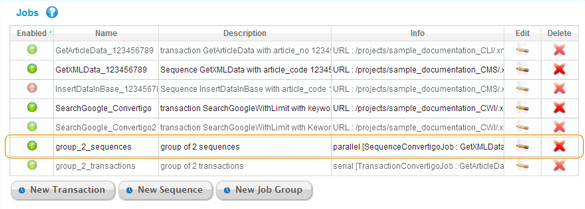
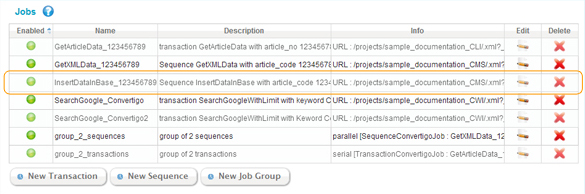
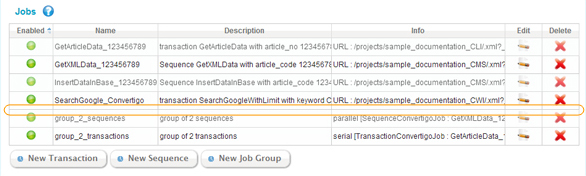
Jobs table
The Jobs table lists the existing jobs. A job, also known as task, specifies the object to be executed. It can be a Convertigo transaction, a sequence, or a group of other jobs.
This section is separated in the following paragraphs:
Description of the Jobs table
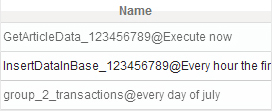
For each job, the Jobs table includes the following columns:
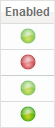
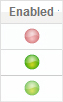
- Enabled: This column displays a green bullet if the job is enabled and a red bullet if the job is disabled. Only enabled jobs can be executed by a scheduled job. Disabled jobs will not be executed, even if used in an enabled scheduled job.
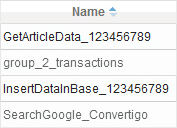
- Name: This is the name of the created job, filled by the user at its creation.
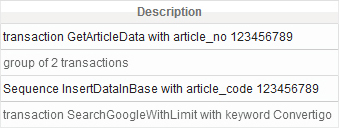
- Description: This is the description of the created job, filled by the user at its creation.
- Info: This column displays:
- the execution URL automatically generated from the configured transaction/sequence, in case of a job executing a transaction/sequence,
- the type of execution (parallel/serial) as well as the several jobs that are grouped, including their type (transaction/sequence), in case of a group of jobs.

- Edit: This column contains a button that allows you to edit the job. For more information on job edition, see “Editing a job”.
- Delete: This column contains a button that allows you to delete the job. For more information on job deletion, see “Deleting a job”.
Creating a new job
The Jobs table allows you to create a new job, first step for creating a scheduled job. It can be a Convertigo transaction or sequence, which can be created in a common way, or a group of other jobs.
Find below two procedures that describe how to create both types of job.
To create a job (transaction or sequence)
1. Click one of the following buttons located beneath the Jobs table:
- New Transaction: to schedule a transaction execution,
- New Sequence: to schedule a sequence execution.

Once clicked, a window appears in front of the page, depending on the chosen item:
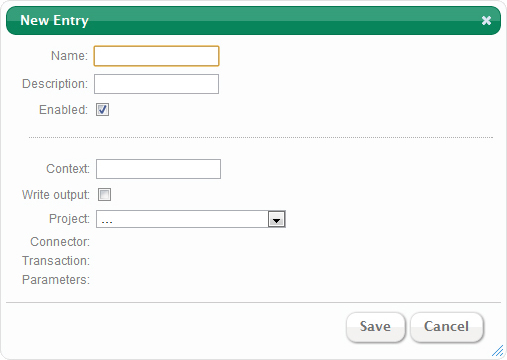
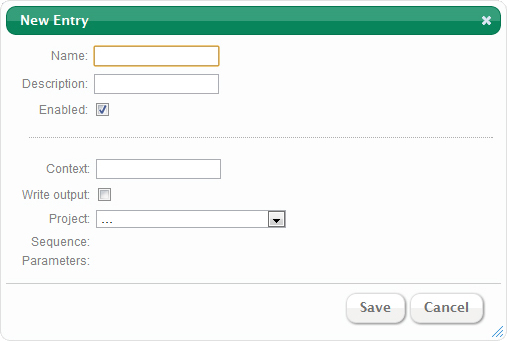
2. Depending on the type of job selected, you have to fill in some information to define the job. Parameters to set are:
- Name: A name for this job, as jobs are used in the Scheduled Jobs table, it is recommended to give recognizable names to jobs.
- Description: An optional description or notes concerning the job.
- Enabled: Checkbox that allows you to define if the job is enabled (checked checkbox) or disabled (not checked checkbox). Only enabled jobs can be executed by a scheduled job. Disabled jobs will not be executed, even if used in an enabled scheduled job. This setting is by default set to enabled.
- Context: An optional name for the Convertigo context into which the transaction/sequence will run. This name will replace the ‘default’ default context name.
- Write output: If checked, the XML output of the transaction/sequence will be saved in a file in the Convertigo logs directory after the task is finished. Otherwise, no execution result will be saved (except traces in logs). This setting is not checked by default.
- Project: This combo box lists all deployed projects in the Convertigo Server. Choose the project to use for the job (into which you want to pick a transaction/sequence).
- Connector: (for transaction jobs only) Once a project is selected, this combo box lists all available connectors. Select the required connector to use for the job (into which you want to pick a transaction).
- Transaction: (for transaction jobs only) Once the project and the connector are selected, this combo box lists all available transactions. Select the transaction to use for the job, i.e. the transaction to be executed.
- Sequence: (for sequence jobs only) Once a project is selected, this combo box lists all available sequences. Select the required sequence to use for the job, i.e. the sequence to be executed.
- Parameters: Once a transaction or a sequence has been selected, its input variables are listed here along with their default values in a table with the following columns:
- Name: Name of the input variable.
- Value: Default variable value. This value can be changed here and will be used if the Send checkbox is checked.
- Description: Variable description.
- Send: Check this checkbox if you want to use the modified variable value for this variable. Otherwise, the variable value will not be sent and the default value will be used.
Depending on the job type, you have for example:
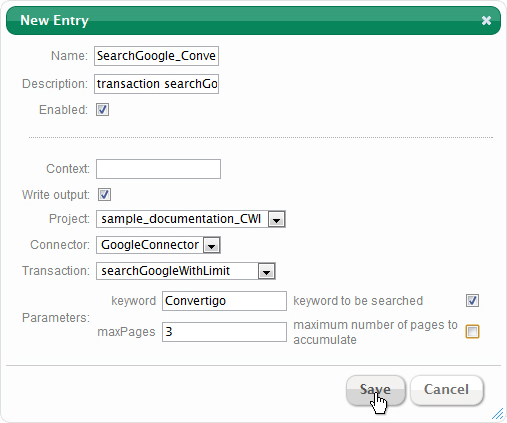
- an enabled transaction job is created to execute the searchGoogleWithLimit transaction from the GoogleConnector connector of the sample_documentation_CWI project, including an updated value for the keyword variable, set to “Convertigo”, and writing the XML output in a file thanks to the Write output setting:
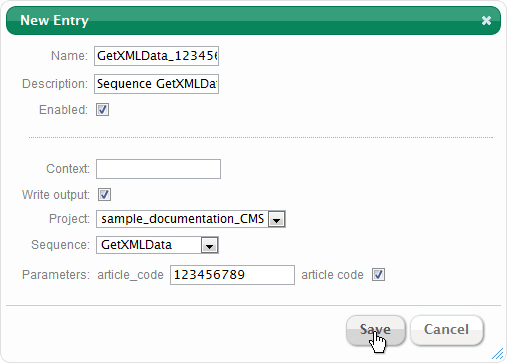
- an enabled sequence job is created to execute the GetXMLData sequence from the sample_documentation_CMS project, including an updated value for the article_code variable, set to “123456789”, and writing the XML output in a file thanks to the Write output setting:
3. When you finish specifying the job, click on the Save button to create it.
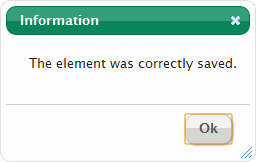
A message window appears to inform that the object was correctly saved:
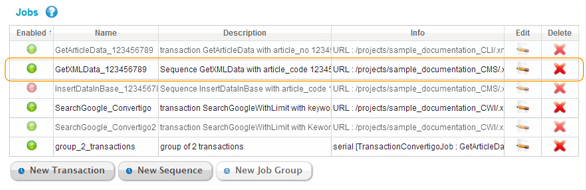
4. Click on the Ok button to close the popup window. The new job appears in the Jobs table:
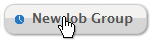
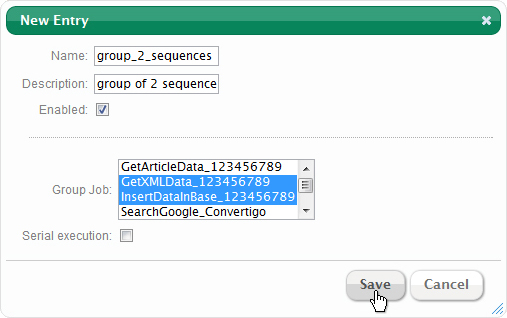
To create a job group
1. Click the New Job Group button located beneath the Jobs table, to schedule a group of jobs containing several transactions or sequences.
Once clicked, a window appears in front of the Administration Console:
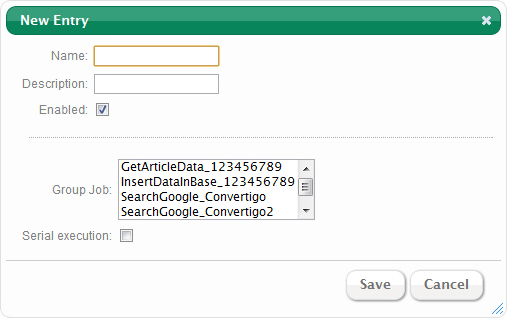
2. You have to fill in some information to define the job. Parameters to set are:
- Name: A name for this job, as jobs are used in the Scheduled Jobs table, it is recommended to give recognizable names to jobs.
- Description: An optional description or notes concerning the job.
- Enabled: Checkbox that allows you to define if the job is enabled (checked checkbox) or disabeld (not checked checkbox). Only enabled jobs can be executed by a scheduled job. Disabled jobs will not be executed, even if used in an enabled scheduled job. This setting is by default set to enabled.
- Group Job: This list enumerates all available transaction/sequence jobs from the Jobs table. Select the jobs to group together in this job group.
- Serial execution: Check this checkbox if you want to execute the chosen transaction/sequence jobs in sequence. Otherwise, they will be executed in parrallel, which is the default value.
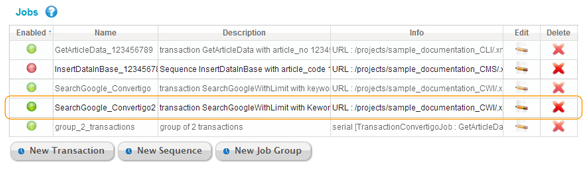
For example here, a 2-sequences group job is created to execute the GetXMLData_123456789 sequence job and the InsertDataInBase_123456789 sequence job in parrallel as the Serial execution checkbox is not checked:
3. When you finish specifying the job, click on the Save button to create it.
A message window appears to inform that the object was correctly saved:
4. Click on the Ok button to close the popup window. The new job appears in the Jobs table:
Editing a job
In the Jobs table, the Edit column contains a button that allows you to edit an existing job.
To edit an existing job
1. Click on the button of the job line:
A popup window opens (here in the case of a sequence job):
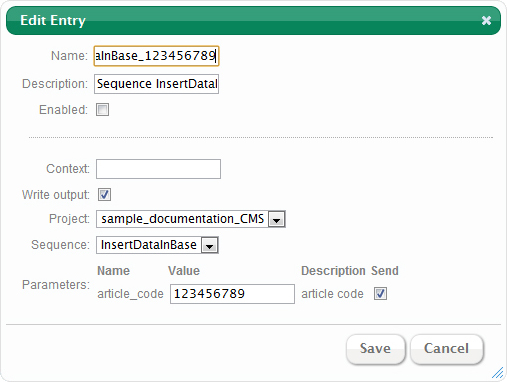
2. Change the values of the job settings you want to edit. For example, enable the job by checking the Enabled checkbox:
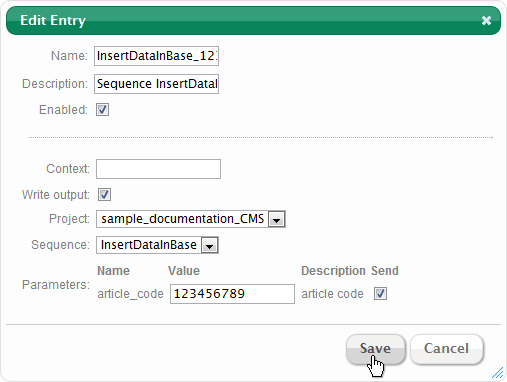
3. Click on the Save button to save the updated values or click on the Cancel button if you want to cancel the job update.
4. After clicking on the Save button, a message window appears to inform that the object was correctly saved:
5. Click on the Ok button to close the popup window. The updated job appears in the Jobs table:
Deleting a job
In the Jobs table, the Delete column contains a button that allows you to delete an existing job.
To delete an existing job
1. Click on the button of the job line:
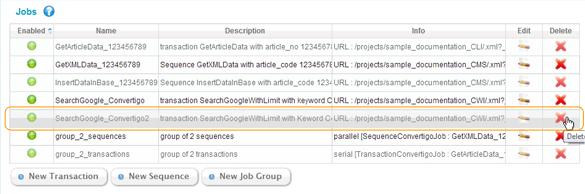
A popup window opens, asking for a confirmation before deleting the job:
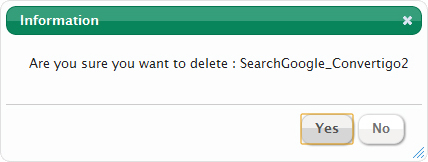
2. Click on Yes to delete the selected job or click on No to abort the job deletion. 3. After clicking on the Yes button, the job is deleted from the Jobs table:
What’s next
Now that the Jobs table is fully described, the following section will present the Schedules table.
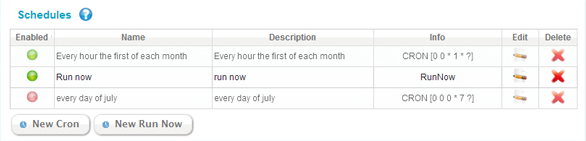
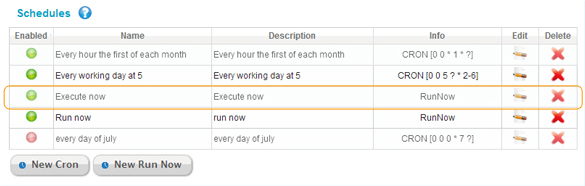
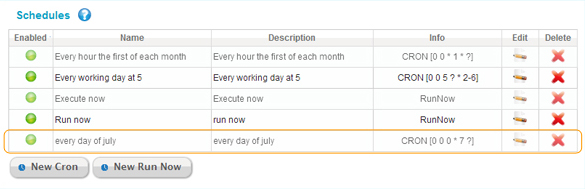
Schedules table
The Schedules table lists the existing schedules. A schedule, also known as time trigger, defines a date, time and reccurrency of triggering for the object to be executed. It can be a Run Now trigger or a CRON trigger.
This section is separated in the following paragraphs:
Description of the Schedules table
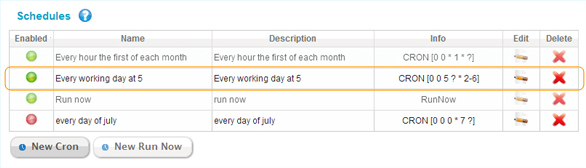
For each schedule, the Schedules table includes the following columns:
- Enabled: This column displays a green bullet if the schedule is enabled and a red bullet if the schedule is disabled. Only enabled schedules are triggered and launch scheduled jobs. Disabled schedules will not be triggered, even if used in an enabled scheduled job.
- Name: This is the name of the created schedule, filled by the user at its creation.
- Description: This is the description of the created schedule, filled by the user at its creation.
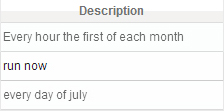
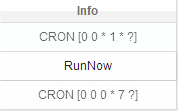
- Info: This column displays:
- the type of schedule (RunNow or CRON),
- the CRON syntax, in case of CRON schedule.
- Edit: This column contains a button that allows you to edit the schedule. For more information on schedule edition, see Editing a schedule.
- Delete: This column contains a button that allows you to delete the schedule. For more information on schedule deletion, see Deleting a schedule.
Creating a new schedule
The Schedules table allows you to create a new schedule, second step for creating a scheduled job. It can be of two types:
- CRON, which permits you to select a date, time and frequency of future job executions,
- Run Now, which permits you to run a scheduled job immediately after creation.
Find below two procedures that describe how to create both types of job.
To create a CRON schedule
1. Click the New CRON button located beneath the Schedules table, to define a CRON schedule.

Once clicked, a window appears in front of the page:
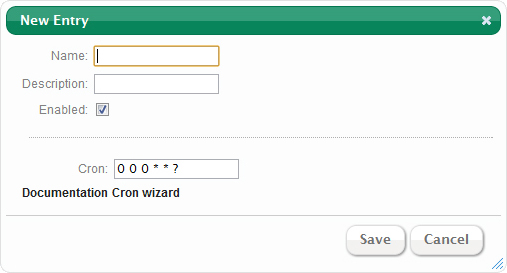
2. You have to fill in some information to define the CRON schedule. Parameters to set are:
- Name: A name for this schedule, as schedules are used in the Scheduled Jobs table, it is recommended to give recognizable names to schedules.
- Description: An optional description or notes concerning the schedule.
- Enabled: Checkbox that allows you to define if the schedule is enabled (checked checkbox) or disabled (not checked checkbox). Only enabled schedules are triggered and launch scheduled jobs. Disabled schedules will not be triggered, even if used in an enabled scheduled job. This setting is by default set to enabled.
- Cron: The CRON syntax defining a time trigger based upon the linux CRON syntax. CRON schedules can be used to start a job at specific times and dates, or periodically. The complete CRON syntax documentation can be accessed by clicking on the Documentation link. A wizard can help you build the CRON syntax, it can be opened by clicking on the Cron wizard link:
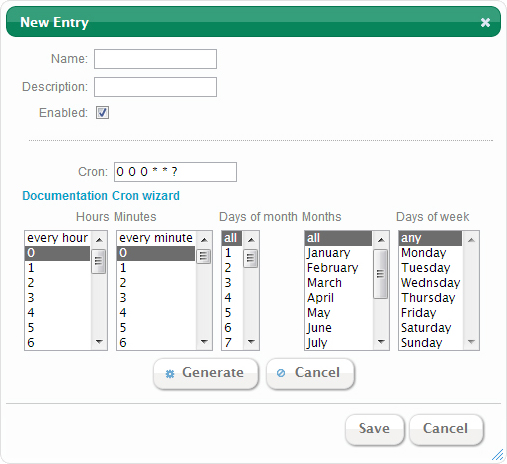
In the CRON wizard, you can find several combo list into which you can select entries to build your CRON:
- Hours: Select the hour of time when you want the CRON to be triggered or “every hour” for it to be triggered every hour.
- Minutes: Select the minutes of time when you want the CRON to be triggered or “every minute” for it to be triggered every minute of the selected hour(s).
- Days of month: Select the days of month when you want the CRON to be triggered or “all” for it to be triggered every day of the selected month(s).
- Months: Select the months when you want the CRON to be triggered or “all” for it to be triggered during all months.
- Days of week: Select the days of the week when you want the CRON to be triggered or “any” for it to be triggered during all days of the week.
3. When you finish building the CRON thanks to the wizard, click on the Generate button for the CRON syntax to be generated in the Cron field, or click on the Cancel button to close the wizard.
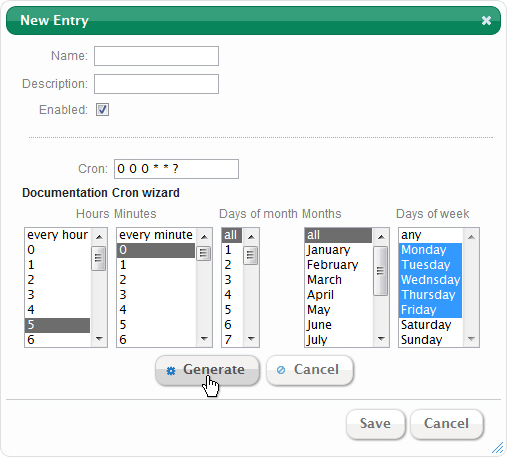
For example here, the generated CRON will be triggered every day of the year, on the working days of weeks, at 5 AM.
4. When you finish specifying the schedule, click on the Save button to create it:
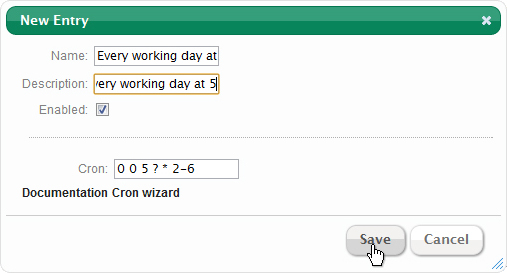
5. After clicking on the Save button, a message window appears to inform that the object was correctly saved:
6. Click on the Ok button to close the popup window. The new schedule appears in the Schedules table:
To create a Run Now schedule
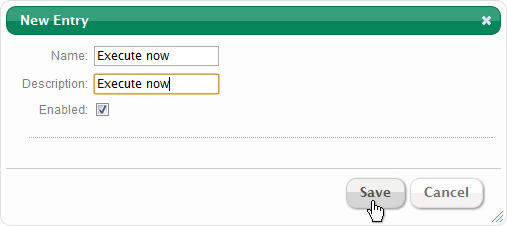
1. Click the New Run Now button located beneath the Schedules table, to define a Run Now schedule.

Once clicked, a window appears in front of the Administration Console:
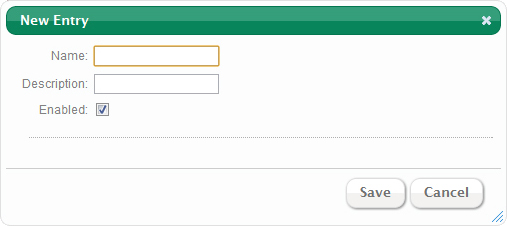
2. You have to fill in some information to define the Run Now schedule. Parameters to set are:
- Name: A name for this schedule, as schedules are used in the Scheduled Jobs table, it is recommended to give recognizable names to schedules.
- Description: An optional description or notes concerning the schedule.
- Enabled: Checkbox that allows you to define if the schedule is enabled (checked checkbox) or disabled (not checked checkbox). Only enabled schedules are triggered and launch scheduled jobs. Disabled schedules will not be triggered, even if used in an enabled scheduled job. This setting is by default set to enabled.
3. When you finish specifying the schedule, click on the Save button to create it:
4. After clicking on the Save button, a message window appears to inform that the object was correctly saved:
5. Click on the Ok button to close the popup window. The new schedule appears in the Schedules table:
Editing a schedule
In the Schedules table, the Edit column contains a button that allows you to edit an existing schedule.
To edit an existing schedule
1. Click on the Edit button of the schedule line.
A popup window opens (here in the case of a CRON schedule):
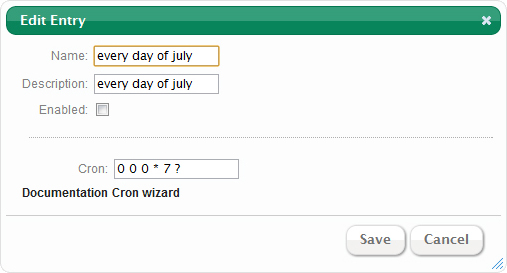
2. Change the values of the schedule settings you want to edit. For example, enable the schedule by checking the Enabled checkbox:
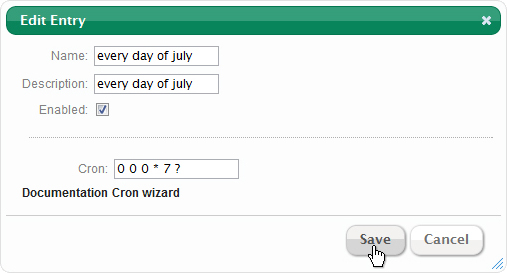
3. Click on the Save button to save the updated values or click on the Cancel button if you want to cancel the schedule update.
4. After clicking on the Save button, a message window appears to inform that the object was correctly saved:
5. Click on the Ok button to close the popup window. The updated schedule appears in the Schedules table:
Deleting a schedule
In the Schedules table, the Delete column contains a button that allows you to delete an existing schedule.
To delete an existing schedule
1. Click on the button of the schedule line.
A popup window opens, asking for a confirmation before deleting the schedule:
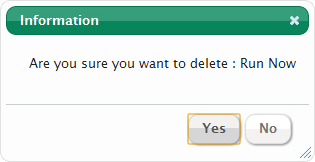
2. Click on Yes to delete the selected schedule or click on No to abort the schedule deletion.
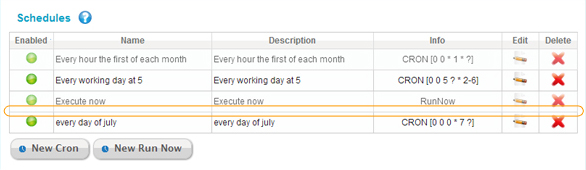
3. After clicking on the Yes button, the schedule is deleted from the Schedules table:
What’s next
Now that the Schedules table is fully described, the following section will present the Scheduled Jobs table, in which you can combine a job and a schedule previously created.
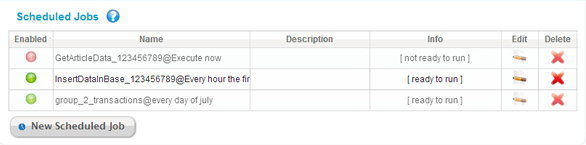
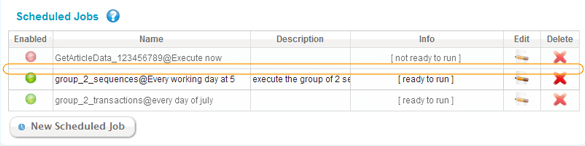
Scheduled Jobs table
The Scheduled Jobs table lists the scheduled jobs. A scheduled job is the association of a job and a schedule. Once combined, the job will run at the date and time specified in the schedule. Both the job and the schedule must be enabled, along with the scheduled job, for the scheduled job to be executed.
This section is separated in the following paragraphs:
- Description of the Scheduled Jobs table
- Creating a new scheduled job
- Editing a scheduled job
- Deleting a scheduled job
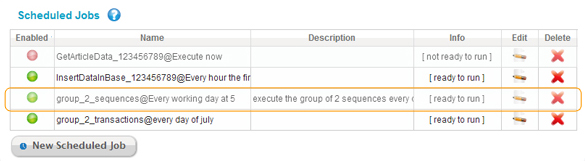
Description of the Scheduled Jobs table
For each scheduled job, the Scheduled Jobs table includes the following columns:
- Enabled: This column displays a green bullet if the scheduled job is enabled and a red bullet if the scheduled job is disabled. Only enabled scheduled jobs are executed. Disabled scheduled jobs will not be executed, even if they combine an enabled schedule and an enabled job.
- Name: This is the name of the created scheduled job, automatically generated by the Scheduler depending on the combined job and shedule.
- Description: This is the description of the created scheduled job, filled by the user at its creation.
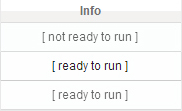
- Info: This column displays information about the scheduled job’s ability to be executed:
- first, if the scheduled job is ready or not ready to run,
- and, if applicable, the reason why the job is not ready to run (if it is the job or the schedule that is disabled). Nothing is written in this second part if it is the scheduled job itself that is disabled.
- Edit: This column contains a button that allows you to edit the scheduled job. For more information on scheduled job edition, see Editing a scheduled job.
- Delete: This column contains a button that allows you to delete the scheduled job. For more information on scheduled job deletion, see Deleting a scheduled job.
Creating a new scheduled job
The Scheduled Jobs table allows you to create a new scheduled job. Find below the procedure that describes how to create a scheduled job.
To create a scheduled job
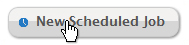
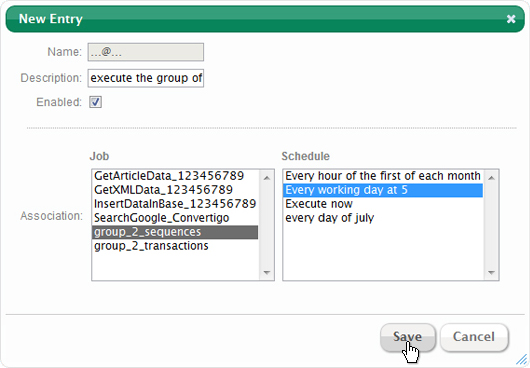
1. Click the New Scheduled Job button located beneath the Scheduled Jobs table, to define a new scheduled job.
Once clicked, a window appears in front of the page:
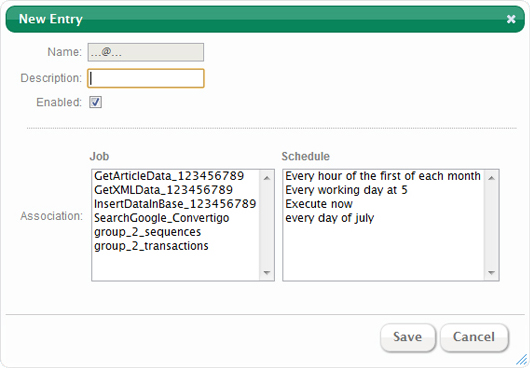
2. You have to fill in some information to define the scheduled job. Parameters to set are:
- Name: A name will automatically be generated for this scheduled job by the Scheduler, depending on the combined job and schedule.
- Description: An optional description or notes concerning the scheduled job.
- Enabled: Checkbox that allows you to define if the scheduled job is enabled (checked checkbox) or disabled (not checked checkbox). Only enabled scheduled jobs are executed. Disabled scheduled jobs will not be executed, even if they combine an enabled schedule and an enabled job.This setting is by default set to enabled.
- Association: This is the main configuration of the scheduled job, through which you can associate the job and the schedule. It presents two lists: Job and Schedule, each enumerating all existing jobs/schedules. You have to configure the Scheduled Job by associating a job and a schedule, simply by selecting the job and the schedule in each of the two lists.
3. When you finish specifying the scheduled job, click on the Save button to create it:
4. After clicking on the Save button, a message window appears to inform that the object was correctly saved:
5. Click on the Ok button to close the popup window. The new scheduled job appears in the Scheduled Jobs table:
Editing a scheduled job
In the Scheduled jobs table, the Edit column contains a button that allows you to edit an existing scheduled job.
To edit an existing scheduled job
1. Click on the Edit button of the scheduled job line.
A popup window opens:
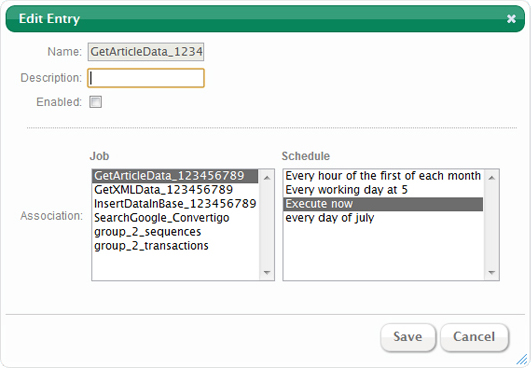
2. Change the values of the scheduled job settings you want to edit. For example, enable the scheduled job by checking the Enabled checkbox:
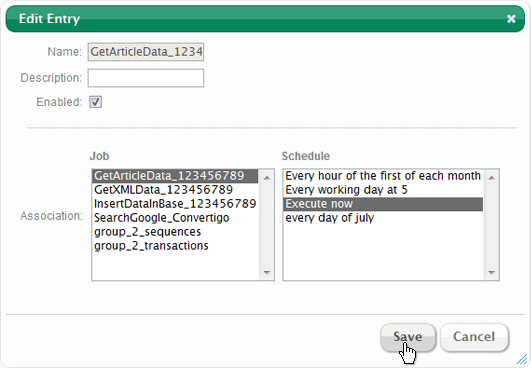
3. Click on the Save button to save the updated values or click on the Cancel button if you want to cancel the schedule update. 4. After clicking on the Save button, a message window appears to inform that the object was correctly saved:
5. Click on the Ok button to close the popup window. The updated scheduled job appears in the Scheduled Jobs table:

Deleting a scheduled job
In the Scheduled Jobs table, the Delete column contains a button that allows you to delete an existing scheduled job.
To delete an existing scheduled job
1. Click on the button of the scheduled job line.
A popup window opens, asking for a confirmation before deleting the scheduled job:
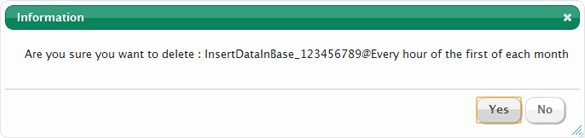
2. Click on Yes to delete the selected scheduled job or click on No to abort the scheduled job deletion. 3. After clicking on the Yes button, the scheduled job is deleted from the Scheduled jobs table:
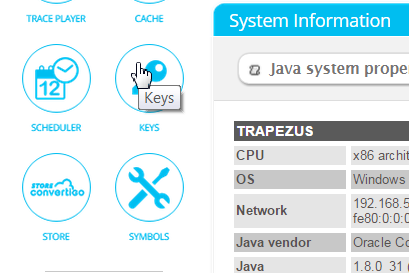
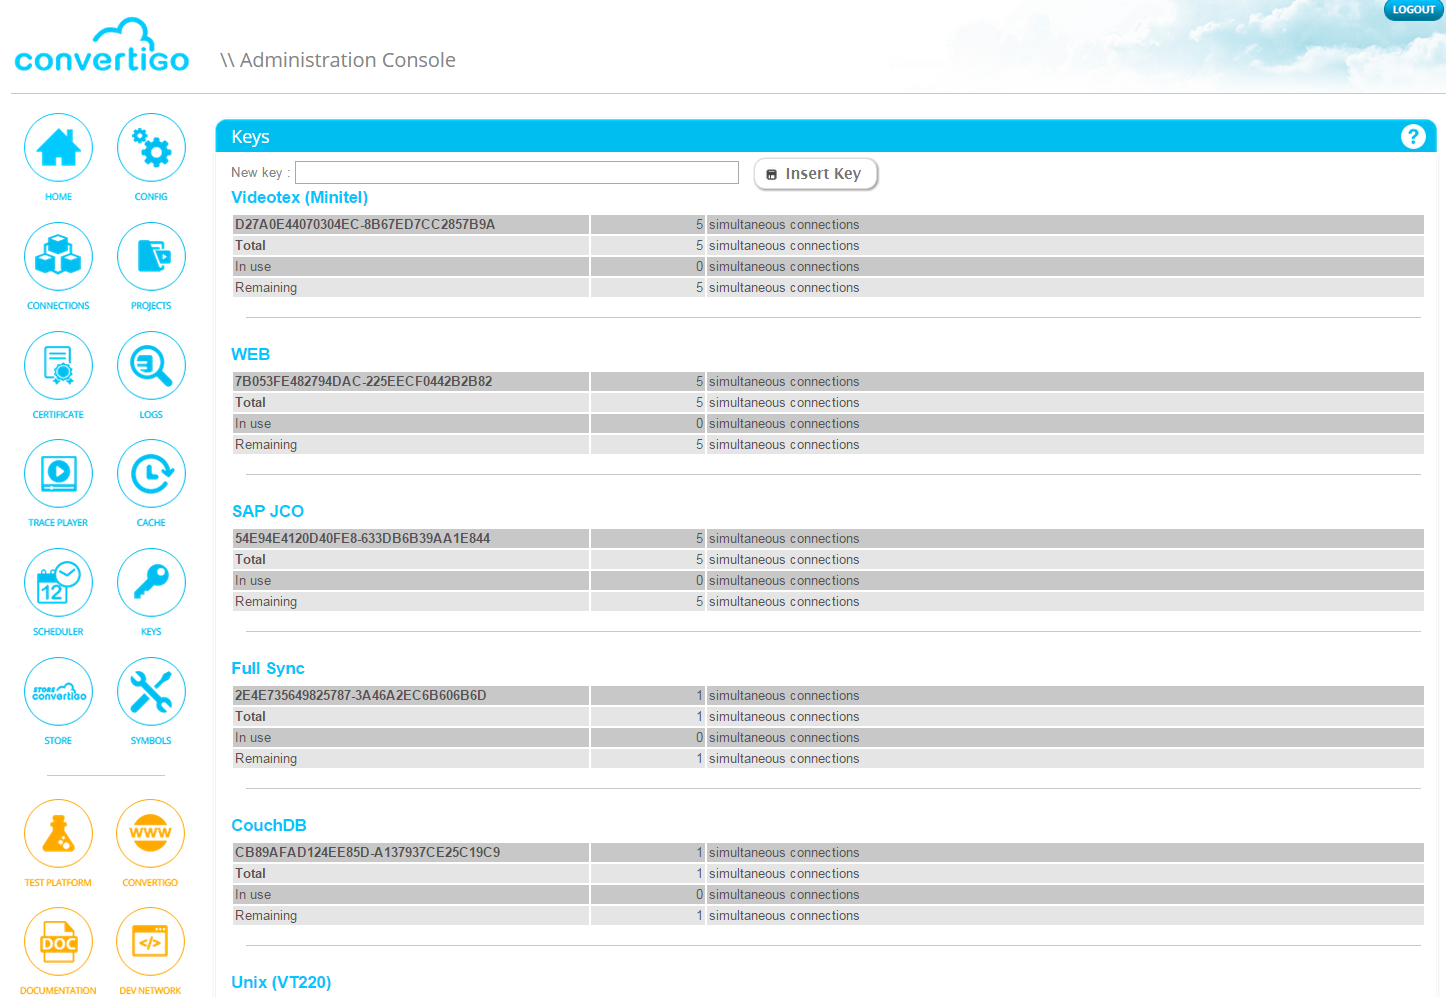
Keys
The Left menu contains a link to the Keys page. The Keys page permits you to add license keys and review active keys.
This section introduces the Keys page and details the different following elements:
Keys page
Navigate the Left menu using the link to the Keys page. For an example on how to navigate the Left menu, see To access Configuration page in the Administration Console.
The Keys page displays in the Keys table all the keys available on the Convertigo Server
What’s next
The following section presents in details the Keys table which allows you to add new keys.
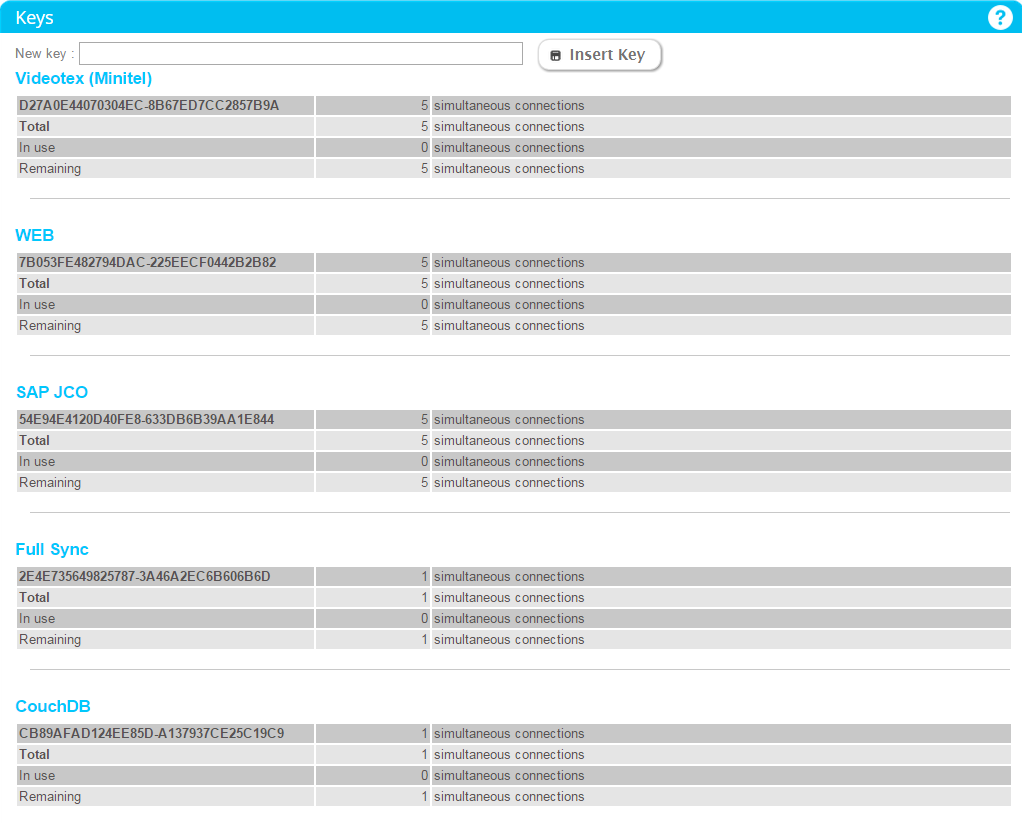
Keys table
The Keys table lists the available keys on the Convertigo server.
This section is separated in the following paragraphs:
Description of the Keys table
The Keys table displays available keys group by category:
- license key: The license key appears under its Convertigo Edition category. The license number is displayed next to it.
- Convertigo Community Edition You don’t have any license key for the product and you use the installed trial keys for the connectors. There’s no license key shown in the Keys table.
- Convertigo Standard Edition You have a license key for the product and you use the installed trial keys for the connectors.

- **Convertigo Extended Edition**
You have a license key for the product and you have at least one extended key for the connectors.

<!-- _includes/base.html -->

- Connector key:
- Legacy connectors : Videotex(Minitel), Unix (VT220), Bull DKU 7107, IBM 3270, IBM 5250 (AS/400)
- Web connector
- SAP JCO connector
- Full Sync connector
- CouchDb connector
For each Connector, the available keys are listed in their order of addition. The first key is always the trial one.
Each key is displayed in a row with its number of allowed simultaneous connections next to it.
Total is the sum of simultaneous connections allowed by keys.
In use is the number of current simultaneous connections in use on the server.
Remaining is the remaining number of simultaneous connections on the server.
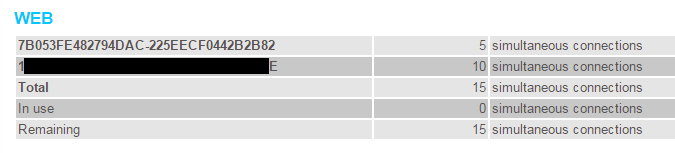
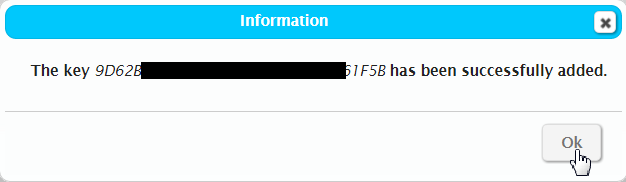
Adding a key
To add a key
In the Keys table, a panel is displayed at the top which allows you to add a new key.
1. Enter your key in the New key textbox and click on the Insert Key button.
A popup window opens, informing if the key was successfully added or not:

Click on Ok to close the window. 2. After clicking the Ok button, the new added key appears in the Keys table.
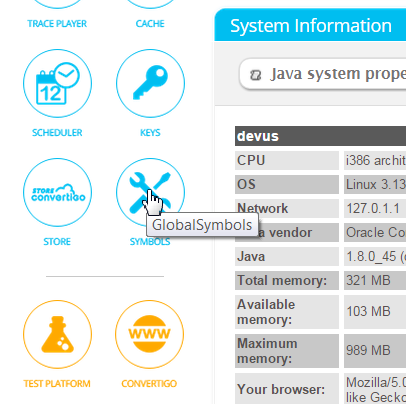
Global Symbols
The Left menu contains a link to the Global symbols page. The Global symbols page permits you to manage Global symbols.
This section introduces the Globals symbols page and details the different following elements:
Global symbols page
Navigate the Left menu using the link to the Global symbols page. For an example on how to navigate the Left menu, see To access Configuration page in the Administration Console.
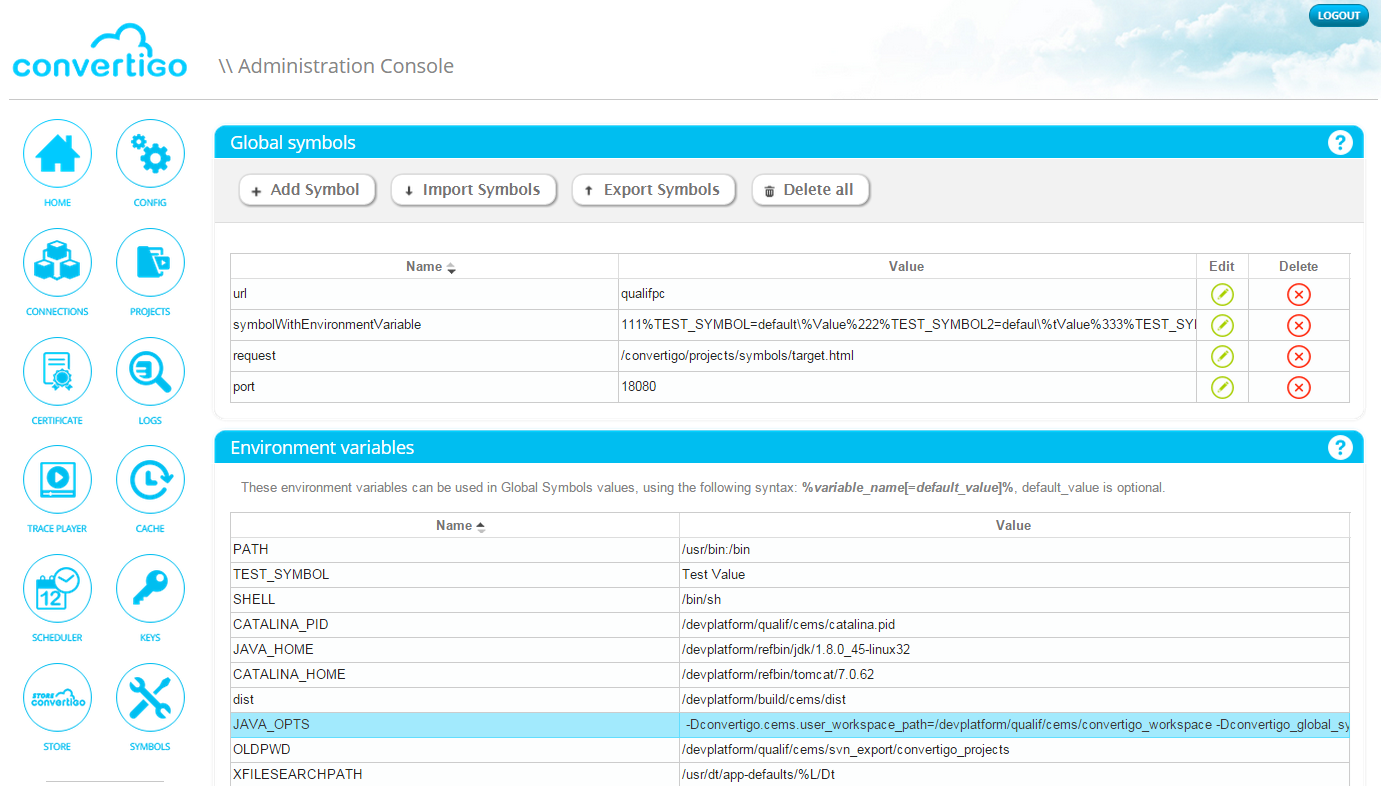
The Global Symbols page displays in the Global Symbols table all the globals symbols defined on the Convertigo Server.
What’s next
The following section present in details the Global symbols table which allow you to add, delete, edit, import and export symbols.
Global symbols table
Global symbols are server environment variables which have values defined on a Convertigo server.
This is the equivalent of system environment variables but applied to a Convertigo server.
This section is separated in the following paragraphs:
- Description of the Global symbols table
- Description of the Environment variables table
- Adding a symbol
- Editing a symbol
- Deleting a symbol
- Importing symbols
- Exporting symbols
- Using the Global symbols
Description of the Global symbols table
The Global symbols table lists all the symbols defined on the Convertigo server.
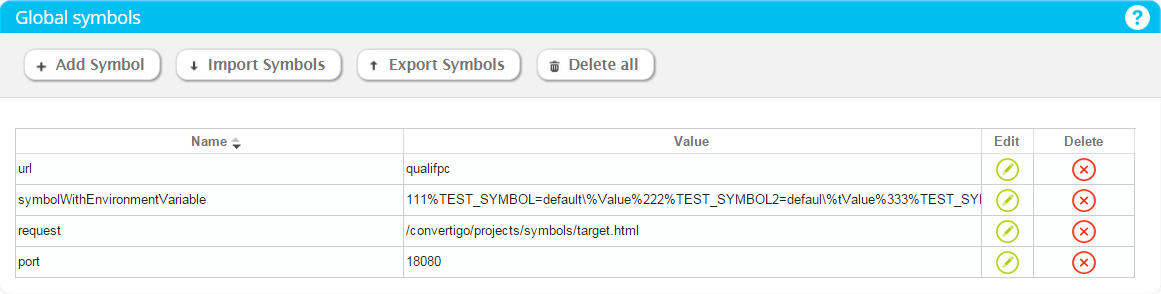
For each symbol, the Global symbols table includes the following columns:
- Name: The symbol’s name.
- Value: The symbol’s value.
- Edit: A button to click on to edit the symbol.
- Delete: A button to click on to delete the symbol.
For more information see Projects table.
Description of Environment variables table
The following Environment variables table list all the system environment variables (system dependent) which you can use for a symbol’s value.
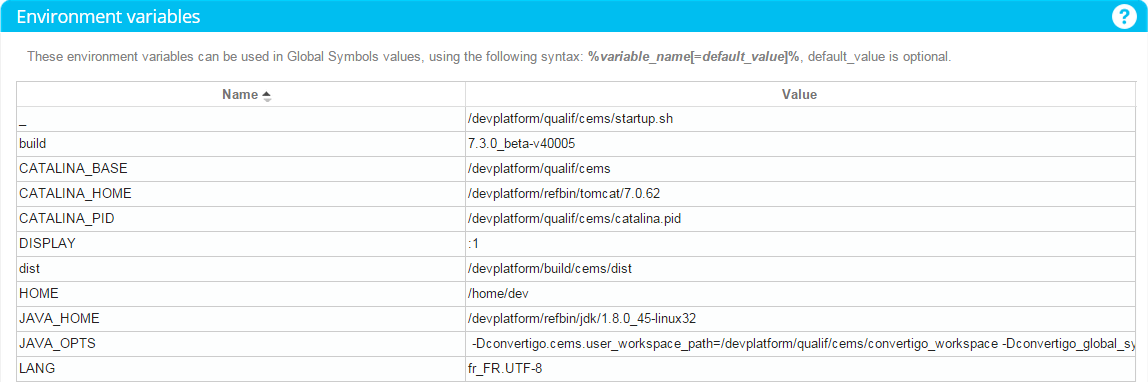
%env_variable_name% or %env_variable_name[=default_value]% to set its default value
Adding a symbol
To add a new symbol
In the Global symbols table, a Add Symbol button appears at the top that allows you to add a new symbol.
1. Click on the top button
 of the Global symbols table
A popup window opens to add the symbol:
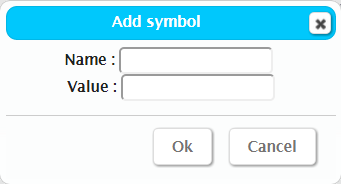
2. Enter a name and a value, then click on the Ok button to add the symbol or on the Cancel button to abort symbol creation.
3. After clicking on the Ok button, a popup window opens to inform if the symbol was successfully added on the server or not.
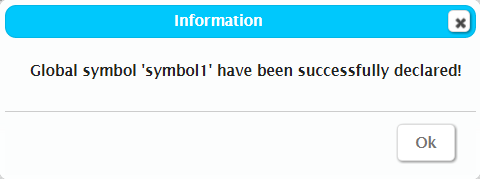
Click on the Ok button to close the window.
4. After clicking on the Ok button, the Symbol add window is still open:
Click on Cancel to close the window or on Ok if you want to add another symbol.
The symbols which were successfully added on the server, appear now in the Global symbols table.
Editing a symbol
To edit an existing symbol
In the Global symbols table, the Edit column contains a button that allows you to edit an existing symbol.
1. Click on the button
 of the symbol line
A popup window opens, with the symbol’s name and value filled in:
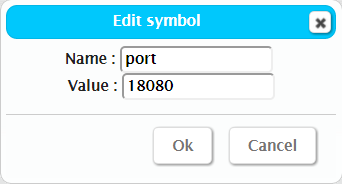
2. Modify the fields values as desired and click the Ok button to validate the edition or the Cancel button to abort it.
3. After clicking on the Ok button, a popup window opens to inform if the symbol has been successfully edited on the server or not:
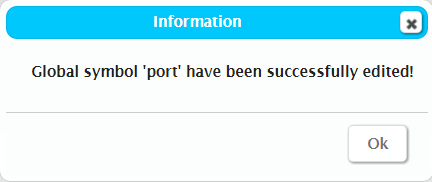
Click on the Ok button to close the window. The symbol has been updated in the Global symbols table.
Deleting a symbol
To delete an existing symbol
In the Global symbols table, the Delete column contains a button that allows you to delete an existing symbol.
1. Click on the button
 of the symbol line
A popup window opens, asking for a confirmation before deleting the symbol:
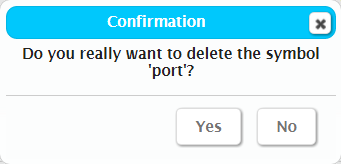
2. Click on Yes to delete the selected symbol or click on No to abort the symbol deletion.
3. After clicking on the Yes button, the symbol is deleted from the server and does not appear anymore in the Global symbols table.
To delete all existing symbols
In the Global symbols table, a Delete all button appears at the top that allows you to delete all existing symbols.
1. Click on the top button
 of the Global symbols table
A popup window opens, asking for a confirmation before deleting the symbols:
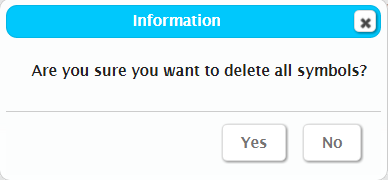
2. Click on Yes to delete all symbols or click on No to abort the symbols deletion.
3. After clicking on the Yes button, all symbols are deleted from the server and the Global symbols table is empty.
Importing symbols
To import a configuration file
In the Global symbols table, a Import Symbols button appears at the top that allows you to import a global symbols configuration file.
1. Click on the top button
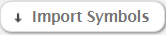 of the Global symbols table
A popup window opens for import options and configuration file choosing:
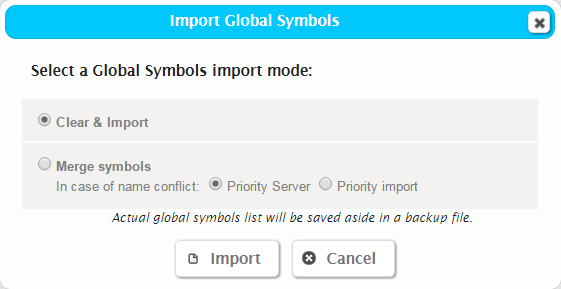
The Import procedure has two options:
- Clear & Import: which clear the current symbols configuration before importing the new configuration.
- Merge symbols: which merge the current symbols configuration with the imported one, using or “Priority Server” or “Priority Import” in case of conflicts.
2. Select an option and click on the Import button to choose a configuration file or click on the Cancel button to abort the import.
3. After clicking on the Import button, a browse window opens for a symbols configuration file (properties file) selection:
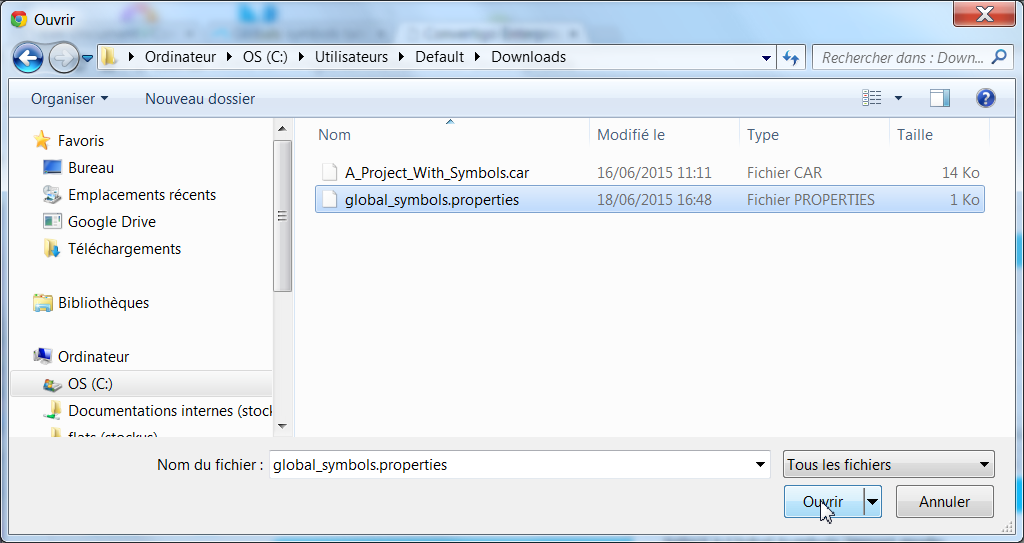
Select a .properties configuration file and click on Open to import symbols or click on Cancel to abort symbols import.
4. After clicking the Open button, the symbols import starts.
A popup window opens, informing if the import was successful or not:
Click on Ok to close the window. The imported or merged symbols are visible in the Global symbols table.
Exporting symbols
Windows XP: Documents and SettingsusernameMy DocumentsDownloads
Windows Vista/ Windows 7/ Windows 8: UsersusernameDownloads
Mac: /Users/username/Downloads
Linux: homeusernameDownloads
To export symbols to a configuration file
In the Global symbols table, a Export Symbols button appears at the top that allows you to export symbols to a configuration file.
1. Click on the top button
 of the Global symbols table
A button bar and a new column are added to the the Global symbols table:

2. Select the symbols one by one or click on the Select all button:

3. Click on the Validate export button to start symbols export or on the Cancel export button to abort.
4. After clicking on the Validate export button, selected symbols are exported to a configuration file which is downloaded to your computer.
This file is named global_symbols.properties.
Using the Global symbols
${symbol_name} or ${symbol_name=default_value} to set its default value